
Start here
Grainbook Studio is where you design what you build — a cutting board, a sign, a box, a table, a bookcase or a whole kitchen — and turn it into a cut list, a price for the customer, and the files your CNC router or laser runs.
It speaks shop: sizes in fractions (type 3-1/2 or 23/32), board feet, grain direction, dados and rabbets. It's part of the Grainbook family with Grainbook Mill, the sawmill and inventory program.
The screen
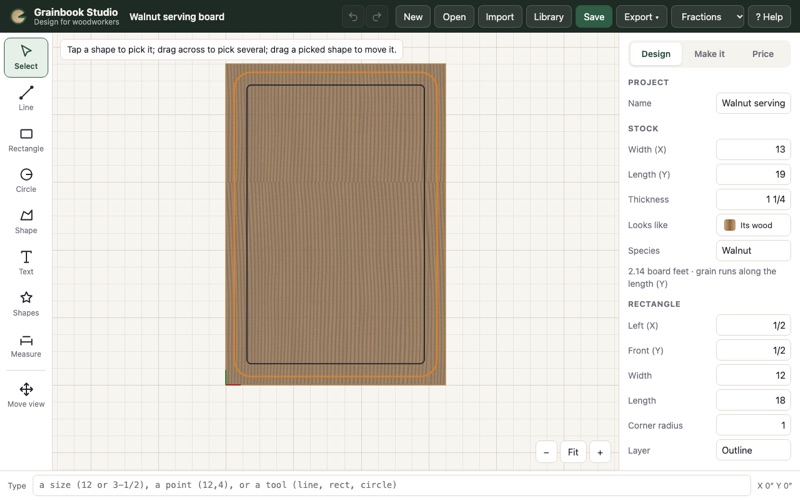
| Where | What's there |
|---|---|
| Top | ↶ Undo and ↷ Redo, New (back to the start screen), Open, Import, Library, Save, Export, how sizes show (fractions, decimals or millimetres) and ? Help. The Grainbook Studio name at the left also goes back to the start screen. |
| Left | Drawing tools (on drawings; furniture designs don't need them). |
| Middle | Your work: the stock in wood colour (a drawing) or a 3D model (furniture). |
| Right | Tabs for the stage you're at: Design → Parts (furniture) → Make it → Price. |
| Bottom | The Type line: sizes, points and commands. Start typing anywhere and it goes there. |
Your first project in five minutes
- Studio opens on the start screen. Tap Cutting board. Leave the sizes or type your own. Tap Start.
- Tap Make it on the right. The juice groove and cut-out are already there.
- Tap Preview the cut to see it carved in wood, or ▶ Play the cut to watch the bit move.
- Tap Price to see what it costs to make, then Save.
Studio on your phone, iPad and the web
Studio can run on your own computer, or on a server so you can use it on any phone, iPad or computer, anywhere. On a server every project, your Library and your customers live in one place, so what you start on the computer is there on the iPad.
Signing in
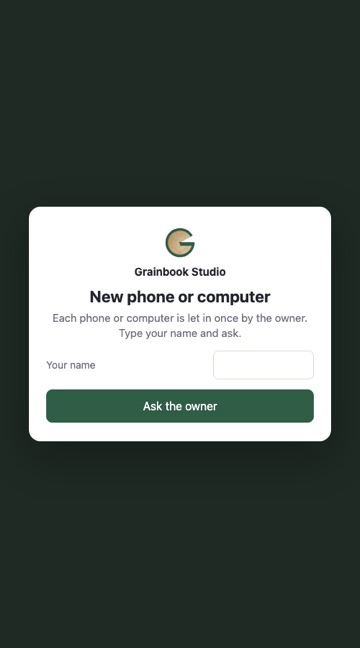
- The very first time, the owner opens Studio's address and sees Set up Studio: type the setup code (from whoever set up the server), your name, and a PIN only you know (4 to 8 numbers).
- Each new phone or computer shows New phone or computer: type your name and tap Ask the owner. The owner sees it in People and devices (and gets a reminder in Studio) and taps Let in. Until then that phone sees no names at all.
- After that: tap your name, type your PIN on the number pad, Go. Five wrong PINs lock that name for a minute; ten wrong from one place lock it out for 15 minutes.
Sign out is on the start screen. On your own computer Studio asks nothing until you add the first person.
People and devices (owners)
| Part | What it does |
|---|---|
| Waiting for your OK | Phones and computers asking to come in, with the name they typed: Let in or Say no. |
| People | + Add a person: their name, what they can do, and a PIN — hand them the phone or computer to type their own. Change: name, a new PIN, or Can sign in: No (their work stays). Staff design, price and make things; owners also look after people and phones. There's always at least one owner. |
| Phones and computers let in | Each one, who let it in and when it was last used. Shut out signs it out at once (a lost phone). |
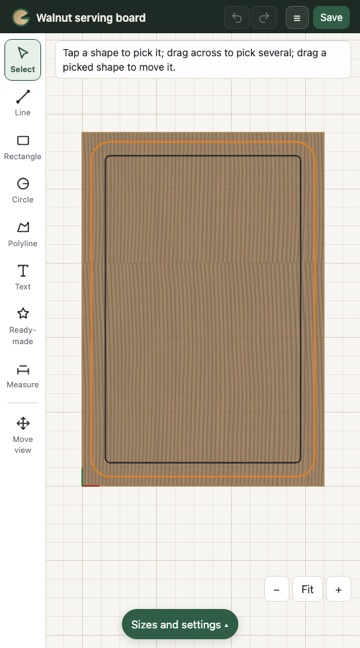
On a phone
The top bar keeps ↶ ↷, Save and ☰ (New, Open, Import, Library, Export, sizes and Help). The settings that sit on the right on a computer pull up from the bottom: tap Sizes and settings ▴, and Back to the drawing ▾ to put them away. Pinch to zoom, drag with two fingers to move around. On an iPad Studio looks as it does on a computer.
On the home screen: in Safari tap the Share button → Add to Home Screen. Studio then opens full screen like an app, with its own icon.
CNC files on a phone or iPad go to the Files app (Downloads). Send them to the machine's computer with AirDrop, a USB stick, or a shared folder.
Backups
On a server Studio copies everything — projects, Library, customers, people and tile photos — every night and keeps 30 days. The keys you paste (Anthropic for Describe it, Grainbook Mill's) are never copied; paste them again if Studio ever moves.
Starting a project
Studio opens on its start screen, the way a drawing program does. Tap New (or the Grainbook Studio name in the top left) to come back to it at any time.
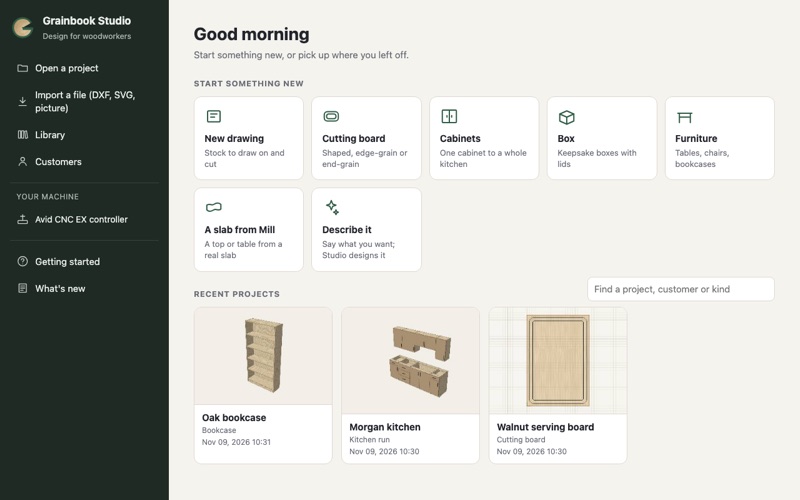
| Part of the start screen | What it does |
|---|---|
| Start something new | One tile for each kind of work. Tap one and its setup window opens: pick the type, fill in the sizes and press Start. Cancel brings you back to the start screen; ← Every kind of project does too. |
| Recent projects | Your saved projects, newest first, each with a picture of how it looked when you last saved, its kind and its customer. Tap one to open it. Find a project, customer or kind narrows the list as you type. |
| Back to … | When a project is open, the top of the side column takes you straight back to it. |
| Open a project, Import a file, Library, Customers | The same as the buttons along the top of the main screen. |
| Your machine | The machine your CNC files are written for. Tap it to pick another — see Your machine. |
| Getting started, What's new | This manual. |
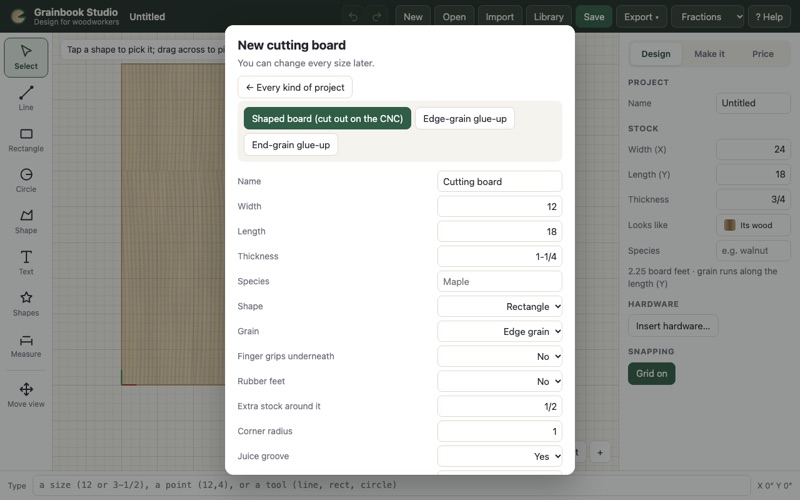
| Tile | Types |
|---|---|
| New drawing | A blank drawing: a piece of stock to draw on — signs, inlays, templates, anything. |
| Cutting board | Shaped board (cut out on the CNC) — rectangle, oval, round or paddle, juice groove, finger grips and feet, with its toolpaths made (see Cutting boards). Edge-grain glue-up and End-grain glue-up — strips of different woods (see End-grain boards); they take the same shape, groove, grips and feet, and their Make it tab opens the CNC cut-out once it's glued up. |
| Cabinets | One cabinet up to a whole kitchen: Base, Wall and Tall cabinet (see Cabinets), Kitchen run (see Kitchens), Kitchen room (see A whole kitchen room). |
| Box | A keepsake box with the bottom in a groove and a lid. |
| Furniture | Table (legs, aprons with tenons, a glued-up top), Chair (legs, seat rails and stretchers with tenons, a slatted, ladder or panel back, a solid or upholstered seat) and Bookcase. |
| A slab from Mill | A top on one of your real slabs — see Working with Grainbook Mill. |
| Describe it | Say what you want to make; Claude designs it as real parts — see Describe it. |
Open lists the projects saved on this computer, newest first. Save (⌘S) keeps the project under its name, with a picture for the start screen; "not saved" beside the name means there are changes since.
Undo and redo
↶ at the top undoes the last change; ↷ puts it back. Keys: ⌘Z undo, ⇧⌘Z (or ⌘Y) redo, or type undo / redo. It covers everything in the project — drawing, moving and sizing shapes, design sizes and choices, toolpaths and tabs — back to the last 200 steps. The buttons go grey when there's nothing to undo or redo. Your Library, your machine and your customers aren't part of a project, so they aren't undone.
Describe it: Claude designs it for you
New → Describe it: say what you want to make, in plain words, and Claude (Anthropic's AI) designs it as real, buildable furniture — every part with its size, the material from your Library, where it sits, joinery notes, the steps to build it, hardware and labor hours. It opens as a design like any other, so the 3D view, cut list, sheet layouts, price, Render and 2D drawings all work on it.
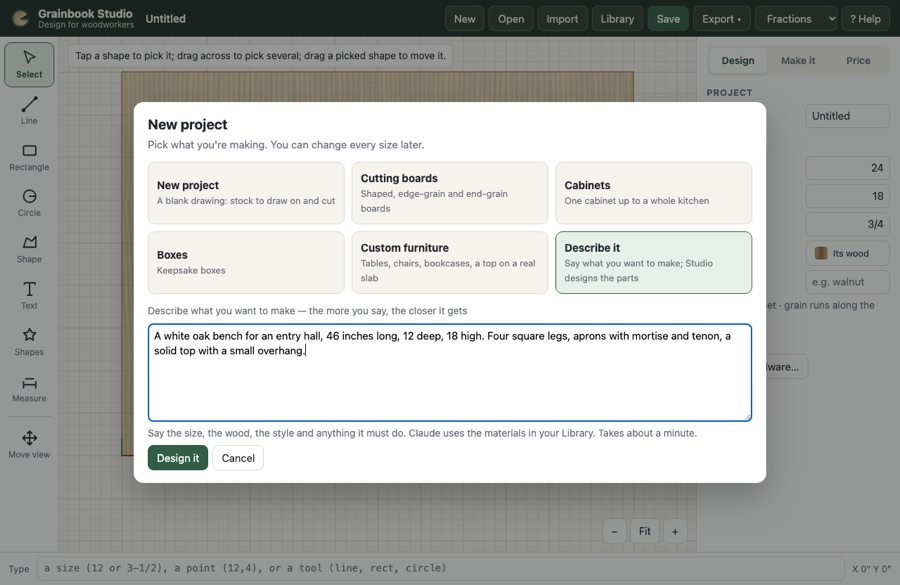
- Describe it. The more you say, the closer it gets: size, wood, style, what it's for. "A walnut coffee table, 48 by 24 and 17 high, tapered legs, a lower shelf of slats, breadboard ends on the top."
- Design it. It takes about a minute. Then the piece opens in 3D.
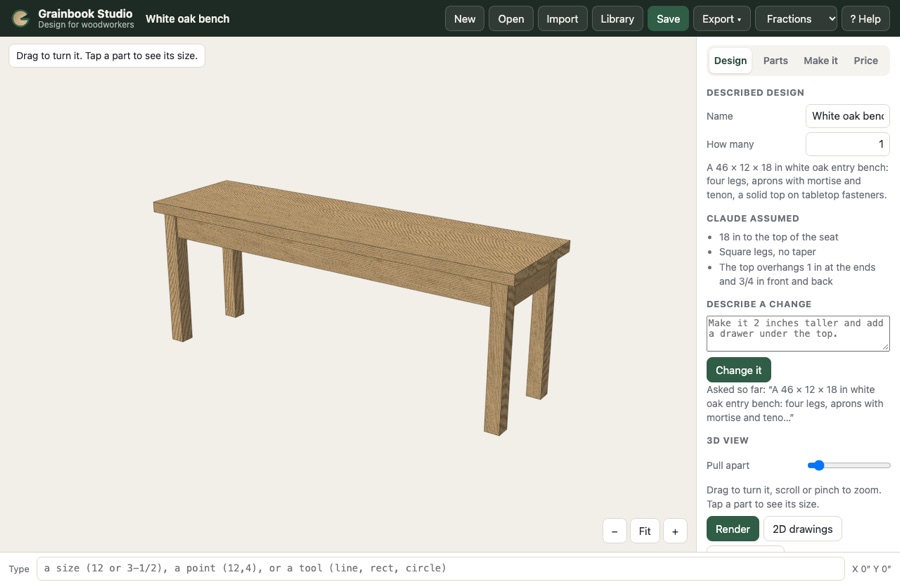
- Check it. The Design tab lists what Claude assumed (sizes, wood, joinery you didn't mention). Turn it, use Pull apart, tap parts to see their sizes, and read the cut list on Parts. A warning shows if parts pass into each other more than a joint would.
- Describe a change. "Make it 2 inches taller and add a drawer under the top." Back to the last version undoes a change you don't like.
- Price it, render it, draw it, cut it — the same as any other design.
Your API key
Describe it uses your own Anthropic account. The first time, tap Add my API key…: make a key at console.anthropic.com → API keys, paste it in, and Save. Studio checks it and keeps it on this computer only — never in the browser or in a project file. Anthropic bills the account for each design (usually a few cents to a dollar). To change or remove it, use Add my API key… again.
It's a starting point, not a guarantee. Claude is good at proportions and joinery, but check sizes, wood movement and strength the way you'd check a drawing from anyone else before you cut. Hardware it names has no price until it matches an item in your catalog.
Drawing
| Tool | How |
|---|---|
| Select | Tap a shape to pick it (Shift adds more), or drag across an empty spot to pick everything inside. Drag a picked shape to move it. ⌘A picks everything. |
| Line | Tap the start, then the end. It keeps going from the last end until Esc. |
| Rectangle | Tap one corner and the opposite corner — or tap one corner and type the size: 12 x 8. Round its corners with Corner radius. |
| Circle | Tap the centre, then the edge — or type the radius (2) or diameter (d 4). |
| Polyline | Straight lines joined corner to corner: tap each corner. Tap the first corner again to close it into a shape; Enter or double-tap leaves it open. |
| Ready-made | Shapes made for you from sizes you type: bowtie, dogbone, keyhole, slot, hole patterns, polygon, star, box joint fingers, oval, arch — see Ready-made shapes. |
| Text | Tap where the text starts, type it and pick a font — see Text. |
| Measure | Measure anything: distances, a whole shape, angles, circles and arcs, areas and gaps — see Measuring. Measurements you keep stay on the drawing but never go to the machine. |
| Move view | Drag to move around. Pinch, scroll or use − Fit + to zoom. Space bar + drag also moves the view. |
Changing shapes
Pick shapes and the right side shows their sizes (type new ones) and these buttons:
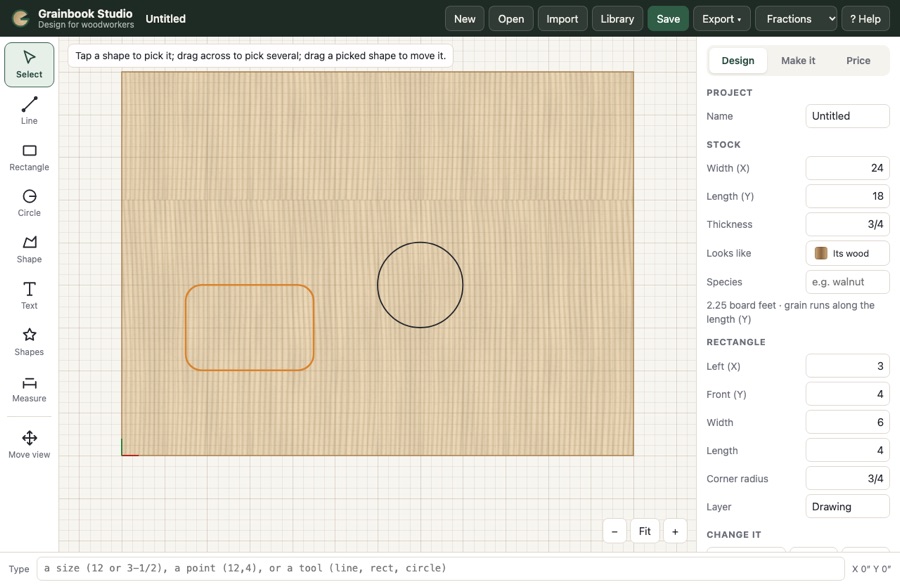
| Button | What it does |
|---|---|
| Duplicate (⌘D) | A copy, a little to the side. |
| Copies… | Rows and columns of copies with the space you choose between them — coasters, drawer pulls, nesting several boards. |
| Offset… | A new outline a set distance outside or inside — a border, an inlay line, a lip. |
| Mirror ↔ / ↕ | Flip left-to-right or front-to-back. |
| Turn 90°, Turn… | Turn by a quarter or any angle (minus turns clockwise). |
| Size… | Type a new width (the height follows) or a percent. |
| Line up | One shape: to the stock's left, centre, right, front, middle or back. Several: to each other. |
Arrow keys nudge the picked shapes 1/16″ (with Shift, 1″). ⌘Z undoes, ⌘⇧Z redoes (see Undo and redo).
Measuring
Pick Measure on the left. A row of choices appears over the drawing; pick what to measure, then tap. The pencil snaps to ends, middles, corners and centres as it does when drawing, so measurements land exactly. While you're tapping, the numbers follow the pointer.
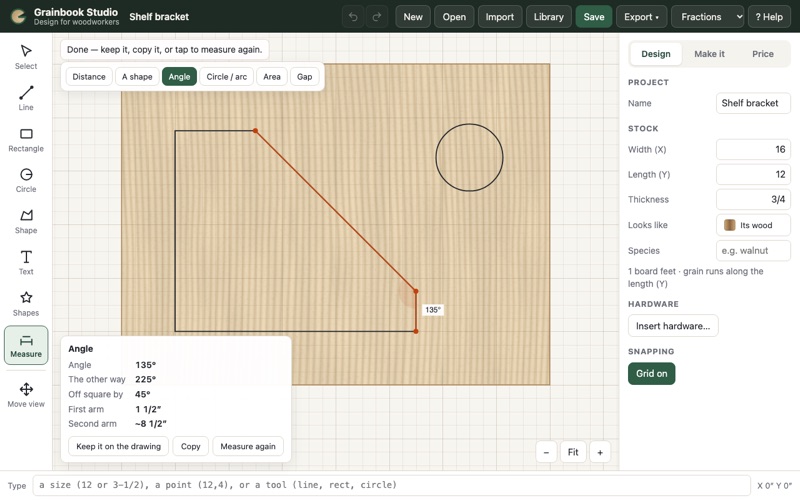
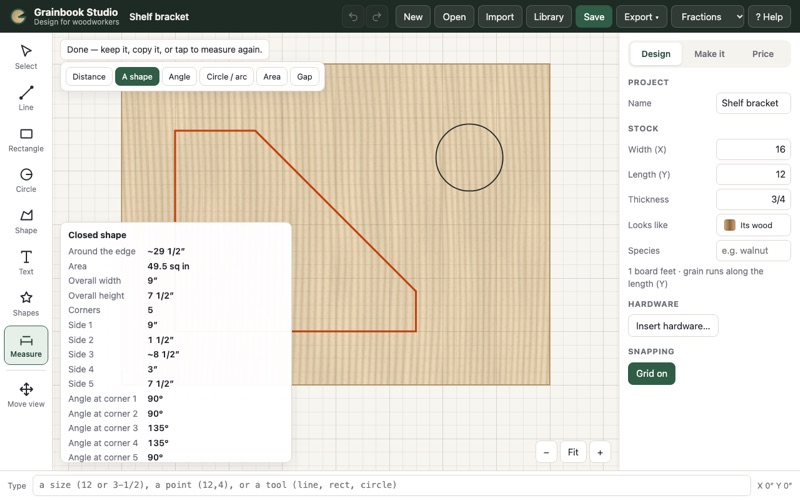
| Choice | How | What you get |
|---|---|---|
| Distance | Tap two points. | The straight distance, how far across (X) and front to back (Y), and its angle. |
| A shape | Tap any shape. | Everything about it. A line: length, angle, ends. A rectangle: width, height, diagonal, corner radius, area, the length around it. A circle: diameter, radius, the length around it, area, centre. A drawn shape: the length around it, area, overall size, every side's length and the angle at every corner (inside the shape, so a corner that turns in shows as more than 180°). Text: its size, outline length and area. |
| Angle | Tap one end, the corner, then the other end. | The angle, the angle the other way round, how far it is off square, and both arm lengths. |
| Circle / arc | Tap three points on a curve. | The circle through them: diameter, radius, the length around it and its centre. Good for finding the radius of a curve someone drew. |
| Area | Tap each corner; tap the first again or press Enter to close. | The area (in square inches and square feet, or mm², cm² and m²), the length around it and the number of corners. |
| Gap | Tap two shapes. | The shortest way between them, with the line drawn, and how much of it is across and front to back. Shapes that touch or cross show 0. |
When a measurement is done: Keep it on the drawing puts a measurement line (distances and gaps) or a note (everything else) on the Measurements layer; Copy puts the numbers on the clipboard; Measure again (or just tapping again) starts over. Esc clears it. You can also type sizes while measuring a distance, as when drawing a line (12, 12<45).
Typing sizes and points
Type sizes the way you'd write them on a board — in any box, or on the Type line at the bottom.
| You type | It means |
|---|---|
3-1/2 or 3 1/2 | 3½ inches |
7/8, 3.25 | ⅞ inch, 3¼ inches |
2'6, 2' 6-1/2" | Feet and inches |
19mm, 9cm | Metric, whatever the screen shows |
While drawing, the Type line also takes points and commands:
| You type | It does |
|---|---|
12,4 | A point 12″ across and 4″ up from the front-left corner |
@6,2 | 6″ across and 2″ up from the last point |
12 / 12<45 | 12″ toward the pointer / 12″ at 45° (0° right, 90° up) |
12 x 8 | (Rectangle) its size from the first corner |
line rect circle shape measure select | Pick that tool |
rotate 45 mirror x offset dup | Change the picked shapes |
fit undo redo grid delete | Show everything, undo, redo, grid on/off, delete what's picked |
Sizes show as Fractions (to the nearest 1/32″; a ~ means it's rounded), Decimals or Millimetres — pick at the top right.
Text and signs
Pick Text, tap where the text starts (its lower-left corner), then type it. Any font on this computer works; the preview shows how it looks. Capital letter height is how tall the capitals stand. Several lines: press Return in the text box.
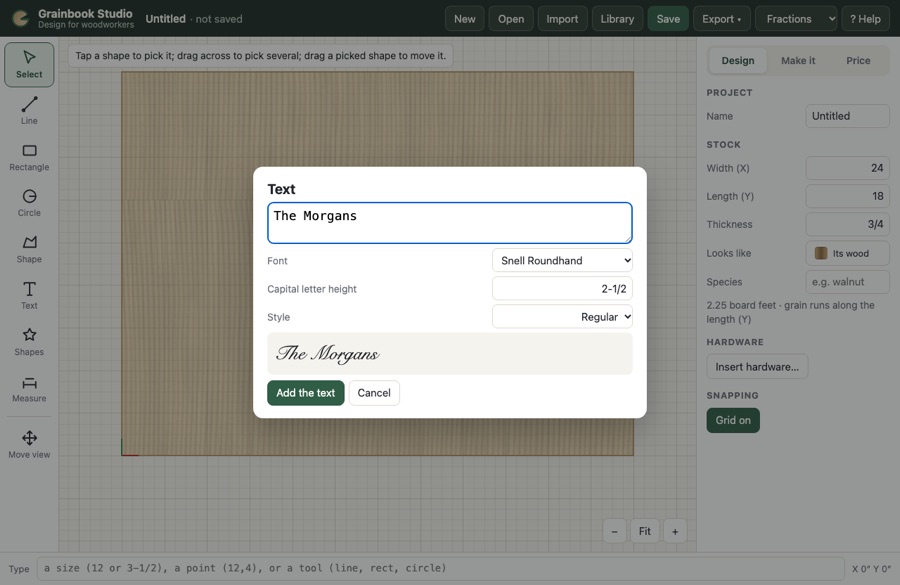
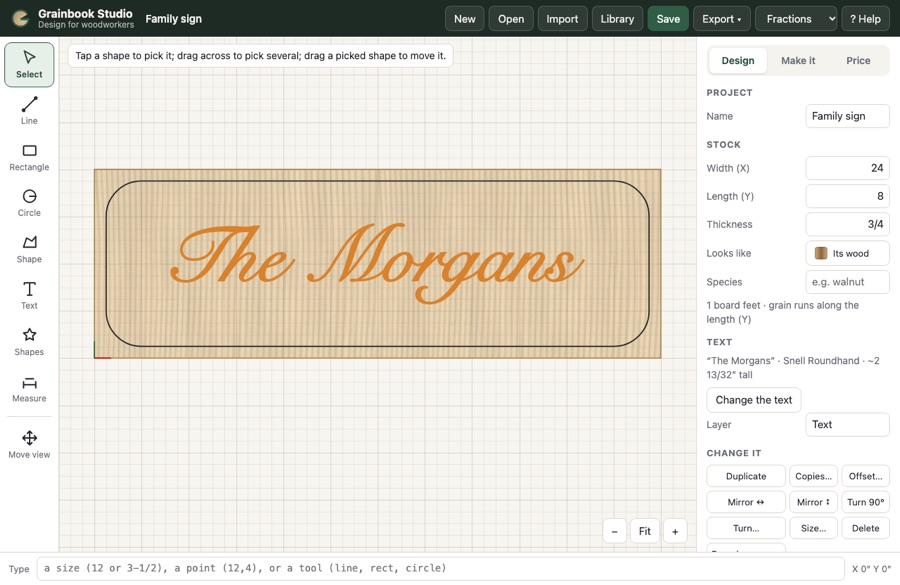
Text becomes outlines the CNC and laser can follow. To change the words later, pick it and tap Change the text. Turning or mirroring text turns it into plain outlines.
A carved sign, start to finish
- New → Blank drawing, the size of your board (say 24 × 8).
- Draw a Rectangle for the outline (type
23 x 7) and give it a Corner radius. - Text → type the name. Pick it and use Line up → Centre and Middle.
- Make it → pick the text → + Add toolpath → V-carve with a V-bit.
- Pick the outline → + Add toolpath → Cut out, all the way through, tabs on.
- Preview the cut, then Save CNC file.
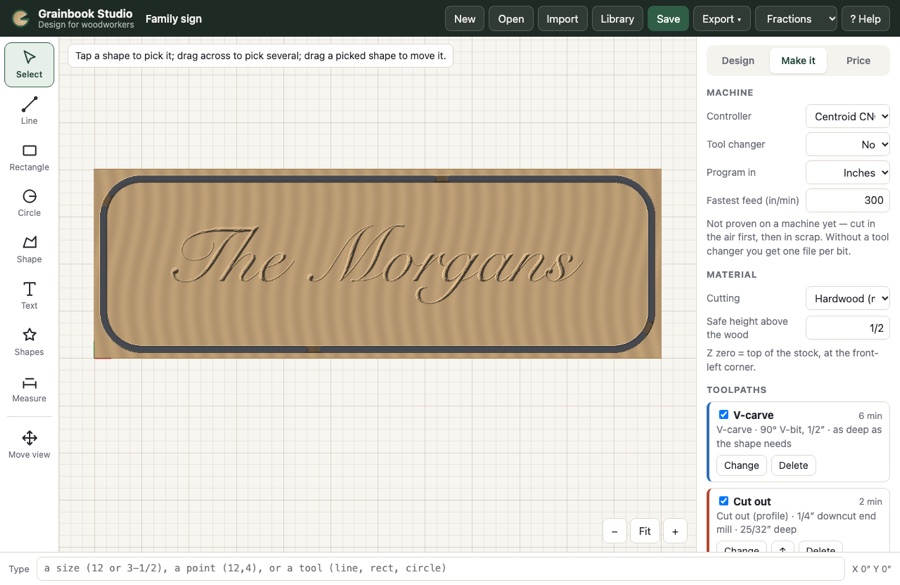
V-carved lettering: deeper where the letters are wider, crisp in the corners.
Importing and exporting
Import (or drag a file onto the screen) brings drawings and pictures in. Export sends your drawing to other programs and machines.
| File | In | Out | Notes |
|---|---|---|---|
| DXF | ✓ | ✓ | AutoCAD, Aspire, VCarve, Fusion, SketchUp. Lines, arcs, circles, polylines, splines, ellipses and blocks come in; units are read from the file. |
| SVG | ✓ | ✓ | Illustrator, Inkscape, Affinity, Cricut and laser programs. Paths, shapes and groups come in at their real size. |
| STL (3D model) | ✓ | Fusion, SketchUp, Blender, 3D printing sites. Becomes a height picture with a 3D carve toolpath — see 3D carving. | |
| Shaper Origin SVG | ✓ | Cut types and depths from your toolpaths — see below. | |
| PDF template | ✓ | Full size, tiled onto letter pages. Print at 100% to trace onto wood or check a size. | |
| HPGL (.plt) | ✓ | Vinyl cutters, drag knives and plotters. | |
| Grainbook Studio project (.gbstudio) | ✓ | ✓ | Export → This project as a file to keep a copy, email it, or move it to another computer; Import opens it. |
| Pictures (JPG, PNG…) | ✓ | Traced into shapes, or kept as a photo for laser engraving. | |
| DWG | Save as DXF in your CAD program first (AutoCAD, or the free ODA File Converter or Autodesk DWG TrueView), then import the DXF. | ||
Imported drawings land centred on your stock. If they're bigger than the stock, the stock grows to fit. Text inside DXF and SVG files isn't brought in — retype it with the Text tool.
Tracing a picture
Import a logo or drawing (JPG, PNG). Move Dark enough until the preview shows what you want, set Smooth and the Width, and tap Use the traced shapes. Clean, high-contrast pictures trace best. Use it as a photo (laser) keeps the picture itself for photo engraving instead.
Shaper Origin
Set up toolpaths on Make it as usual, then Export → Shaper Origin SVG. Each shape is coloured the way Origin reads it, with its depth written in:
| Your toolpath | Origin cut |
|---|---|
| Cut out, bit outside the line | Exterior (black fill) |
| Cut out, bit inside the line | Interior (white fill, black line) |
| Pocket (grey fill) | |
| Groove on the line, V-carve, drill | On-line (grey line) |
| Shapes with no toolpath | Guide (blue line) |
Copy the file to a USB drive and plug it into Origin, or upload it to Shaper Hub. Check the depth on Origin's screen before cutting.
Cabinets and furniture
Pick a design on New, fill in the sizes and tap Start. Grainbook Studio works out every part, its joinery and where it sits — and shows it in 3D.
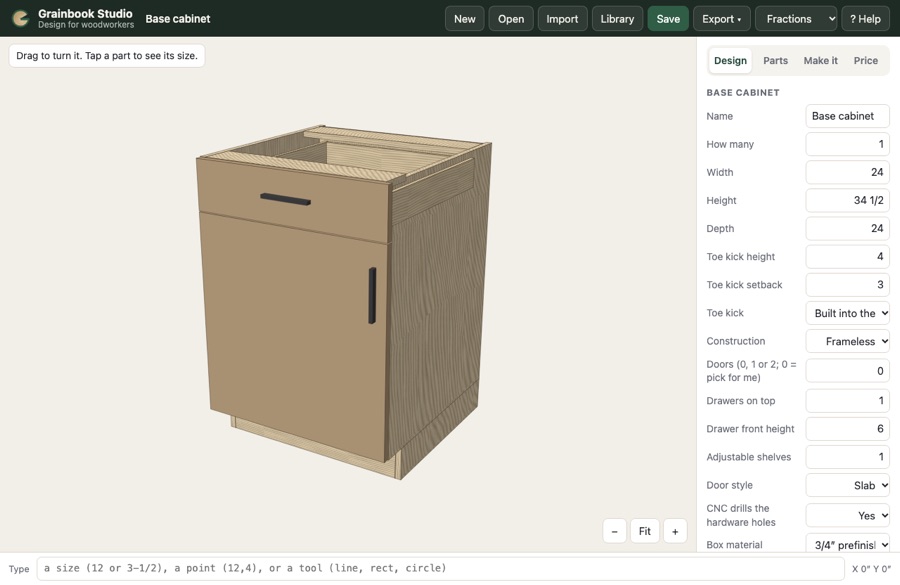
Drag the model to turn it, scroll or pinch to zoom, tap a part to see its size and joinery. Pull apart spreads the parts so you can see how it goes together. Change any size on the right and everything follows.
Your choices
| Choice | Options |
|---|---|
| Toe kick | Built into the sides: the sides run to the floor with the kick notched out of the front, and a kick board behind. Separate base: a ladder (front and back rails with cross pieces) you build and level first; the boxes sit on it — easiest on uneven floors and long runs. Legs with a clip-on kick: adjustable legs and a kick board that clips on. |
| Construction | Frameless (32 mm style): full-overlay doors with 1/16″ reveals. Face frame: 1-1/2″ solid-wood stiles and rails (pocket screwed) on the front; doors lap the frame 1/2″. |
| Door style | Slab; Shaker (5-piece): 2-1/4″ stiles and rails of solid wood with a 1/4″ panel in a groove (3/8″ tongues); Shaker (CNC MDF): one MDF slab with the panel recess cut on the CNC. Drawer fronts under 7″ stay slab. |
| CNC drills the hardware holes | Hinge cups (and press-in pins), hinge plate holes, shelf pin holes (5 mm, 32 mm apart), drawer slide holes and pull holes are cut on the CNC with the parts. |
| Hinges, Drawer slides, Pulls or knobs | From the hardware catalog — see Hardware. Each brings its own prep and price. |
| Finished ends | Which ends show — Both, Left, Right, None, or All sides (ends and back) for a cabinet that stands alone (the back gets a finished panel too) — and whether they're the painted box side or an applied panel to match the doors. In a kitchen run, mark each cabinet's ends on its code (below). |
| Doors, Drawer fronts | Any sheet or solid wood. Drawer fronts can differ from the doors (walnut fronts on painted doors, say) or be Same as the doors. Solid-wood doors and fronts are milled to the Solid-wood door and front thickness (3/4″ usual). |
| Drawer boxes | A sheet (1/2″ Baltic birch) or solid wood — maple is usual, any species works — at the Solid-wood drawer box thickness (1/2″ usual). Solid boxes are noted for dovetail or box-joint corners, go on the lumber list by the board foot, and get no edge banding. |
| Finish | Natural wood, a stain, or a paint colour — see Colours and wood. |
| Countertop | Shown on base cabinets (not made by you): quartz, granite, marble, quartzite, soapstone, butcher block, laminate, solid surface, concrete, stainless steel, porcelain, terrazzo or recycled glass, in a colour. |
How the boxes are built
- Boxes from prefinished maple plywood (change it under Box material): sides full height, bottom (and top on wall and tall cabinets) in 1/4″ dados, back in a groove 3/4″ in from the back edge, two 4″ stretchers on base cabinets.
- Doors and drawer fronts default to MDF for paint; pick plywood or solid wood for a natural finish.
- Drawer boxes: 1/2″ plywood (or solid wood) with the bottom in a groove. With undermount slides (Blum TANDEM, MOVENTO) the box is the opening less 42 mm, its bottom 1/2″ up, with the back notched and drilled for the slide.
- Tall cabinets have a fixed shelf (in dados) where the upper and lower doors meet.
- Edge banding on the front edges that show (frameless).
Cabinet by cabinet
For a single cabinet, a kitchen run or a whole room, the Parts tab has a sheet for each cabinet (cabinets built alike share one sheet, marked × 2, × 3…, with their parts listed for one cabinet): its name and what it is (base, sink base, wall, tall…), its width × height × depth, drawers and doors, which ends are finished, its own parts (sizes and materials), its hardware, and its price. A cabinet's price is its own parts, hardware and labor plus its share of the sheets and CNC time, with your overhead and profit; anything not in one cabinet (moldings, tile, extra labor) is its own line, so they add up to the estimate. On the Price tab, Show each cabinet's price → Yes puts the list on the printed estimate.
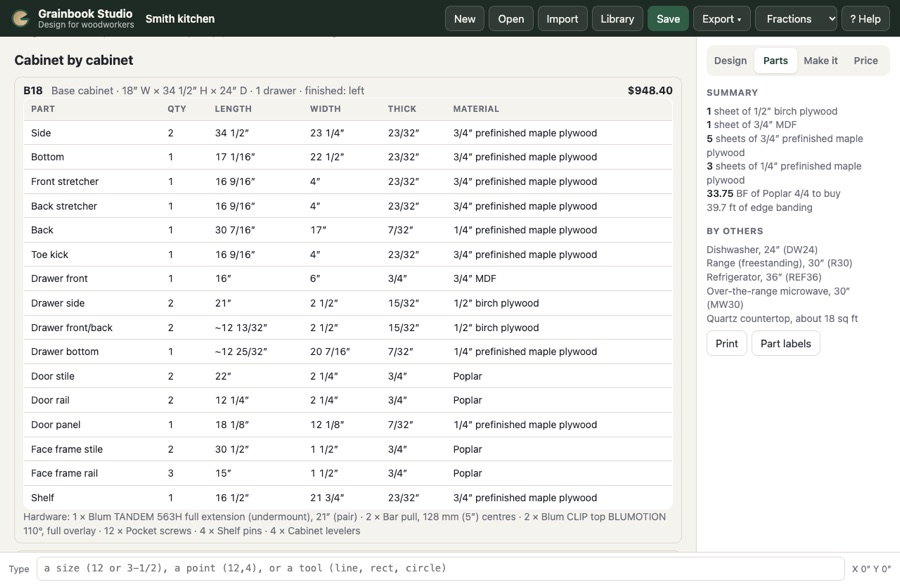
Front view and part labels
Parts starts with a front view drawn to scale with the overall width and height (and each cabinet's code in a kitchen) — good for the customer to approve. Part labels prints a label for every part (Avery 5160, 30 to a sheet): part, cabinet, size, which sheet it's on, which edges get banding, and whether it's been machined.
Parts: the cut list, sheets and lumber
The Parts tab shows everything you need at the saw: the cut list (finished sizes, length with the grain, how many), the sheet layouts, and for solid wood the board feet to buy.
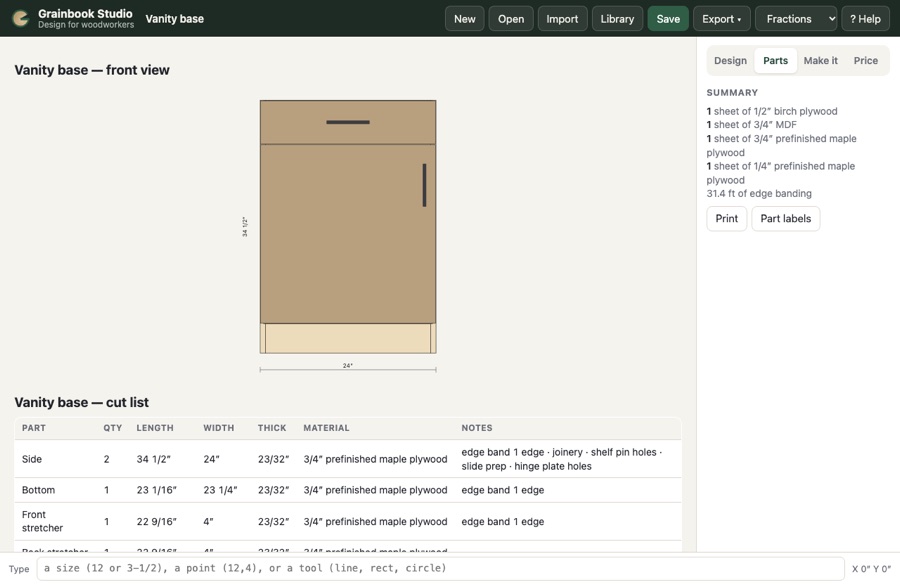
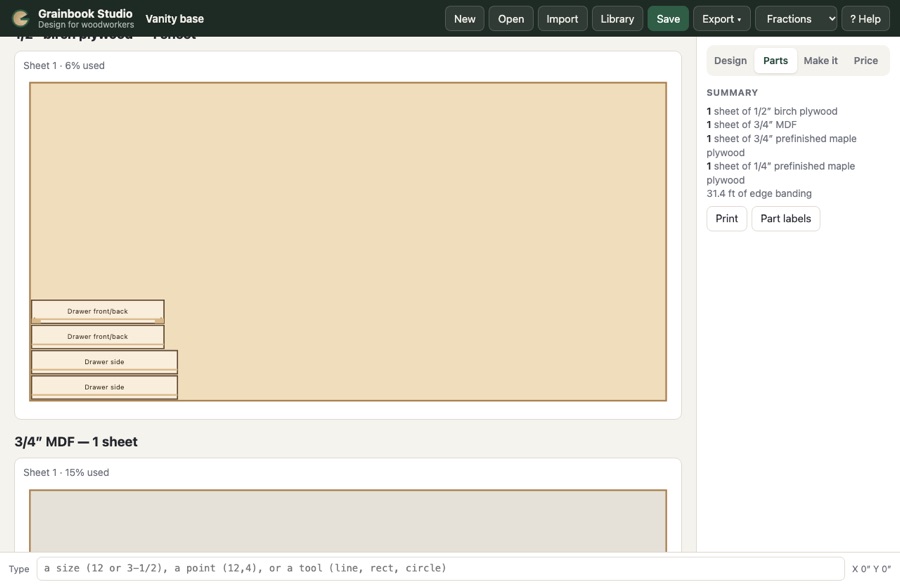
- Sheets: parts are laid out biggest first, leaving room for the bit between them. On grain-matched plywood, parts keep their grain with the sheet's length; MDF and melamine parts can turn to fit.
- Lumber: rough thickness is the next stock size that leaves 3/16″ to flatten and plane (a 7/8″ apron comes from 5/4), plus 1/4″ in width, 1″ in length, and your waste allowance.
- How many on the Design tab multiplies everything.
- Print prints the cut list and layouts.
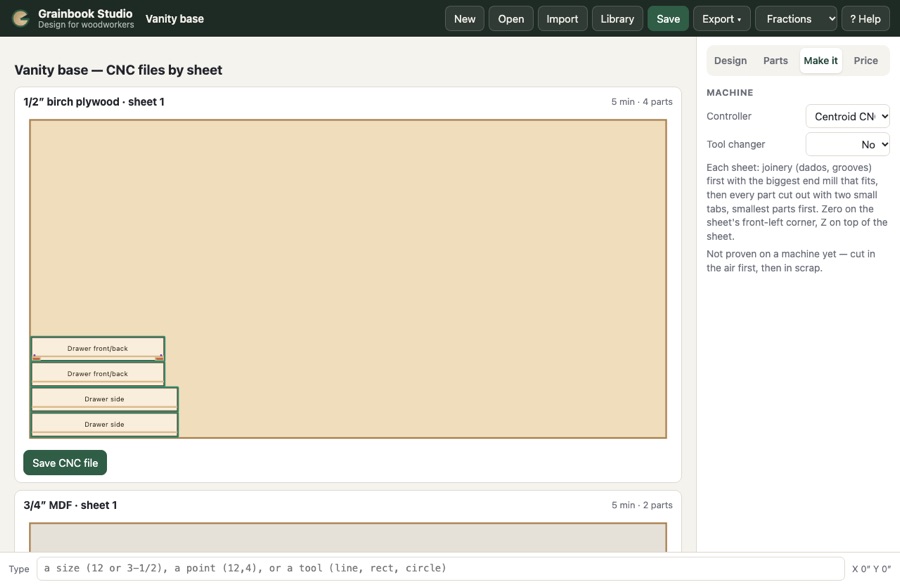
CNC files for each sheet
On Make it, each sheet shows its parts and toolpaths with the cutting time. Each sheet gets: the joinery first (dados and grooves, with the biggest end mill that fits; grooves exactly as wide as a bit are cut in one pass down the middle), then every part cut out with two small tabs, smallest parts first, ramping into each cut. Zero on the sheet's front-left corner, Z on top of the sheet. Tap Save CNC file on a sheet.
End-grain boards
Pick End-grain board and type the strips across the board — wood and width, separated by commas, like walnut 1-1/2, maple 1-1/2, cherry 1. The list repeats until the board is wide enough. Woods come from your lumber list (Shop prices).
- Strip thickness is how thick you mill the strips. It sets the rows: each slice, turned up on end, adds that much to the board's length.
- Pattern: Checkerboard flips every other slice end for end; Brick slides every other slice half a strip; Stripes keeps them all the same way.
- Saw kerf and Extra for flattening make the strips long enough for every slice.
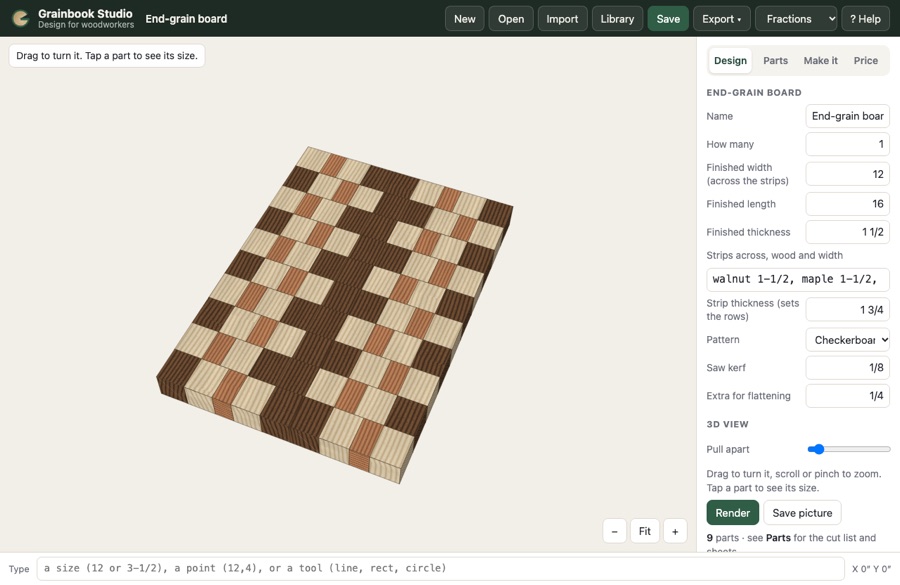
The 3D view shows the finished pattern. Parts lists the strips to mill, the board feet to buy, and the steps in order — rip, first glue-up, crosscut, flip, second glue-up, flatten. Price includes the wood, finish and the shop time for each step.
Kitchens
Pick Kitchen run and type the cabinets left to right, separated by commas.
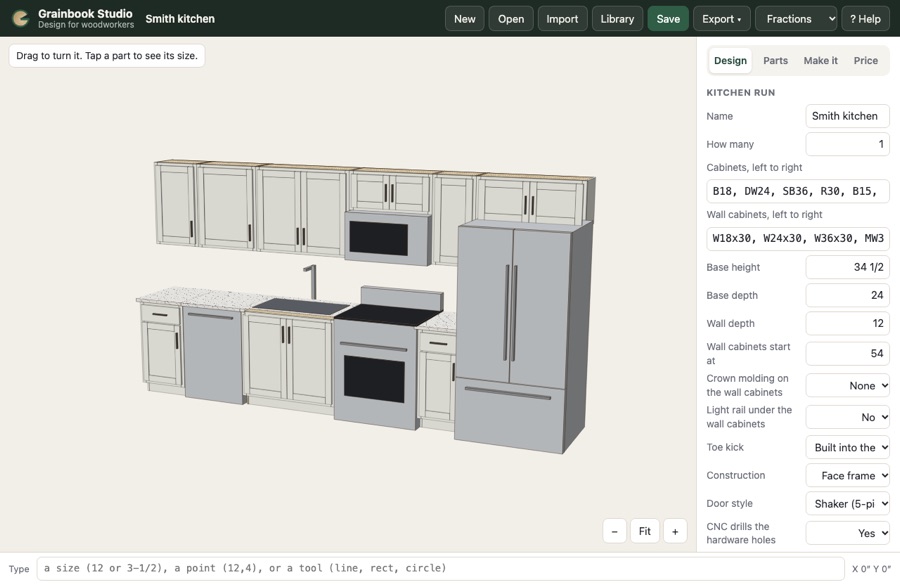
| Code | Cabinet |
|---|---|
B24 | Base, 24″ wide: a drawer over doors, one shelf |
B24D | Drawer base: three drawers |
B24-0 | Base with doors only |
SB36 | Sink base: doors, no shelf |
BCL36, BCR36 | Blind corner base, blind on the left or right: a 24″ blind panel on the corner side and a door on the open side, hinged away from the corner. Put it in the corner and start the next wall's run 24″ out. |
W30x30 | Wall cabinet, 30″ wide and 30″ tall (wall cabinet tops line up, so a W36x15 sits high, over a fridge) |
T24x84 | Tall cabinet (pantry), in the base row |
DW24 | Dishwasher (the countertop runs over it) |
R30, SR30 | Range, freestanding or slide-in (the countertop stops either side) |
CT30 | Cooktop on a 30″ doors-only base |
REF36 | Refrigerator |
WO30 | Wall oven in a tall cabinet |
MW30, HOOD30 | (Wall row) over-the-range microwave with a short cabinet above it, or a chimney hood |
X30 | An open space — a window, a gap |
F3, F3x30 | A 3″ filler strip (base row, or wall row 30″ tall) against a wall or between cabinets — in the cut list, in the front material |
B24/L, /R, /LR, /A, /0 | After any code: which ends of that cabinet are finished — left, right, both, all sides (ends and back, for a peninsula), or none. Without a mark, Studio finishes the ends that stand open (the end of a run, or beside a fridge or range). |
Cabinets built exactly alike share one name. Three B24s with the same parts, ends, holes and hardware are all B24 — the cut list says B24 × 3 and they get one cabinet sheet marked × 3, priced each and in total. The same code built differently gets a letter: a B24 with a finished end beside two plain ones becomes B24 and B24A × 2 (after a code ending in a letter, a dash: B24D-A). In a whole room, alike cabinets share a name across every wall and the island; their sheet says which walls they're on.
Crown molding (3″ or 4-1/2″) runs along the tops of the wall cabinets and light rail under them, in the face frame wood; both are drawn and priced by the foot with their installing time.
Appliances are drawn at standard sizes (a 24″ dishwasher, a 30″ range, a 36″ fridge…) — check the model's installation guide. Appliances and the countertop are listed under By others on the Parts tab, with the countertop's square feet, but aren't in the cut list or price. A sink base gets a sink and faucet when there's a countertop. Ends next to a range or fridge are finished automatically.
Base height and depth, wall depth, where the wall cabinets start, and the materials apply to the whole run. The cut list groups identical parts across cabinets and says which cabinets they're for; sheets, CNC files and the price cover the whole kitchen.
A whole kitchen room
New → Kitchen room lays out the room: its walls, floor, doors and windows, cabinets on each wall, and an island — in 3D, with the walls nearest you left out so you can see in (turn it and they swap).
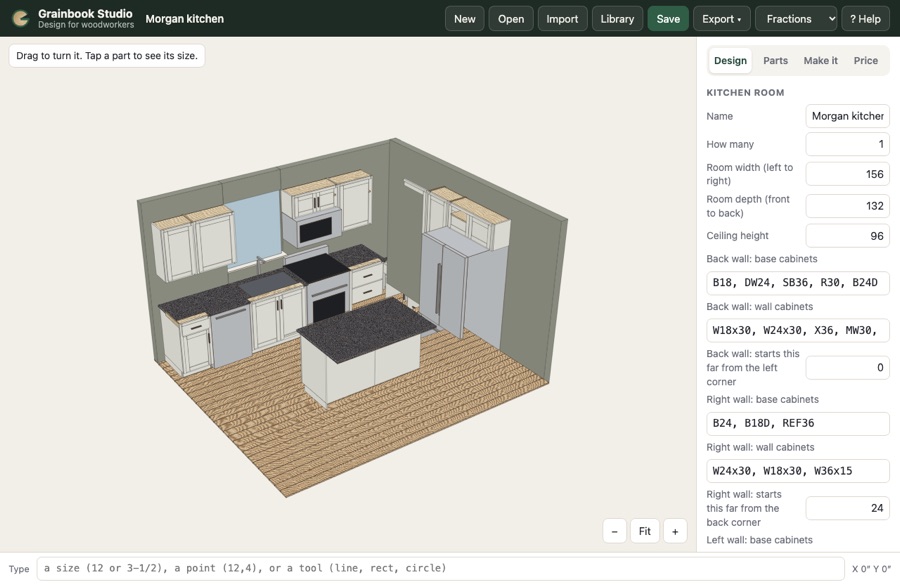
| Setting | What to type |
|---|---|
| Room width, depth, ceiling | The inside of the room. |
| Back / Right / Front / Left wall | Base and wall cabinet codes for each wall (the same codes as a kitchen run), left to right as you face that wall, and how far from the wall's left-hand corner they start (leave 24″ when the next wall's cabinets turn the corner). |
| Island | Its cabinet codes (they face the back wall), where it stands, the seating overhang on the far side, and Island: finished sides — Every side (open ends and the back, with a finished panel), Ends only, or Back only. |
| Doors and windows | One per line, separated by commas: window back 36x40 at 42 sill 44 (width × height, how far from the wall's left corner, sill height) or door left 36x80 at 30. |
| Wall colour, Floor | Any paint colour; wood floors (boards) or tile and concrete. |
Walk in (Design tab) stands you inside the room at eye height: drag to look around, scroll or use the arrow keys to step forward and back (↑ ↓) and turn (← →). Back outside returns to the overview. Save picture downloads what you see — handy for the customer — and printed estimates include the 3D picture and the front view. For a picture that looks like a photograph, use Render.
You'll see a warning if a run is longer than its wall, or cabinets cover a door or window — use an open space code like X36 in the wall row over a window. The cut list, sheets, CNC files, labels and price cover every cabinet in the room; appliances and countertops are listed under By others.
Photo-real pictures (Render)
Render (Design tab, next to Save picture) makes a picture that looks like a photograph of the finished piece: real light bouncing round it, soft shadows, light through the windows, the shine on stone, steel, glass and paint, and real wood grain in each species' colours. Use it to show a customer what they're buying before you cut anything. It works for every furniture, cabinet, cutting board, kitchen and room design.
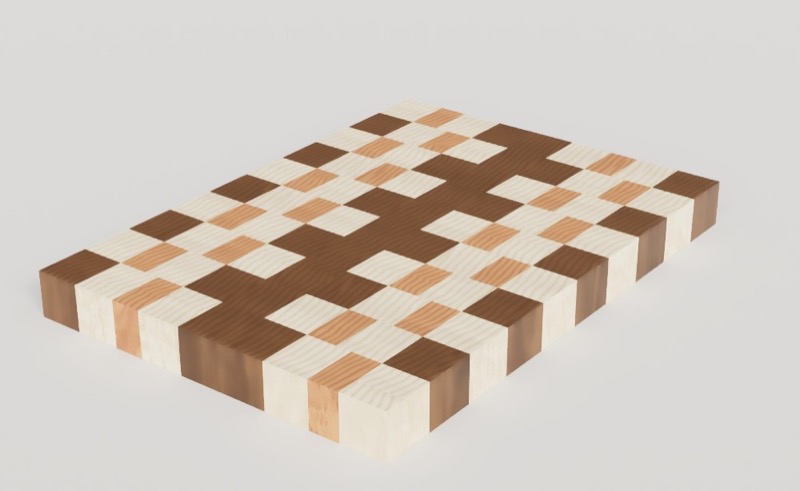
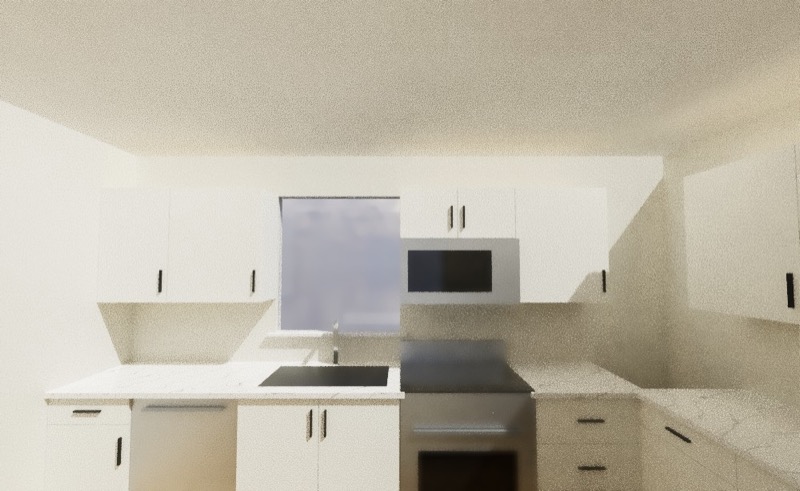
The picture starts grainy and gets cleaner every pass — you can watch it settle. It uses the same view as the 3D picture, so turn and zoom the 3D view first (or Walk in to a room) and then press Render.
| Setting | What it does |
|---|---|
| Light | Photo studio — soft, even light like a product photo. Warm studio — warmer, with a window to one side. Daylight — outdoor sky light; best for kitchens and rooms. |
| Brightness | Lighter or darker overall. Standing inside a room it also turns the ceiling lights up or down. |
| Backdrop | Plain — a light grey floor and background. The room in the light — shows the place the light came from behind the piece (and outside the windows of a room). |
| Quality | How many passes: Quick (80, a few seconds) to check the view, Good (300), Best (1,000) for customers, Final (3,000) for the cleanest picture of a whole room. Times depend on your computer. |
| Smooth the speckle | Smooths the grain left in dim corners without blurring edges. Leave it on unless fine detail looks soft. |
| Size | Fit the window, or a fixed size for printing or posting (1920 × 1080, 2400 × 1600, or 1080 × 1350 for a phone). |
Start again renders again with the settings. Save picture downloads it as a JPG. Use on the estimate puts it on the printed estimate in place of the 3D view (on the Price tab, Render a picture opens Render too, and Use the 3D view instead takes your picture off again). Changing any setting starts the picture over. Close goes back to your design.
How things look: wood is a real wood photo coloured to each species and laid along each part's grain at its real size; the ends of parts show end grain. Painted parts, stained parts, plywood boxes (prefinished or raw), countertops, stainless appliances, glass and pulls each get their own surface. Standing inside a room, Studio adds a ceiling with lights in it.
Render needs a graphics card that runs WebGL 2 — any Mac from the last several years does. If the picture stays on "Setting up the scene…", close it and try again with Quality Quick.
Backsplash tile and flooring
Kitchens and rooms can show backsplash tile and a floor from your own catalog: each item drawn at its real size in 3D and in Render, measured, and put on the bill of materials and the estimate with its manufacturer, colour and item number.
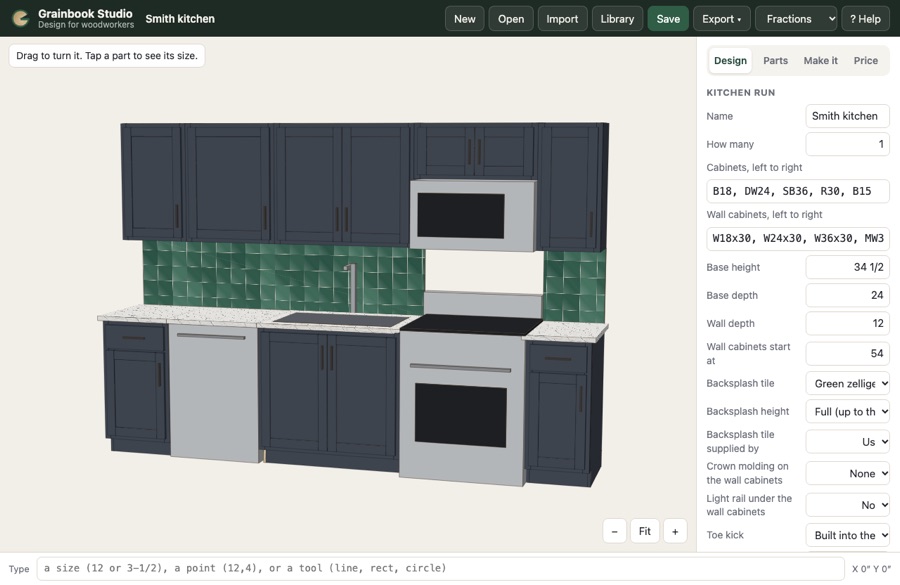
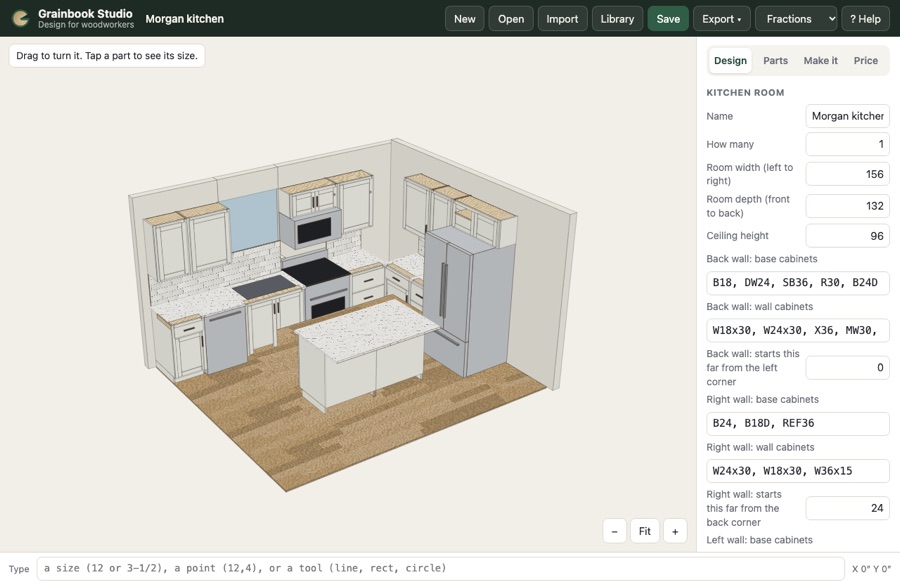
Your catalog: Library → Tile & flooring
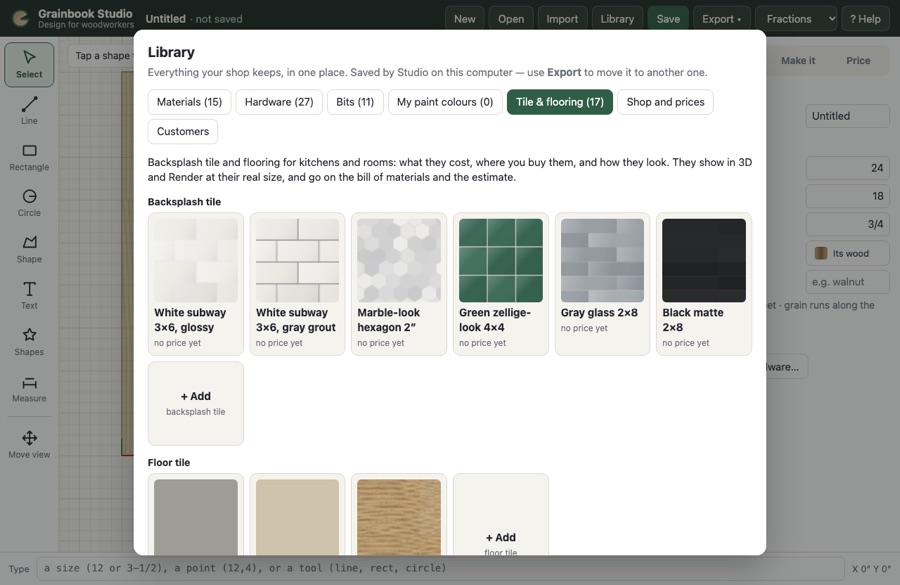
Backsplash tile, floor tile, laminate, hardwood and vinyl plank. Studio comes with a few plain examples (no store, no price) to start from; add the products you actually use. Tap an item to change it, or + Add.
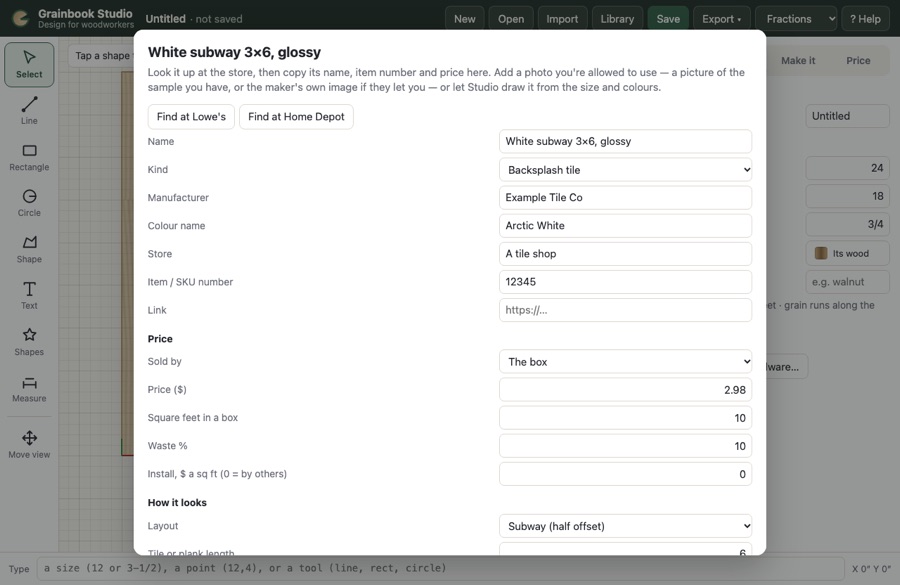
| Box | What to put |
|---|---|
| Find at Lowe's · Find at Home Depot | Opens that store's search for what you've typed, so you can look the product up and copy its details here. |
| Name, Kind | What it is, and which list it's in. |
| Manufacturer, Colour name | Printed with the item on the take-off, bill of materials, estimate and invoice. |
| Store, Item / SKU number, Link | Where you buy it — on the shopping list so anyone can order it. |
| Sold by, Price, Square feet in a box | Price a square foot, or a box (with how many square feet a box covers — Studio rounds up to whole boxes). |
| Waste % | Extra for cuts and breakage (10% is usual for tile, 15% for diagonal or hex, 5–10% for flooring). |
| Install, $ a sq ft | If you install it, the rate — it goes on the estimate as its own line. 0 means installed by others. |
| Layout, Tile or plank length and width, Grout line | How it's laid: Stacked, Subway (half offset), Third offset, Hexagon, or Planks (random lengths, staggered ends). Sizes in inches; the grout line (or plank seam) width. |
| Grout colour, Colour, Second colour, Wood look, Finish | How Studio draws it when there's no photo: tiles vary between the two colours; planks use the wood look's real grain; glossy tile shines in Render. |
| Photo and The photo covers | Optional: a photo of the product (a sample board you have, or the maker's own picture if they let you use it). Measure how much it shows — 12 × 24 inches, say — so Studio lays it at the real size. Photos stay on this computer and go with Export library. |
Why not just bring in the stores' whole catalogs? Their product photos belong to them and the makers, and their prices change daily — so you add the products you actually sell, with a link back to the store, and your own photo if you have one.
On a kitchen or room
On a Kitchen run or Kitchen room, pick the Backsplash tile and its Backsplash height (full, up to the wall cabinets; 18″; or a 4″ splash). The tile runs behind every stretch of counter — not behind a fridge or a tall cabinet, and not behind an island. On a room, Floor from the catalog covers the whole floor.
Supplied by (backsplash and floor): Us prices it; The customer still draws it in 3D and Render and lists it — maker, colour, how much to buy — marked supplied by customer at $0, so they buy the right amount. An install rate is still charged if you're installing it.
Bill of materials and estimate
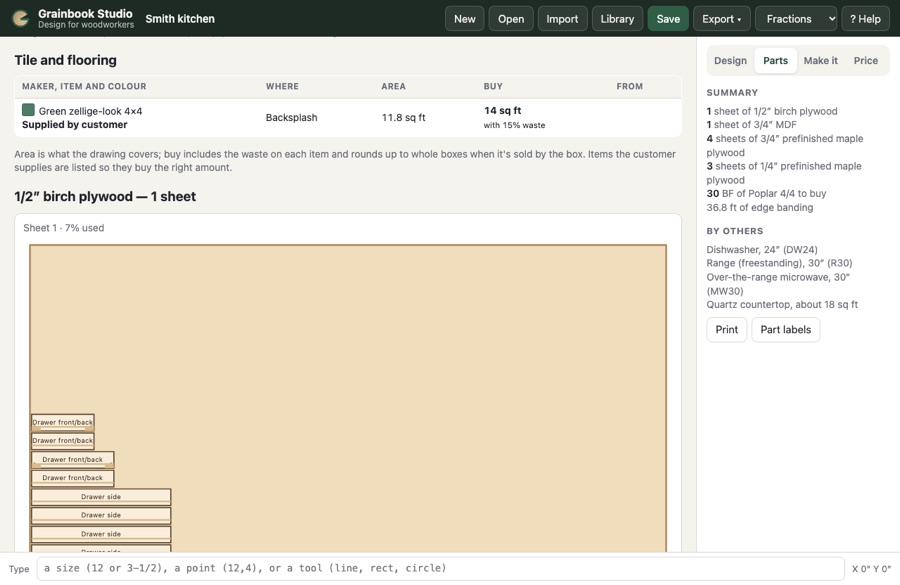
The Parts tab lists Tile and flooring: manufacturer, item and colour, where it goes, the area, what to buy (with waste, in whole boxes) and where to get it. The Price tab adds a Tile and flooring group to the estimate (and a warning if an item has no price yet). Send to Grainbook Mill carries every line, by name, to the project there, so the invoice shows them too.
2D drawings and printing
Any design — a cabinet, a kitchen, a chair, a described design — can become shop drawings: 2D drawings on the Design tab (or Export → 2D drawings) makes the front, right side and top views, laid out the North American way (top above the front, side to its right), with hidden lines left out, overall sizes, each cabinet's width across a kitchen run, the view names and a title block.
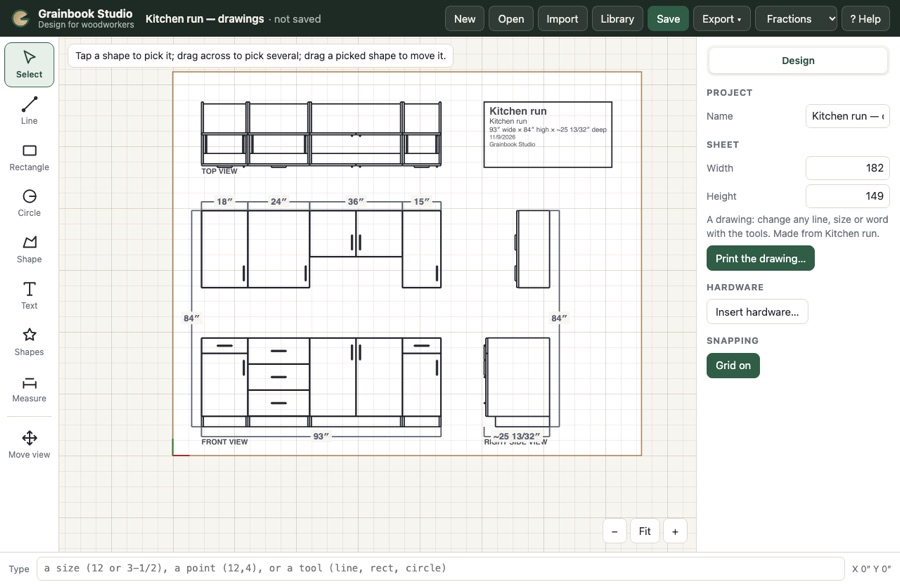
The drawings open as their own project on a white sheet, made of ordinary lines, measurements and words, so you can change anything with the drawing tools: add a Measure where the shop needs one, add notes with Text, move a view, delete a line. Save it like any project.
Printing to scale
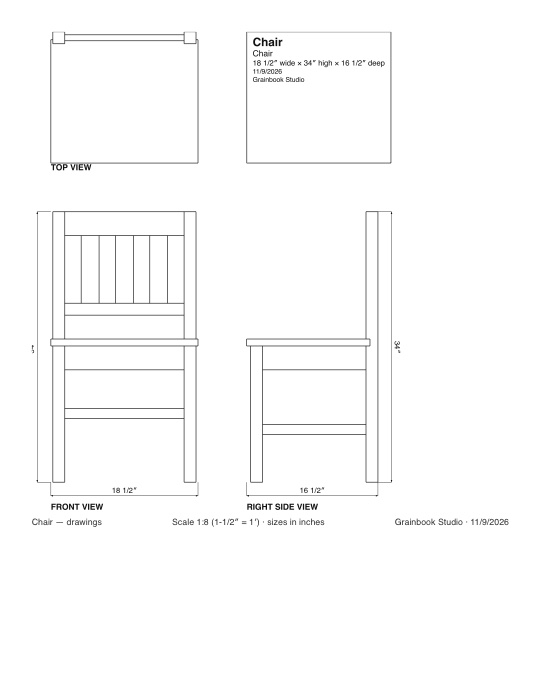
On a drawing, tap Print the drawing… (Design tab) or Export → Print the drawing (to scale). Pick the Paper (Letter either way round, or Tabloid); Studio picks the largest standard Scale that fits — 1:1, 1:2 (6″ = 1′), 1:4 (3″ = 1′), 1:8 (1-1/2″ = 1′), 1:12 (1″ = 1′), 1:16, 1:24, 1:48, 1:96 — or choose your own. The printout says its scale at the bottom, so a scale rule reads it true. To make a PDF, choose Save as PDF in the print window. This works for any drawing — a sign or cutting board layout too.
Making it on the CNC
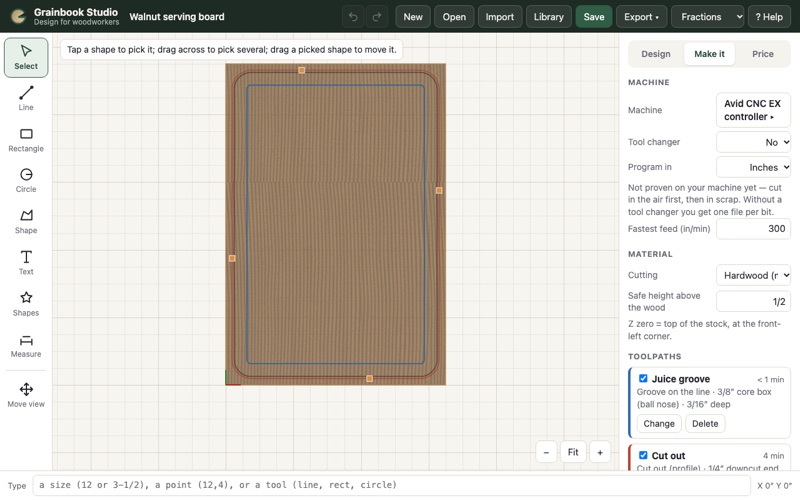
Tap Make it. Your toolpaths are drawn over the design in colour, in the order they'll be cut.
Your machine
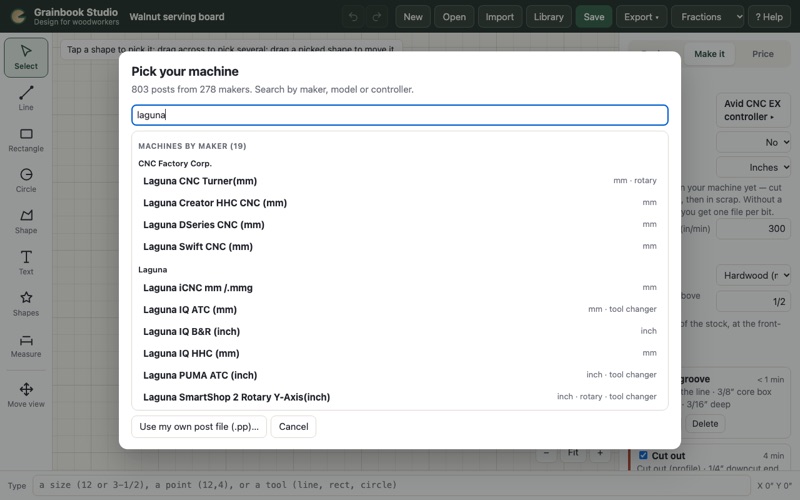
Tap the Machine button under Make it (or Your machine on the start screen) and pick yours from the list. It's remembered on this computer.
| In the list | What it is |
|---|---|
| Studio's own | Avid CNC EX (the default; written the way Avid sets up its own files — .cnc, one file per job, the EX asks for each bit), Centroid CNC12 (Acorn, Oak), GRBL (Shapeoko, X-Carve, Onefinity, Sienci), Mach3 / Mach4, UCCNC, LinuxCNC, Masso and ShopBot. |
| Machines by maker | Several hundred routers, engravers and lasers, A to Z by maker. Type the maker, the model or the controller (Laguna, WinCNC, Syntec) to find yours. Each line says whether it writes inches or millimetres and whether it's a rotary post, has a tool changer, is a plotter / engraver, is drilling only, or should be checked first (see below). |
| Use my own post file (.pp)… | Pick a post processor file you already have for your machine (for example one your machine's maker gave you). Studio reads the machine's commands from it on this computer; any notes in it are left out. |
After you pick, the Machine section shows what that machine needs:
- ShopBot: tick Spindle speed set from the file if your router's speed is controlled by the ShopBot (TR), Tool changer if it has one (C9), Second head to cut with head 2. Inch files check the control is set to inches, and mm files to millimetres, before they run.
- Studio's own controllers: Tool changer and Program in inches or millimetres.
- A machine from the list: the units and file type are set by that machine. With a tool changer every bit is in one file; otherwise you get one file per bit.
- Circles and curves as true arcs (G2/G3) — on unless you turn it off. A circle goes to the machine as two half-circle arcs on its exact centre and radius, and rounded corners as one arc each, the way Vectric and AutoCAD send them — not hundreds of tiny straight moves. Files are much smaller and curves cut smoother. Turn it off only for an old controller that can't read arcs.
- Check first: some makers' files call little programs of their own that Studio can't run. Studio writes those moves plainly; read the file and run it in the air before cutting.
Rotary jobs (a 4th axis)
Pick a rotary machine from the list (it says rotary). Draw the job flat, as if the cylinder were unrolled: the stock's length front to back (or its width, for posts that wrap X) is the way around. Studio turns that direction into degrees on the rotary axis when it writes the file — all the way around is 360°.
| Setting | What it does |
|---|---|
| Cylinder diameter | The blank's diameter. Left empty, it's worked out from the stock (the way around ÷ π). |
| Z zero is | On top of the cylinder (zero the bit on the top of the blank) or On the rotary axis (zero on the centre line; Studio adds half the diameter). |
Curves are written as short straight moves around a cylinder, never as arcs.
Tool changer: on the Avid CNC EX the whole job is one file either way — at each bit change the EX stops and asks for the next bit (and measures it if you use the touch-off routine), or the tool changer fetches it. On other controllers, No gives one file per bit, numbered in cutting order — run the first, change bits and re-zero Z, run the next; Yes puts the tool changes in one file. Fastest feed keeps suggestions within what your machine can do.
Zero
X and Y zero on the front-left corner of the stock, Z zero on the top of the stock — the red and green marks on the drawing. Safe height is how high the bit lifts to move between cuts.
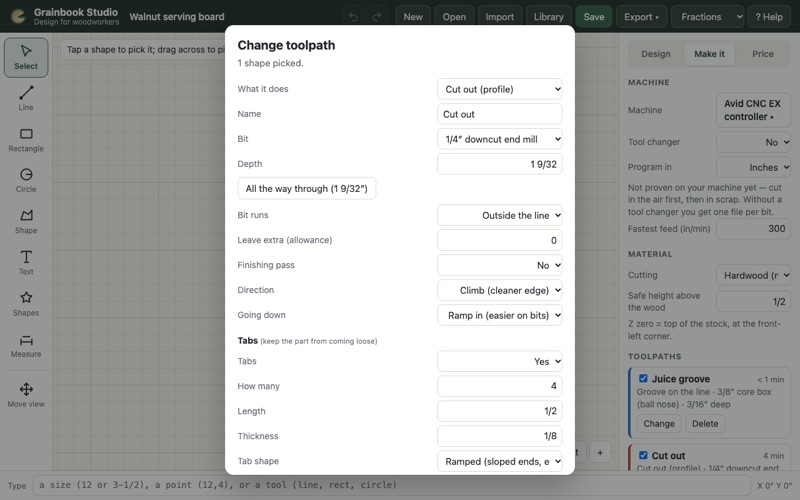
Adding a toolpath
- Pick the shapes to cut on the drawing.
- + Add toolpath → choose What it does.
- Pick the Bit and Depth (for parts, All the way through goes 1/32″ past the bottom, and follows the stock if you change its thickness later).
- Check the feeds and speeds and tap Add.
| What it does | Use it for |
|---|---|
| Cut out (profile) | Cutting a part free or along an edge. Bit runs Outside the line for a part, Inside the line for a hole, On the line to follow it exactly. Leave extra (allowance) keeps the part a little bigger (or, typed as a minus, smaller). Finishing pass roughs the cut out leaving a thin skin (Skin for the last pass, 1/64″–1/32″) and then takes the skin off at full depth in one clean pass. Leave Tabs on when it goes through — see Tabs. |
| Clearing inside a shape to a depth — trays, recesses, mortises. Shapes inside are left standing. Clear it In rings (following the shape inward) or In rows (back and forth at the Row angle you choose, then once round the wall to clean it up). Leave on the walls keeps a little on the sides for a later pass. | |
| Groove on the line | The bit follows the line — juice grooves, decorative lines. |
| Quick engrave (sharp corners) | A V-bit along the line at a set depth. At sharp outside corners it rises out to the corner, so corners come out crisp, not rounded — lettering, borders, line art. Faster than a V-carve when the lines are all one width. |
| Thread milling | A thread inside a round hole with a thread mill bit (add one in Bits as a Thread mill). Draw the hole at the thread's full size, drill or bore it to the tap-drill size first, type Threads per inch (or a pitch like 1.5mm) and the thread's length as Depth. Cut from the bottom up, right-hand. |
| Flatten / surface | Flattening slabs and the spoilboard: rows back and forth over the shape picked (Flatten the whole stock draws one the size of the stock), running past every edge. Depth is how much comes off in all, in passes of Depth per pass. Rows run across or front to back — along the grain gives the cleanest surface. Use your widest surfacing bit with a stepover around 70%. |
| Texture | Short strokes that dip in and out, rows across the area, for a hand-tooled look on panels, doors and signs. Set the shortest and longest stroke, how much the depth varies, and the stroke angle; Shuffle the strokes gives a new pattern. A ball nose or core box looks most like a gouge. |
| 3D shape (prism, dome, bowl, moulding) | Turns any closed outline into a 3D shape and carves it — see 3D shapes from an outline. |
| Drill holes | At the centre of each circle picked, in pecks (the bit comes up to clear chips after each depth per pass). Bore them to size cuts a circle bigger than the bit to its full size: it spirals down, then circles out to the wall. |
| Chamfer an edge | A V-bit along the line, as deep as it has to go for a chamfer of the Chamfer width you type (Studio shows the depth for the bit you picked). Cut the part out first, so the edge is there. |
| Fluting | Grooves along lines that ease in and ease out: full depth in the middle, sloping up to nothing at each end — table legs, columns, panels. A core box or ball nose gives the classic look. |
| 3D carve a picture or model | A carved relief from a photo, a drawing or a 3D model (STL) — see 3D carving. |
| V-carve | Lettering and designs with a V-bit, deeper where the shape is wider. Set a Deepest depth and Clear wide parts with an end mill for big letters — a pocket is added to clear the flat middle first. Inlay makes the two halves of a V-carve inlay — see below. |
More cut-out and pocket options
| Option | What it does |
|---|---|
| Onion skin (cut-outs) | Stops a thin skin above the bottom (Skin thickness, about 1/50″) so small parts stay put on the sheet instead of tabs. Snap the parts free and sand, or skim the skin off with a fast last pass. Works best on flat, even sheets with a compression bit. |
| Lead in and out (cut-outs) | The bit slides into the line from the waste side and slides out the same way, so there's no mark where the cut starts and ends. Lead length is how far out it starts. |
| Inside corners (cut-outs and pockets) | A round bit leaves round inside corners. Dogbone runs into each corner along its middle so a square part fits (mortises, slots for tenons, cabinet joinery); T-bone runs along one side instead, so the notch hides on that side. |
| Then clean the corners with (pockets) | Rest machining: after a big bit clears the pocket, a smaller bit goes round the walls to take out what the big one couldn't reach. Studio adds that second toolpath for you, right after the pocket. |
| Finish passes run (3D) | Across, Front to back, or Both ways — both is the smoothest, and takes twice as long. |
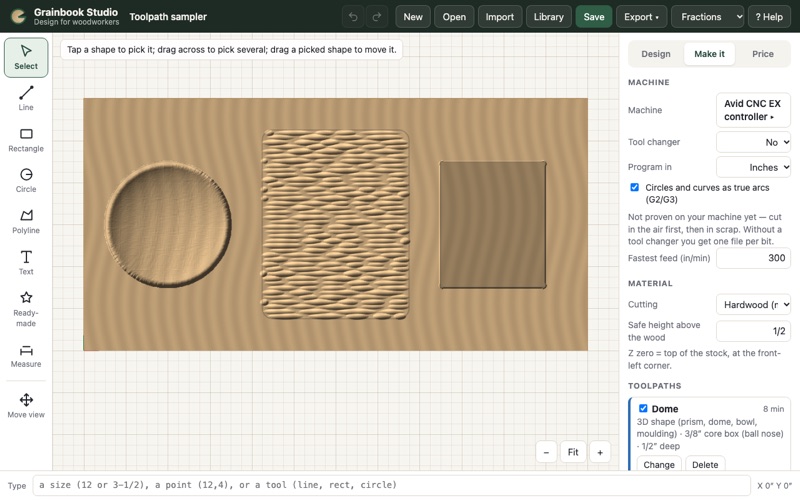
The preview of a dome (3D shape), a texture panel, and a mortise with dogbone corners.
3D shapes from an outline
Pick a closed shape — a circle, a rectangle, a drawn outline, even lettering — and add 3D shape. Studio works out how far each spot is in from the edge and carves a surface from that.
| Shape | What you get |
|---|---|
| Prism | A sharp ridge down the middle, sloping straight down to Depth at the edges — the bevelled look of carved letters and stars. |
| Dome | A rounded top, curving down to Depth at the edges — medallions, buttons, raised panels. |
| Bowl | Carved down into the wood, deepest in the middle — dishes, catch-alls. |
| Tray | Carved down with a flat bottom and rounded sides (Rounded sides, how wide) — serving trays, valet trays. |
| Edge: roundover, cove, ogee, chamfer | Like a router bit's profile run round the outline, Width of the edge shape wide and Depth deep — picture frames, sign edges, raised panels, mouldings. The wood around the outline is cleared to Depth. |
Raised shapes (prism, dome) leave the wood around them alone, or Clear down to the depth around them. Rough first with an end mill clears deep shapes quickly before the ball nose finishes.
Tabs
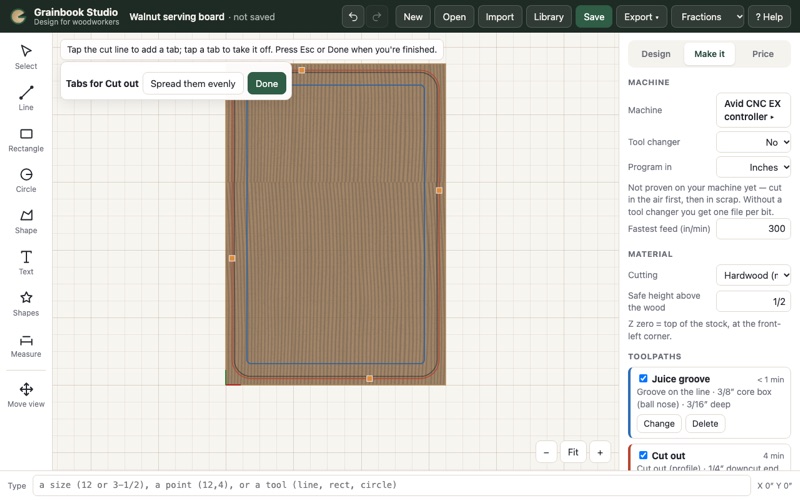
Tabs are short bridges of wood the bit leaves at the bottom of a cut-out, so the part can't come loose and get thrown when the last pass frees it. Cut them with a flush-trim bit or a chisel afterwards.
| Setting | What it does |
|---|---|
| Tabs | On or off. All the way through turns them on for you; a cut that goes through with tabs off is flagged before you save the CNC file. |
| How many, Length, Thickness | Spread evenly round each part. Length is the bridge left at the bottom; thickness is how much wood it leaves (1/8″ is common). |
| Tab shape | Flat: the bit goes straight up over the tab and back down. Ramped: it slopes up and down instead — kinder to the bit and the machine, and the tabs snap off more easily. |
| Place tabs on the drawing… | Studio puts the cut-out in and shows its tabs as orange squares. Tap the coloured cut line to add a tab there; tap a tab to take it off. Spread them evenly goes back to even spacing; Done (or Esc) finishes. Put tabs on straight runs, away from where the part is thin or you need a clean edge. |
V-carve inlays
- Draw the design on the board. Pick it → V-carve → Inlay: Inlay pocket, Deepest 1/4″, clear wide parts with an end mill.
- Duplicate the design and Mirror ↔ the copy (the plug goes in face down). Move it onto the plug wood's drawing, or onto spare stock.
- Pick the copy → V-carve → Inlay: Inlay plug, same V-bit, same Deepest. Plug start depth (about 0.1″) leaves a gap for glue.
- Cut both, glue the plug in face down, clamp, and when dry saw or plane the plug's back off and sand flush.
3D carving from a picture
Import a picture → Use it as a photo, set its width, pick it, and add 3D carve a picture or model. Dark parts are carved deeper (or raised — your pick), down to Depth.
3D models (STL): Import an .stl file (from a 3D design program, or a model you bought). Choose which side faces up, whether the model is in millimetres or inches, and its width on the wood; Studio shows how deep it will carve. Place it and add a 3D carve puts the model on the drawing (as a height picture: white is the top of the model) and adds the 3D carve toolpath, finishing both ways. Studio carves what can be seen from above — undercuts can't be reached by a 3-axis machine.
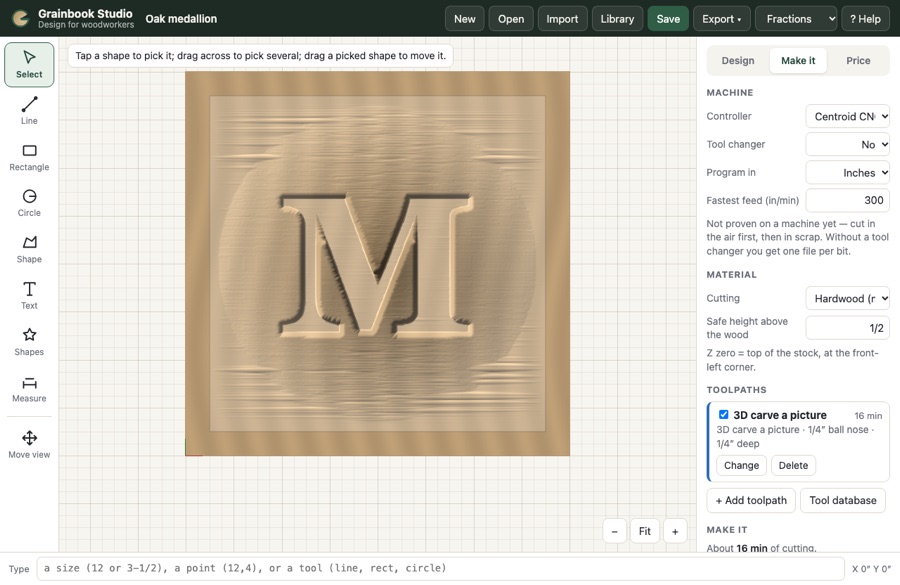
- Bit: a ball nose leaves the smoothest surface. Stepover 8–12% of the bit; smaller is smoother and slower.
- Rough first with an end mill clears deep carvings in flat layers, leaving 1/32″ for the ball nose to finish.
- Smooth softens grainy photos. Pictures with clear shading carve best — logos with a soft glow, drawings, portraits with good light.
- The bit never cuts deeper than the surface anywhere under it, so fine detail is limited by the bit's size.
Direction: Climb leaves the cleaner edge on a rigid machine; Conventional is gentler on one with play. Going down: Ramp in slopes into the cut instead of plunging — easier on bits and the machine.
Toolpaths are cut in the order listed; ↑ moves one earlier. New work goes before any cut-out that goes all the way through, and you're warned if a cut-out would free a part before the rest of its work is done.
Bits, feeds and speeds
Bits lists the bits in your shop — change it to match your rack. Feeds and speeds are suggested from each bit's size and flutes and the wood you're cutting: a chip load that suits the bit at 18,000 RPM, plunge at a third of the feed, a depth per pass of half the bit in hardwood. They're starting points — listen to the cut and look at the chips (good chips, not dust). Anything you type stays with that toolpath; Use the suggested numbers puts them back.
Preview, play and save
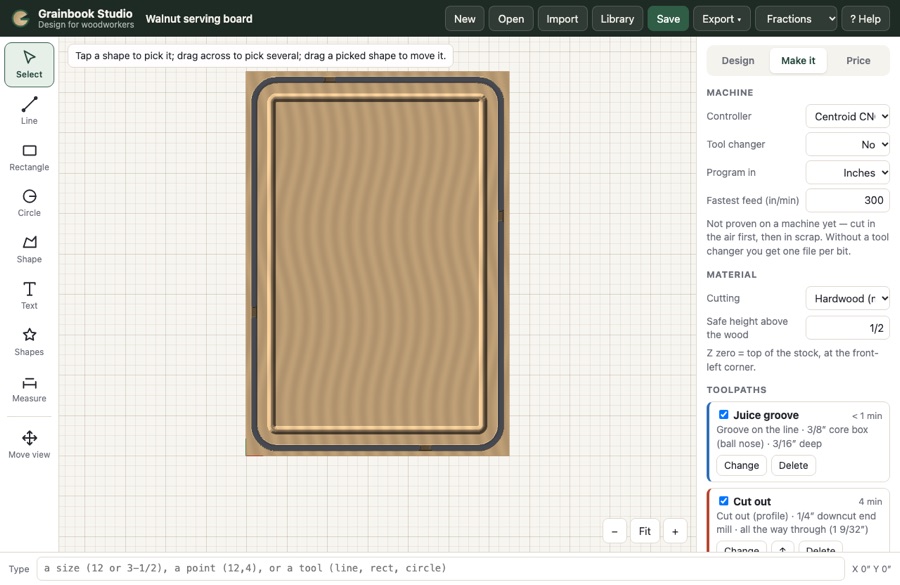
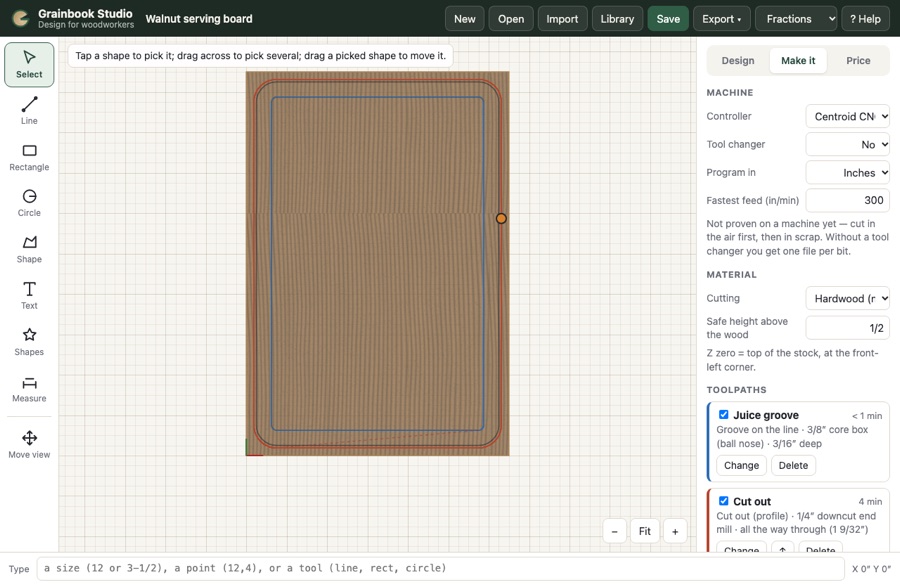
Preview the cut carves the toolpaths into the stock (darker is deeper, grey is through). ▶ Play the cut runs the bit through every move, faster than real time; Speed changes how fast.
Save CNC file writes the program to your Downloads folder. About … of cutting is the time at your feeds plus moves between cuts — the real time is a little longer.
Cutting boards
New → Cutting board draws the board and makes its toolpaths. Choose:
| Choice | What it does |
|---|---|
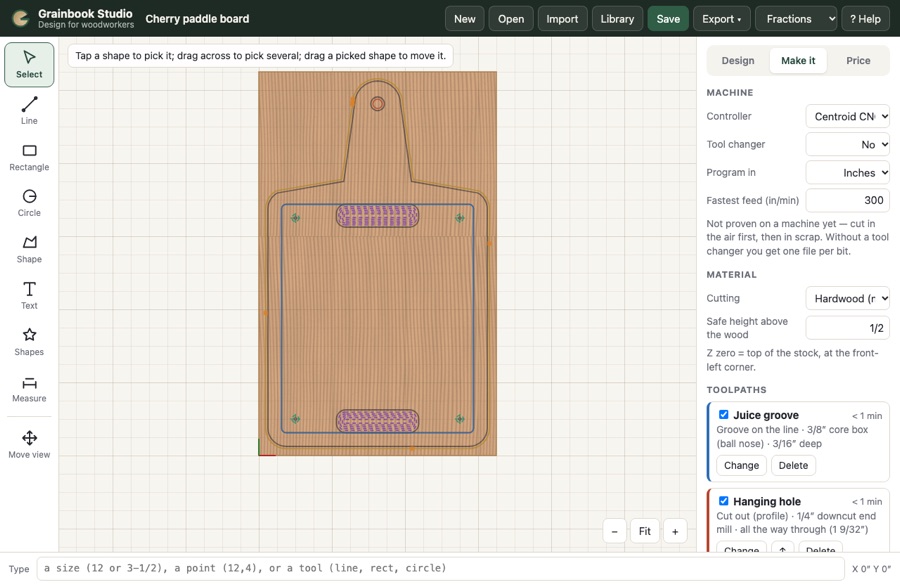
| Shape | Rectangle (rounded corners), oval, round, or paddle — a handle with a hanging hole at the far end. |
| Grain | Edge grain or long grain cut like hardwood; End grain uses gentler feeds, and V-carved inlays cut the V-bit before the clear-out (clearing first fuzzes end grain). |
| Finger grips underneath | A shallow rounded pocket in each end of the underside. |
| Rubber feet | 1/8″ pilot holes 1-1/2″ in from each corner of the underside. |
| Juice groove | A groove the core box bit cuts on the line, set in from the edge. |
Underside work (side 2)
Grips and feet are on the underside: they save as their own file, marked "side 2 (flipped)", and are dashed on the drawing. Run the top first (but not the cut-out), turn the blank over left to right with the same end toward you, zero X and Y on the front-left corner and Z on the top again, and run side 2. Then run the cut-out.
Edge-grain and end-grain boards
Edge-grain board: type the strips across (maple 1, walnut 3/4, maple 1); each strip is ripped as wide as the board is thick and glued on edge. End-grain board: see End-grain boards. Both give the strips to mill, the board feet to buy, the steps, and a 3D view of the finished board.
Inlays in an end-grain board
- Make the board at least 1-1/4″ thick, and keep inlays thin (about 1/4″) with their grain running the same way as the board's.
- Use the V-bit first and clear the flat middle after (Studio does this for end-grain boards); slow the router a little.
- Test the depth and glue gap on a scrap of the same end grain first.
Hardware
The hardware catalog holds hinges, drawer slides, pulls, knobs, inserts, T-nuts, cam locks, magnets and more — each with its price and the prep it needs (the holes and pockets the CNC cuts). Open it from Price → Hardware catalog, or Insert hardware… on a drawing.
| Maker | In the catalog |
|---|---|
| Blum | CLIP top BLUMOTION 110° hinges (full overlay, inset, face frame, INSERTA press-in); TANDEM and MOVENTO undermount slides |
| Salice | Silentia+ Series 300 soft-close hinges (screw-on and press-in 48/6), Series 300 94° |
| Accuride | 3832 full-extension side-mount slides |
| Pulls and knobs | Bar pulls at 3″, 96, 128, 160, 192, 224 mm and 12″ centres; knobs |
| Fasteners | 1/4″-20 threaded inserts and T-nuts, 8 mm dowels, 15 mm cam locks, 5 mm shelf pins, 10 mm magnets, rubber feet |
Items marked check use the makers' usual published sizes: check the maker's drawing for your exact model before a production run.
On a drawing
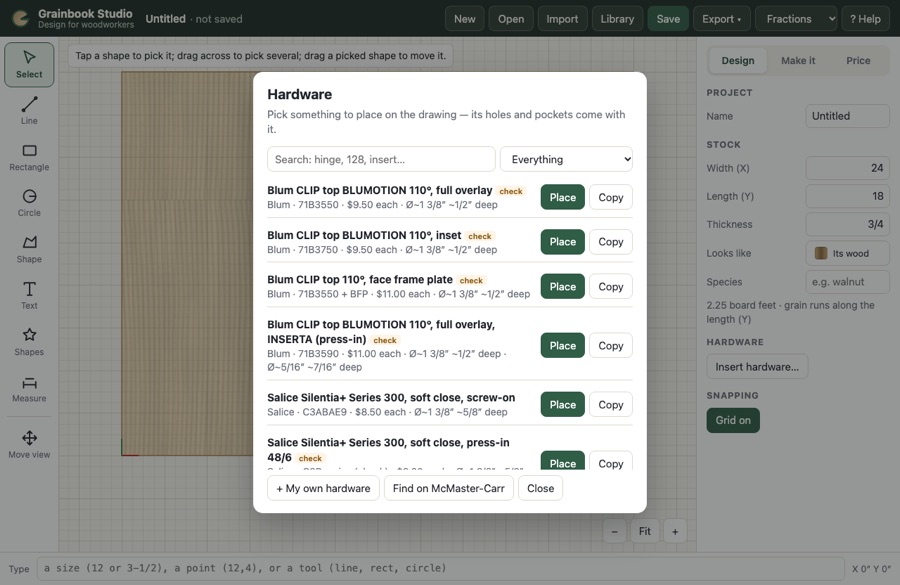
Insert hardware… → pick an item → Place → tap where its centre goes (type 90 to turn it). Its holes and pockets appear on the drawing, toolpaths are added on Make it (holes the size of a drill are drilled, others pocketed, through-holes go through), and the part goes on the Price.
Your own hardware (and McMaster-Carr)
+ My own hardware: name it, give the maker, part number, price and a link, then its prep — holes (with depth, or "thru"), holes with a counterbore, and pockets, measured from the point you'll place it. Read the prep from a DXF drawing takes every circle in a maker's 2D drawing as a hole. Find on McMaster-Carr opens their site so you can find a part, then add it with its number and price (McMaster-Carr offers DXF drawings for most parts). Copy on any item starts yours from it.
Colours and wood
Every design has a Finish: Natural wood, Stained or Painted. Tap Paint colour or Stain to pick from Sherwin-Williams, Benjamin Moore, Behr, Valspar, PPG, Farrow & Ball, C2 and stains — search by name or number (they show as White Dove OC-17). Screen colours are close, not exact: check a real chip. + My colour adds any colour from a chip (maker, number, name, and the colour).
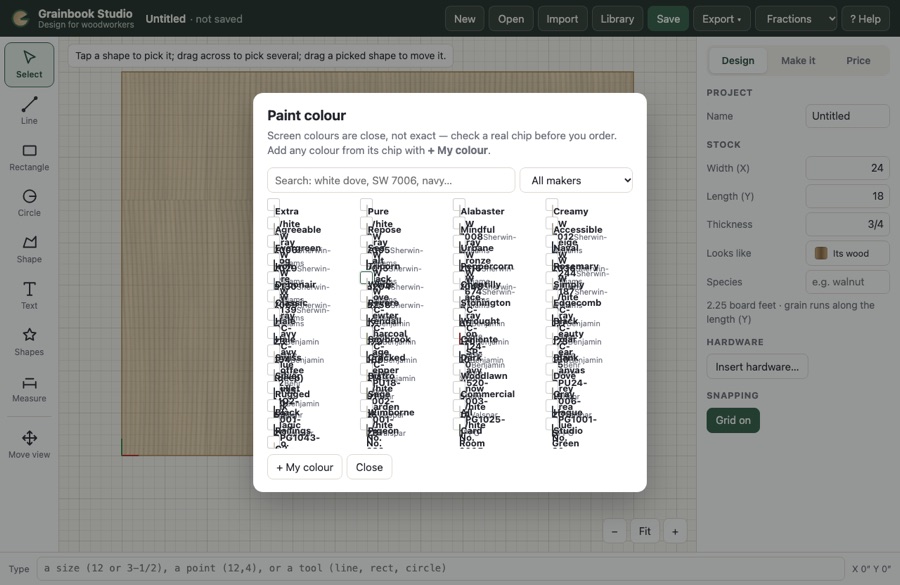
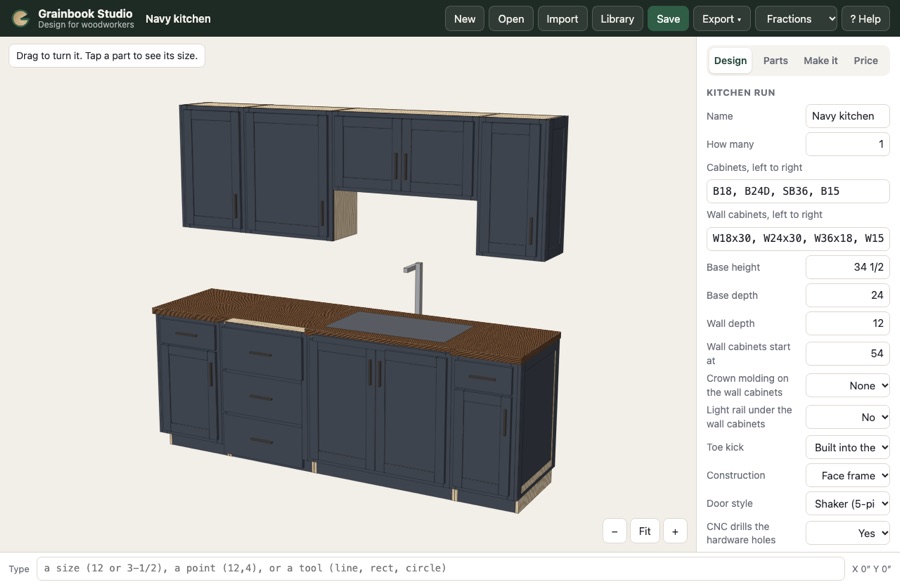
On painted cabinets the paint goes on the face frames, doors, drawer fronts, toe kicks and finished ends; the boxes stay their plywood. Wood is drawn with its grain at real size, running the length of each part, with end grain on the ends — change a size and the grain follows. Stains tint the grain. On a drawing, Looks like paints the stock or shows its wood.
Whole paint palettes from the paint makers
Studio has the most popular colours from Sherwin-Williams, Benjamin Moore, Behr, Valspar, PPG, Farrow & Ball and C2 built in. For a maker's whole palette, bring in the colour file they publish for architects and designers:
- On the paint maker's website, find their colour palette download for designers — usually Adobe swatches (.ase or .aco). A GIMP palette (.gpl) or a spreadsheet (.csv with name, code and hex, or R, G, B columns) works too.
- Library → My paint colours → Import a paint maker's colour file… and pick the file (or several).
- Check the Maker (Studio guesses it from the file name), choose Paint or Stain, and Import. Codes like
SW 7006,OC-17or2125-10are split from the names, so the maker's number shows beside each colour.
Imported colours appear in every colour picker under their maker; search by name or number. Importing the same file again just updates it. Remove these takes a whole maker off.
Screen colours are close, not exact — always check a real chip before the customer orders paint.
Ready-made shapes and combining
Ready-made (left side) has shapes made from sizes you type: bowtie (butterfly key), dogbone rectangle (a square-cornered mortise a round bit can cut), keyhole slot, slot, holes in a row (32 mm shelf pins by default), holes round a circle, polygon, star, box joint fingers, oval and arch. Fill in the sizes and tap where the middle goes.
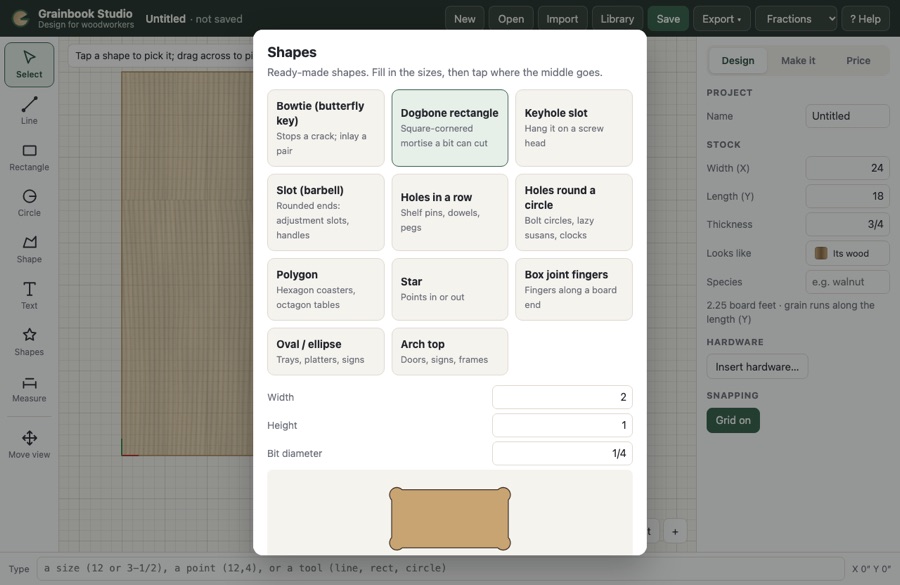
With shapes picked: Round corners… rounds outside corners (and inside ones if you ask) to a radius. With two or more: Join makes one shape, Cut away takes the others out of the biggest, Overlap keeps only where they overlap.
Tool database
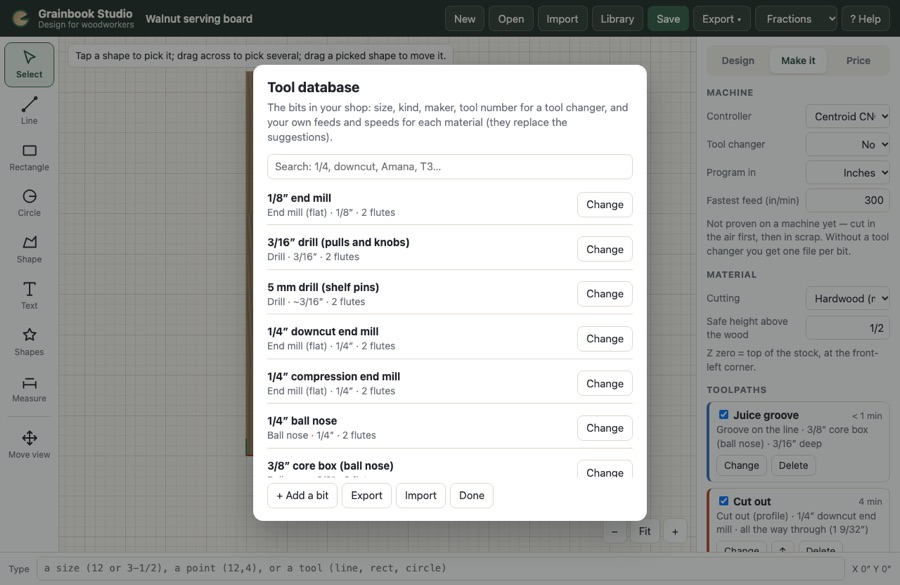
Make it → Tool database lists your bits with their size, kind and cut (upcut, downcut, compression…), cutting length, maker and part number, and the tool number in your tool changer (written as T1, T2… in the file). Open a bit to type your own feeds and speeds for each material — they replace the suggestions from then on. Export saves the database as JSON and CSV (for a spreadsheet or another computer); Import reads either back.
Laser
Laser work goes on the same drawing as router work. Pick shapes, + Add toolpath, and choose one of the laser jobs. They save as their own laser file.
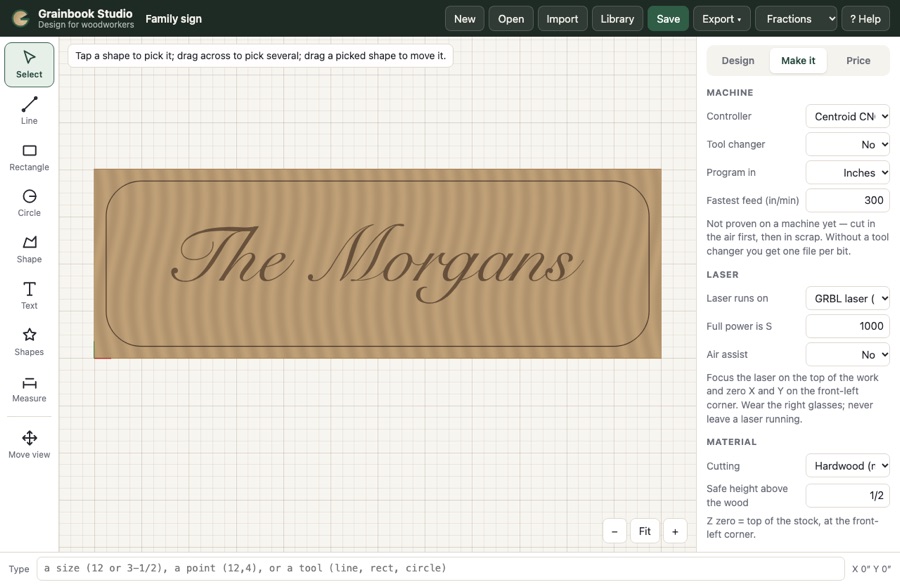
| Laser job | Use it for | Start around |
|---|---|---|
| Along the line | Cutting thin stock or scoring lines | Cut: slow, full power, 2–3 passes. Score: fast and lighter. |
| Fill inside | Engraving text, logos and shapes solid | 20–40% power, 3,000–6,000 in/min, 0.004″ line spacing (250 lines per inch) |
| Engrave a photo | Photos and shaded pictures (Import → Use it as a photo) | Dots (dithered) shading at 0.005″ spacing on most wood |
Laser runs on: GRBL laser (most diode laser kits and machines run in laser mode) Avid CNC EX laser (power set by S from 0 to 100 on each cut, off to move — no M3), or Centroid CNC12. Full power is S is the number your controller uses for 100% (1000 on most GRBL lasers). Air assist turns on air with M8.
Your Library: materials, hardware, bits, colours, prices
Library (top bar) is everything your shop keeps, in one place. Studio saves it on this computer — not in the web browser, so clearing the browser or using a different one loses nothing. Every new project uses it. You don't need Grainbook Mill for any of it.
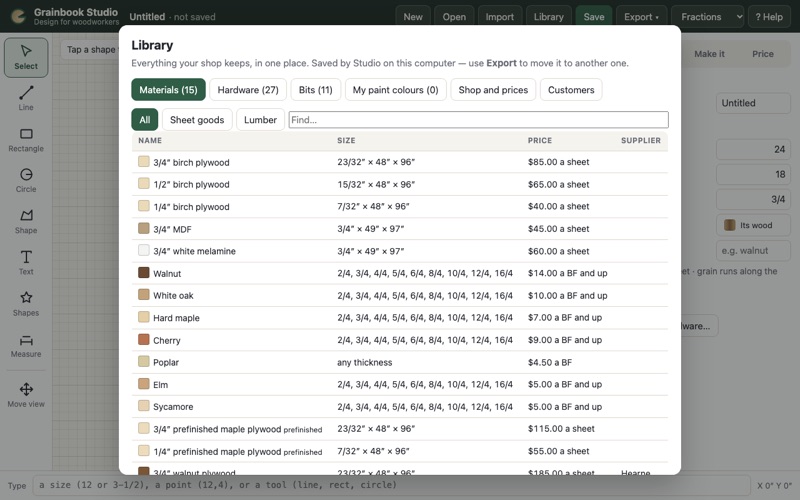
| Tab | What's in it |
|---|---|
| Materials | Sheet goods (plywood, MDF, melamine…) and lumber, with their sizes, prices, supplier and how they look. All / Sheet goods / Lumber and Find… narrow the list. Tap one to change it. |
| Hardware | Opens the hardware catalog: hinges, slides, pulls, knobs and fasteners, each with the holes and pockets it needs. Add your own there. |
| Bits | Opens your tool list: router bits, V-bits, drills and laser settings, with tool numbers and feeds and speeds per material. |
| My paint colours | Colours you've added: one at a time from a chip (+ Add one colour), or a paint maker's whole palette (Import a paint maker's colour file…). Remove takes one off; Remove these takes off a whole maker. See Whole paint palettes. |
| Tile & flooring | Backsplash tile and flooring — see Backsplash tile and flooring. |
| Shop and prices | Opens Shop prices: your business details for estimates, shop and CNC rates, markup, waste, edge banding, finish and hardware prices. |
| Customers | Your customer list (below). |
A sheet good
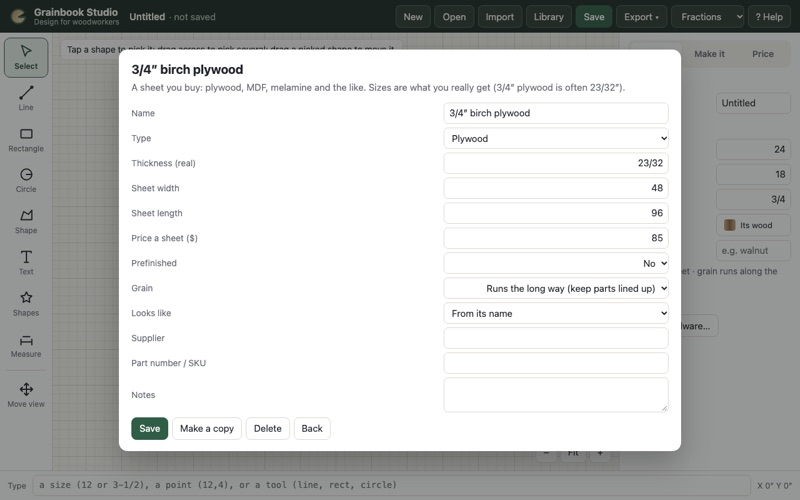
| Box | What to put |
|---|---|
| Name | What you call it, e.g. 3/4″ walnut plywood. |
| Type | Plywood, MDF, Melamine, Particle board, Hardboard or Other. MDF, melamine, particle board and hardboard show as a plain colour, not wood grain. |
| Thickness (real) | What it really measures — 3/4″ plywood is often 23/32″. Dadoes, grooves and cut depths use this. |
| Sheet width / length | The sheet you buy, usually 48 × 96. Sheet layouts fill this size. |
| Price a sheet | What you pay for a whole sheet. |
| Prefinished | Yes for sheets that come clear coated (no finish is charged on them). |
| Grain | Runs the long way keeps parts lined up with the grain on the sheet layouts; No grain lets Studio turn parts to fit more on a sheet. |
| Looks like | The wood it shows in 3D and in Render. From its name works it out from the name; or pick a wood; or No wood grain and pick a Colour. |
| Supplier, Part number, Notes | For you — handy when you order. |
Lumber
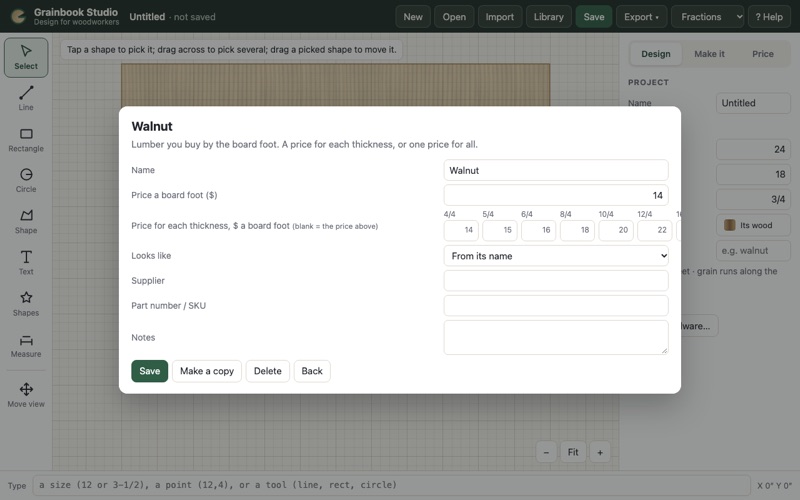
Price a board foot is the price for any thickness. Fill in Price for each thickness (4/4, 5/4, 6/4, 8/4, 10/4, 12/4, 16/4) where thicker stock costs more; leave a box blank to use the main price. Cut lists and estimates buy the thickness each part needs and use its price. If Grainbook Mill is connected, Lumber prices from Grainbook Mill fills these in from your Mill's board prices.
Make a copy starts a new material from this one. Delete takes it out of the Library (saved projects that use it keep their own copy). Back returns to the list without saving.
Moving your library to another computer
Export library saves everything — materials, hardware, bits, colours, prices, your machine and your customers — as one file. On the other computer, Import library and choose Add to mine (keeps what's there; an item in both takes the file's version) or Replace mine (the file's library replaces everything).
Customers
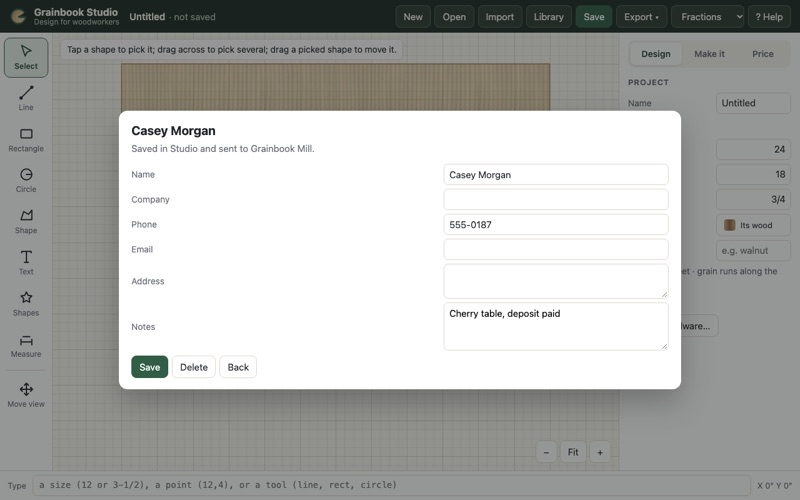
Library → Customers is Studio's own customer list. Find anyone by name, company, phone or email; tap a name to change it; + New customer adds one.
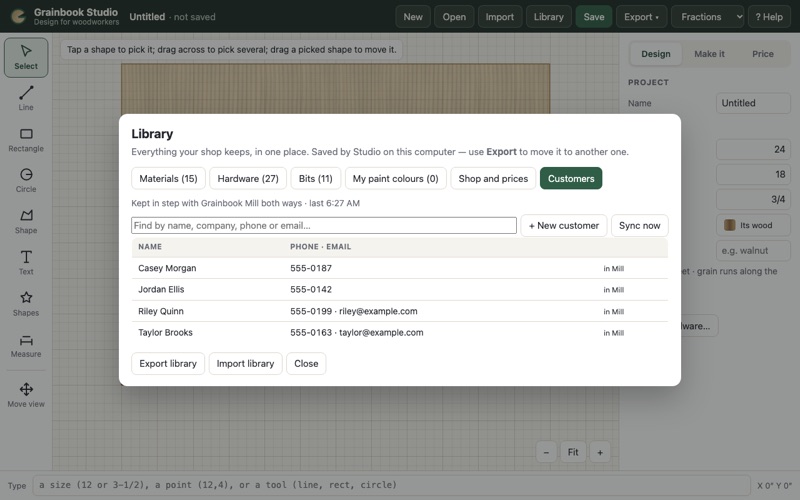
Each customer has a Name, Company, Phone, Email, Address and Notes. Delete takes them out of Studio (if they're also in Grainbook Mill they stay there).
A project's customer: on the Price tab, tap Customer and pick them (type to find them, or + New customer). Their name, address, phone and email print at the top of the estimate, and Send to Grainbook Mill fills them in for you.
With Grainbook Mill
When Grainbook Mill is connected, both programs share one customer list, both ways, on their own:
- Someone you add or change in Studio is sent to Mill within a few seconds (and Mill sends new customers on to Square as usual).
- Customers added or changed in Mill (or in Square) come into Studio every five minutes. Sync now does it straight away.
- If the same customer was changed in both, the newer change wins.
- Next to each name: in Mill (linked), going to Mill (waiting for the next sync), Square (came from Square). A red note means Mill turned a change down — the note says why.
- Square customers keep their name, phone and email from Square: change those in Square. Notes you add in Studio go to Mill.
- Deleting a customer in Studio doesn't delete them in Mill.
Without Mill, nothing changes: the list is simply Studio's own.
Pricing your work
The Price tab works out what a project costs to make and what to charge, and prints a clean estimate with your shop's name.
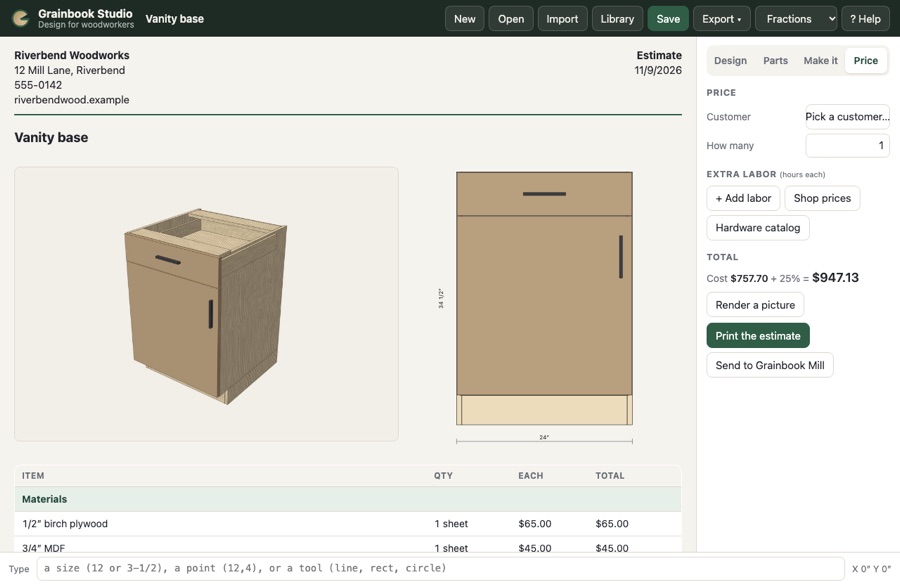
| Line | Where it comes from |
|---|---|
| Materials | Sheets from the layouts, board feet with waste for solid wood, edge banding by the foot. |
| Hardware | Hinges, slides, pulls, shelf pins, levelers and fasteners the design uses. |
| Finish | Square feet of the faces that show. |
| Labor | Shop time for the design (assembly, doors, drawers, banding), the Extra labor you add, and CNC time from the toolpaths. |
Shop prices holds your rates: shop and CNC time per hour, overhead and profit, lumber waste, edge banding, finish, each kind of hardware, and every material's price. Set Charge part sheets to 1 to charge only the part of a sheet a job uses (to the next quarter sheet). Your shop's name, address, phone and website go at the top of printed estimates. Prices are kept in your Library and used for new projects. Tap Customer to pick who the estimate is for (see Customers); Render a picture puts a photo-real picture on the estimate.
For drawings like cutting boards and signs, pick what the Stock is (the wood and its price per board foot) and add your labor; How many prices a batch.
Working with Grainbook Mill
If you also run Grainbook Mill (the sawmill and inventory program), connect the two and Studio can use what Mill knows.
Connecting
- In Grainbook Mill: Settings → Other programs → make a read and write API key named "Grainbook Studio". Copy it.
- In Studio: Price → Shop prices → Grainbook Mill…. Type Mill's address and paste the key. Tap Connect.
The key stays on this computer and is never shown again. Disconnect forgets it; turning the key off in Mill stops it too.
What you can do
| Do this | What happens |
|---|---|
| Use Mill lumber prices (Grainbook Mill… window) | Your board prices come in for every species, with a price for each thickness — a table top in 8/4 walnut is priced at your 8/4 walnut rate. Species Studio didn't have are added. |
| New → Slab from Grainbook Mill | Type a slab's tag. Its real shape comes in — traced from its photo when Mill has a traced edge, or from its width readings — with its length, thickness, species and price. Draw on it (bowties, a cut-off, a base outline), make toolpaths, price it. |
| Price → Send to Grainbook Mill | Makes a project in Mill for the customer with the estimate's materials, hardware and labor. A slab from Mill goes on hold for them. Bill it from Mill as usual. |
Reference: the screen, piece by piece
This part of the manual lists every button, box and choice in Grainbook Studio. The chapters before it show how to do things; these say what each thing is.
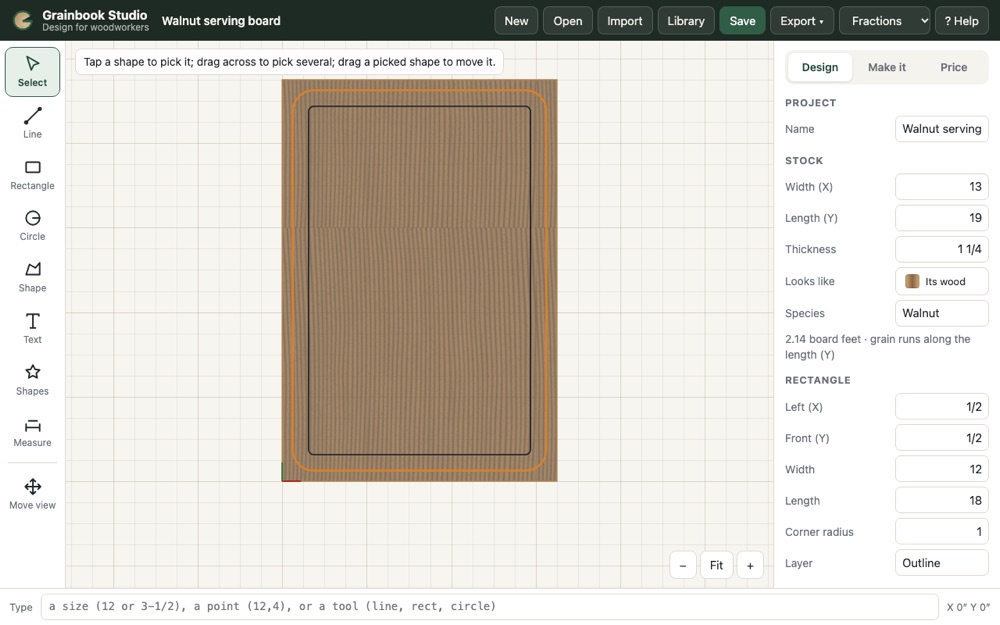 12345678910
| # | Part | What it is |
|---|---|---|
| 1 | Top bar | New starts a project · Open opens a saved one · Import brings in a drawing, picture or project file · Library your materials, hardware, bits, colours, prices and customers · Save saves the project on this computer · Export saves it as another kind of file · Fractions / Decimals / Millimetres how sizes are shown (you can always type any of them) · ? Help this manual. |
| 2 | Project name | The project you have open. · not saved shows when there are changes to save. |
| 3 | Tools | Drawing tools (see Every tool). On furniture and cabinet designs the drawing tools step aside for the 3D view. |
| 4 | Tip line | What the tool you’re using wants next, or the size of the part you tapped in 3D. |
| 5 | Drawing | Your stock and shapes, seen from above, with a grid. Front-left corner of the stock is 0,0; X runs right, Y runs away from you. On designs: the 3D view. |
| 6 | Zoom | − and + zoom out and in; Fit shows everything. |
| 7 | Tabs | Design (sizes and choices), Parts (designs only: cut list, sheets, labels), Make it (toolpaths and CNC files), Price (the estimate). |
| 8 | Panel | Everything for the tab you’re on: the stock and the picked shape on Design, toolpaths on Make it, and so on. |
| 9 | Type box | Type sizes, points and commands instead of tapping (see Every typed command). Just start typing — the box picks it up. |
| 10 | Position | Where the pointer is, in X and Y from the stock’s front-left corner. |
Reference: every tool and the Design panel
Tools
| Tool | How it works |
|---|---|
| Select | Tap a shape to pick it; drag across to pick several (Shift adds to what’s picked); drag a picked shape to move it. |
| Line | Tap where the line starts, then where it ends. Keep tapping to carry on; Esc to stop. |
| Rectangle | Tap one corner, then the other — or tap one corner and type the size, like 12 x 8. |
| Circle | Tap the centre, then the edge — or type the radius, or d and the diameter, like d 3-1/2. |
| Shape | Tap each corner. Tap the first corner again, or press Enter, to close it; Esc leaves it open. |
| Text | Tap where the text starts (its lower-left corner), then type it and pick a font and height. Any font on this computer. |
| Shapes | Ready-made shapes: fill in a few sizes, then tap where the middle goes (see Every ready-made shape). |
| Measure | Tap two points; the measurement stays on the drawing (it isn’t cut). |
| Move view | Drag to move around the drawing. Pinch or scroll to zoom. |
Points snap to corners, ends, middles, centres and the grid (a small marker shows what it snapped to). Hold the space bar, or drag with the middle or right mouse button, to move the view with any tool.
Design panel: Project and Stock
| Box | What it does |
|---|---|
| Name | The project’s name (also its file name when saved). |
| Width (X), Length (Y), Thickness | The stock you’re cutting from. Grain runs along Y (the length). |
| Looks like | Its wood shows the species’ grain; or pick a paint or stain colour to see it painted. |
| Species | The wood (sets the grain you see and the lumber price). Board feet show underneath. |
Design panel: the picked shape
| Shape | Boxes |
|---|---|
| Rectangle | Left (X), Front (Y), Width, Length, Corner radius |
| Circle | Centre X, Centre Y, Diameter |
| Line, Measurement | Start X, Start Y, End X, End Y (its length and angle show underneath) |
| Shape | How many corners, open or closed |
| Text | The words, font and height; Change the text |
| Photo | Left (X), Front (Y), Width (for laser photo engraving) |
| Traced picture | How many outlines and how wide |
| Every shape | Layer — a name to group shapes (layers go out with DXF and SVG files). |
Change it (one or more shapes picked)
| Button | What it does |
|---|---|
| Duplicate | A copy just beside it (⌘D). |
| Copies… | A grid of copies: how many across and up, and the space between. |
| Offset… | A new outline a set distance outside or inside (closed shapes). |
| Mirror ↔ / Mirror ↕ | Flip left to right / front to back. |
| Turn 90° | A quarter turn anticlockwise. |
| Turn… | Any angle (minus turns clockwise). |
| Size… | A new width (keeps the shape) or a percent. |
| Delete | Removes them (Delete or Backspace key too). |
| Round corners… | Rounds the corners of closed shapes to a radius; inside corners too if you choose. |
| Join | (two or more closed shapes) One shape of them all. |
| Cut away | The biggest shape with the others cut out of it. |
| Overlap | Only where they overlap. |
Line up
Left, Centre, Right, Front, Middle, Back line picked shapes up with each other — or, with one shape picked, on the stock. Arrow keys nudge picked shapes 1/16″ (with Shift, 1″).
Hardware and Snapping
Insert hardware… opens the catalog; pick an item and tap where it goes (its holes come with it). The list under it shows what’s on the drawing (and goes on the estimate). Grid on / off turns snapping to the grid on and off.
Reference: every typed command
Start typing anywhere — the Type box at the bottom picks it up — and press Enter. Sizes can be 12, 3-1/2, 3 1/2, 3.5, 90mm or 9cm.
| Type | What happens |
|---|---|
line l · rect r · circle c · shape p · measure m · select s | Picks that tool. |
12,4 | A point 12″ right and 4″ back from the stock’s front-left corner. |
@6,0 | A point 6″ right of the last point (a move from the last point). |
12 (drawing a line or shape) | The next point 12″ away, toward the pointer (or straight on). |
12<45 | The next point 12″ away at 45° (0° = right, 90° = away from you). |
12 x 8 (Rectangle, after the first corner) | The other corner 12″ across and 8″ back. |
2 or d 4 (Circle, after the centre) | A 2″ radius, or a 4″ diameter. |
fit or z | Shows everything. |
undo u · redo | Undo and redo (also ⌘Z, ⇧⌘Z). |
delete del | Deletes what’s picked. |
dup copy | Duplicates what’s picked. |
mirror · mirror y | Mirrors what’s picked left to right · front to back. |
turn 30 or rotate 30 | Turns what’s picked 30° anticlockwise. |
offset | Offsets what’s picked (asks how far). |
grid | Grid snapping on or off. |
hardware hw | Opens the hardware catalog to insert something. |
90 (placing hardware) | Turns the hardware 90° before you tap where it goes. |
Reference: every way to start a project
New shows six kinds of work. Pick one, then its type in the row underneath, fill in the boxes, and press Start. You can change every size later.
| Kind | Types and boxes |
|---|---|
| New project | A blank drawing: stock to draw on and cut. Boxes: Name, Width, Length, Thickness, Species. |
| Cutting boards | Shaped board (cut out on the CNC): Name, Width, Length, Thickness, Species; Shape (Rectangle, Oval, Round, Paddle); Grain (Edge grain, Long grain (face), End grain — sets feeds and cut order); Finger grips underneath and Rubber feet (cut from the other side, in their own file); Extra stock around it; Corner radius; Juice groove, Groove in from edge, Groove width. Edge-grain glue-up and End-grain glue-up: see edge-grain and end-grain choices (their Make it tab opens the CNC cut-out). |
| Cabinets | Base cabinet, Wall cabinet, Tall cabinet, Kitchen run (a wall of cabinets), Kitchen room (every wall and an island). |
| Boxes | Keepsake box. |
| Custom furniture | Table, Chair, Bookcase, and Slab from Grainbook Mill (type a slab’s tag: its real outline and price come in; needs Grainbook Mill connected). |
| Describe it | Say what you want; Claude designs it as parts (see Describe it). Needs your Anthropic API key. |
Reference: Base cabinet
Frameless, doors or drawers, toe kick.
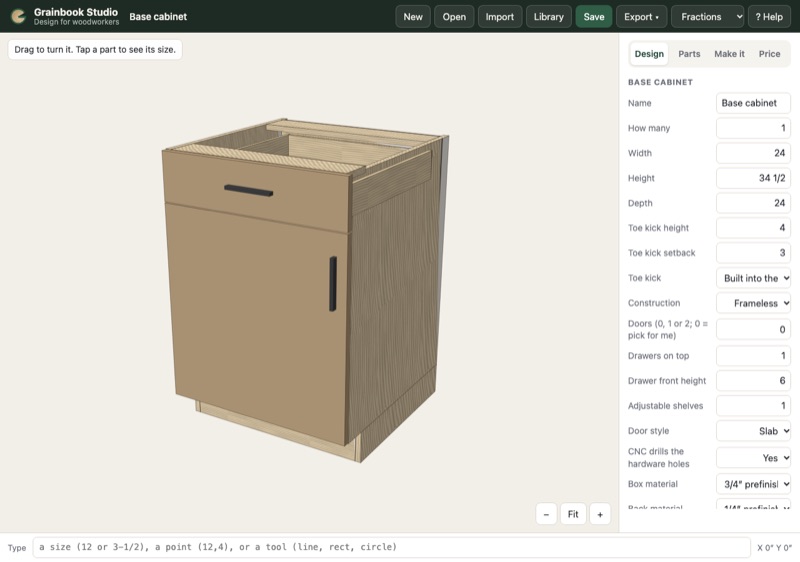
| Choice | What it means | Starts at |
|---|---|---|
| Width | How wide it is, outside to outside. | 24″ |
| Height | How tall it is. For base and tall cabinets this includes the toe kick, not the countertop. | 34-1/2″ |
| Depth | Front to back, outside to outside (not counting the doors). | 24″ |
| Toe kick height | How tall the toe kick is. | 4″ |
| Toe kick setback | How far the toe kick sits back from the face of the cabinet. | 3″ |
| Toe kick | Built into the sides — the sides run to the floor with a notch cut out at the front for your toes (most shops). Separate base — a ladder base you build and level first; the boxes sit on it. Legs with a clip-on kick — plastic leveling legs; a kick board clips on after install. | Built into the sides |
| Construction | Frameless — European style: doors cover the box edges, everything bored on the System 32 pattern. Face frame — a solid-wood frame (1-1/2″ stiles and rails) on the front; doors overlay it by 1/2″. | Frameless |
| Doors (0, 1 or 2; 0 = pick for me) | How many doors. 0 lets Studio choose: one door up to 24″ wide, two above that. | 0 |
| Drawers on top | How many drawers across the top (each the Drawer front height). 0 for doors only. | 1 |
| Drawer front height | The height of each drawer front. | 6″ |
| Adjustable shelves | Adjustable shelves on shelf pins (the CNC drills the pin holes when it drills the hardware holes). | 1 |
| Door style | Slab — one flat piece. Shaker (5-piece) — solid-wood stiles and rails (2-1/4″) around a 1/4″ panel in a groove. Shaker (CNC MDF) — one MDF piece; the CNC pockets the recessed centre. | Slab |
| CNC drills the hardware holes | Yes — the sheet CNC files drill hinge cups, hinge plates, slide holes, shelf-pin holes and pull holes. No — you drill them by hand (the holes still show on the cut list). | Yes |
| Box material | The sheet the box is made from: sides, bottom, top stretchers and shelves. | from your Library |
| Back material | The sheet for the back. | from your Library |
| Doors | What the doors are made of: a sheet (MDF, plywood…) or solid wood (marked “solid wood”; glued up to the Solid-wood thickness). Also used for end panels, fillers and the island back panel. | from your Library |
| Drawer fronts | What the drawer fronts are made of: Same as the doors, or any sheet or solid wood — solid fronts over 8″ tall are marked as glue-ups. | from your Library |
| Solid-wood door and front thickness | How thick solid-wood doors and fronts are milled (3/4″ usual). Sheets keep their own thickness. | 3/4″ |
| Drawer boxes | What the drawer boxes are made of: a sheet (1/2″ Baltic birch is usual) or solid wood — maple is usual, any species works. Solid boxes are noted for dovetail or box-joint corners and get no edge banding; the drawer bottom stays the back material. | from your Library |
| Solid-wood drawer box thickness | How thick solid-wood drawer sides, fronts and backs are milled (1/2″ usual; 5/8″ for heavy drawers). Sheets keep their own thickness. | 1/2″ |
| Face frame and door frames | The lumber for face frames, 5-piece door frames, crown and light rail. | from your Library |
| Hinges | Which hinge, from your hardware catalog. Its cup size and plate pattern set the drilling. | from your Library |
| Pulls or knobs | Which pull or knob, from your hardware catalog. Its screw spacing sets the holes. | from your Library |
| Drawer slides | Which drawer slide, from your hardware catalog. Undermount slides set the drawer box size and the notches and holes in it. | from your Library |
| Finished ends | Which sides show. A finished end gets the finish (or an applied panel); ends against a wall or another cabinet stay plain. All sides (ends and back) also covers the back with a finished panel — for a cabinet standing alone or as an island. | Both |
| Finished ends are | Painted box side — the side of the box itself is finished. Applied panel to match the doors — a panel in the door style is added to the outside. | Painted box side |
| Countertop (shown, by others) | A countertop to show in 3D and on the picture. It is made and fitted by others, so it is listed under "By others", not in the cut list or the price. | None |
| Countertop colour | The countertop colour. | White |
| Finish | Natural wood — clear finish on the wood. Stained — the Stain colour on the parts that show. Painted — the Paint colour on doors, drawer fronts, face frames, finished ends and toe kicks; the boxes stay their plywood. | Natural wood |
| Paint colour | Tap to pick a paint colour (maker, name and code) or add your own from a chip. | from your Library |
| Stain | Tap to pick a stain colour. | from your Library |
Every cabinet design also has Name and How many at the top of the panel.
Reference: Wall cabinet
Frameless, doors, shelves.
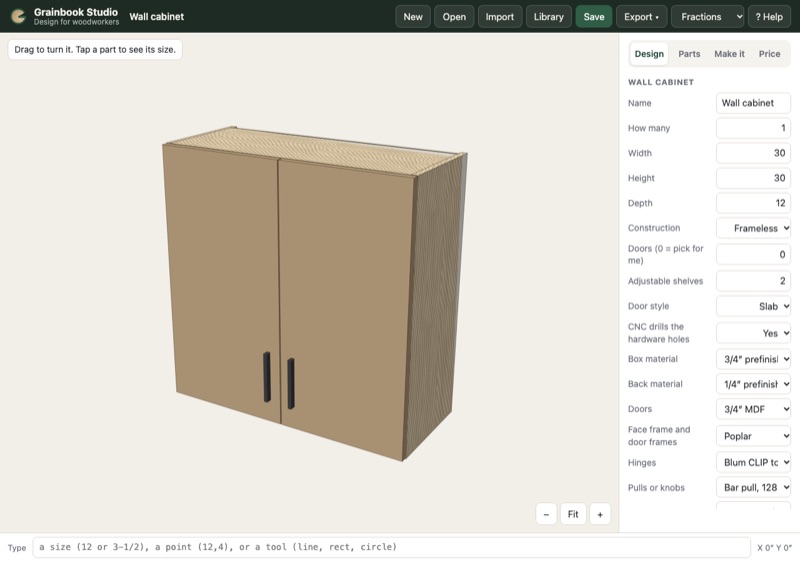
| Choice | What it means | Starts at |
|---|---|---|
| Width | How wide it is, outside to outside. | 30″ |
| Height | How tall the wall cabinet is. | 30″ |
| Depth | Front to back, outside to outside (not counting the doors). | 12″ |
| Construction | Frameless — European style: doors cover the box edges, everything bored on the System 32 pattern. Face frame — a solid-wood frame (1-1/2″ stiles and rails) on the front; doors overlay it by 1/2″. | Frameless |
| Doors (0 = pick for me) | How many doors. 0 lets Studio choose: one door up to 24″ wide, two above that. | 0 |
| Adjustable shelves | Adjustable shelves on shelf pins (the CNC drills the pin holes when it drills the hardware holes). | 2 |
| Door style | Slab — one flat piece. Shaker (5-piece) — solid-wood stiles and rails (2-1/4″) around a 1/4″ panel in a groove. Shaker (CNC MDF) — one MDF piece; the CNC pockets the recessed centre. | Slab |
| CNC drills the hardware holes | Yes — the sheet CNC files drill hinge cups, hinge plates, slide holes, shelf-pin holes and pull holes. No — you drill them by hand (the holes still show on the cut list). | Yes |
| Box material | The sheet the box is made from: sides, bottom, top stretchers and shelves. | from your Library |
| Back material | The sheet for the back. | from your Library |
| Doors | What the doors are made of: a sheet (MDF, plywood…) or solid wood (marked “solid wood”; glued up to the Solid-wood thickness). Also used for end panels, fillers and the island back panel. | from your Library |
| Solid-wood door thickness | How thick solid-wood doors and fronts are milled (3/4″ usual). Sheets keep their own thickness. | 3/4″ |
| Face frame and door frames | The lumber for face frames, 5-piece door frames, crown and light rail. | from your Library |
| Hinges | Which hinge, from your hardware catalog. Its cup size and plate pattern set the drilling. | from your Library |
| Pulls or knobs | Which pull or knob, from your hardware catalog. Its screw spacing sets the holes. | from your Library |
| Finished ends | Which sides show. A finished end gets the finish (or an applied panel); ends against a wall or another cabinet stay plain. All sides (ends and back) also covers the back with a finished panel — for a cabinet standing alone or as an island. | Both |
| Finished ends are | Painted box side — the side of the box itself is finished. Applied panel to match the doors — a panel in the door style is added to the outside. | Painted box side |
| Finish | Natural wood — clear finish on the wood. Stained — the Stain colour on the parts that show. Painted — the Paint colour on doors, drawer fronts, face frames, finished ends and toe kicks; the boxes stay their plywood. | Natural wood |
| Paint colour | Tap to pick a paint colour (maker, name and code) or add your own from a chip. | from your Library |
| Stain | Tap to pick a stain colour. | from your Library |
Reference: Tall cabinet
Pantry or utility, upper and lower doors.
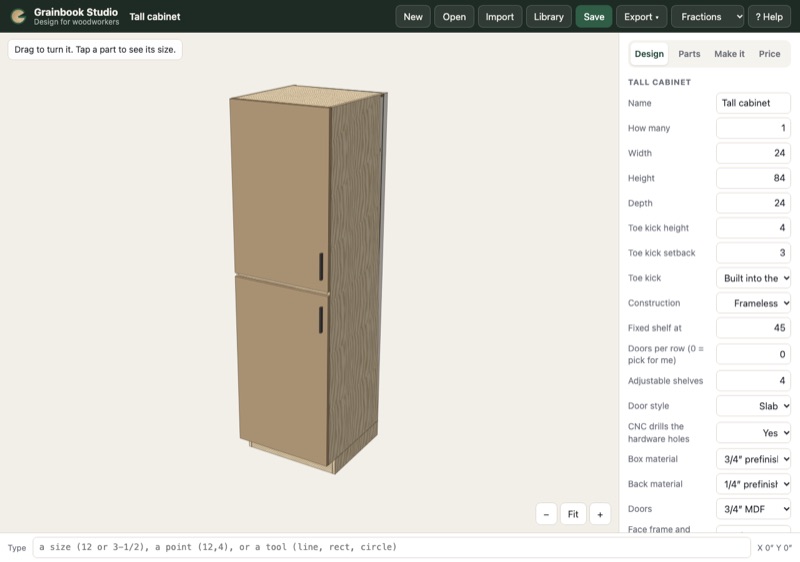
| Choice | What it means | Starts at |
|---|---|---|
| Width | How wide it is, outside to outside. | 24″ |
| Height | How tall, including the toe kick. | 84″ |
| Depth | Front to back, outside to outside (not counting the doors). | 24″ |
| Toe kick height | How tall the toe kick is. | 4″ |
| Toe kick setback | How far the toe kick sits back from the face of the cabinet. | 3″ |
| Toe kick | Built into the sides — the sides run to the floor with a notch cut out at the front for your toes (most shops). Separate base — a ladder base you build and level first; the boxes sit on it. Legs with a clip-on kick — plastic leveling legs; a kick board clips on after install. | Built into the sides |
| Construction | Frameless — European style: doors cover the box edges, everything bored on the System 32 pattern. Face frame — a solid-wood frame (1-1/2″ stiles and rails) on the front; doors overlay it by 1/2″. | Frameless |
| Fixed shelf at | Height of the fixed shelf that divides upper and lower doors. | 45″ |
| Doors per row (0 = pick for me) | How many doors. 0 lets Studio choose: one door up to 24″ wide, two above that. | 0 |
| Adjustable shelves | Adjustable shelves on shelf pins (the CNC drills the pin holes when it drills the hardware holes). | 4 |
| Door style | Slab — one flat piece. Shaker (5-piece) — solid-wood stiles and rails (2-1/4″) around a 1/4″ panel in a groove. Shaker (CNC MDF) — one MDF piece; the CNC pockets the recessed centre. | Slab |
| CNC drills the hardware holes | Yes — the sheet CNC files drill hinge cups, hinge plates, slide holes, shelf-pin holes and pull holes. No — you drill them by hand (the holes still show on the cut list). | Yes |
| Box material | The sheet the box is made from: sides, bottom, top stretchers and shelves. | from your Library |
| Back material | The sheet for the back. | from your Library |
| Doors | What the doors are made of: a sheet (MDF, plywood…) or solid wood (marked “solid wood”; glued up to the Solid-wood thickness). Also used for end panels, fillers and the island back panel. | from your Library |
| Solid-wood door thickness | How thick solid-wood doors and fronts are milled (3/4″ usual). Sheets keep their own thickness. | 3/4″ |
| Face frame and door frames | The lumber for face frames, 5-piece door frames, crown and light rail. | from your Library |
| Hinges | Which hinge, from your hardware catalog. Its cup size and plate pattern set the drilling. | from your Library |
| Pulls or knobs | Which pull or knob, from your hardware catalog. Its screw spacing sets the holes. | from your Library |
| Finished ends | Which sides show. A finished end gets the finish (or an applied panel); ends against a wall or another cabinet stay plain. All sides (ends and back) also covers the back with a finished panel — for a cabinet standing alone or as an island. | Both |
| Finished ends are | Painted box side — the side of the box itself is finished. Applied panel to match the doors — a panel in the door style is added to the outside. | Painted box side |
| Finish | Natural wood — clear finish on the wood. Stained — the Stain colour on the parts that show. Painted — the Paint colour on doors, drawer fronts, face frames, finished ends and toe kicks; the boxes stay their plywood. | Natural wood |
| Paint colour | Tap to pick a paint colour (maker, name and code) or add your own from a chip. | from your Library |
| Stain | Tap to pick a stain colour. | from your Library |
Reference: Bookcase
Fixed shelves in dados, back in a groove.
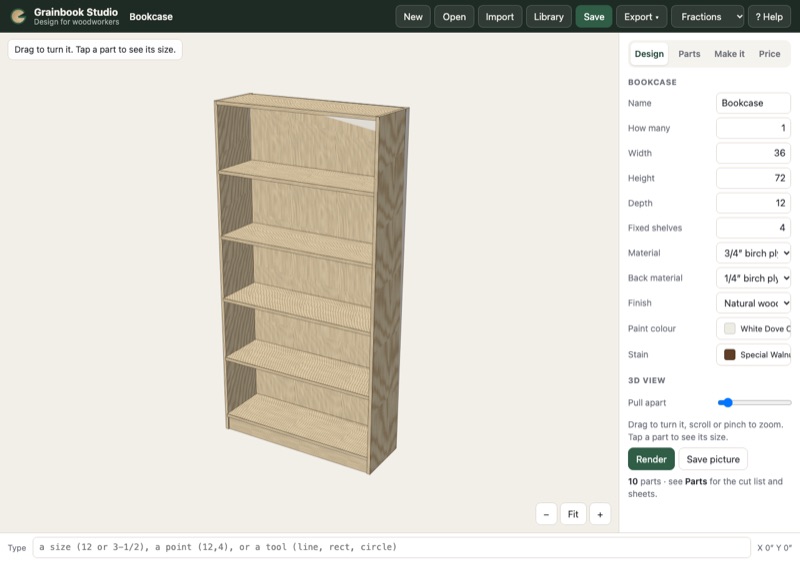
| Choice | What it means | Starts at |
|---|---|---|
| Width | How wide it is, outside to outside. | 36″ |
| Height | How tall it is. For base and tall cabinets this includes the toe kick, not the countertop. | 72″ |
| Depth | Front to back, outside to outside (not counting the doors). | 12″ |
| Fixed shelves | Fixed shelves, each in a dado. | 4 |
| Material | The sheet the case and shelves are made from. | from your Library |
| Back material | The sheet for the back. | from your Library |
| Finish | Natural wood — clear finish on the wood. Stained — the Stain colour on the parts that show. Painted — the Paint colour on doors, drawer fronts, face frames, finished ends and toe kicks; the boxes stay their plywood. | Natural wood |
| Paint colour | Tap to pick a paint colour (maker, name and code) or add your own from a chip. | from your Library |
| Stain | Tap to pick a stain colour. | from your Library |
Reference: Box
Keepsake box, bottom in a groove, lid.
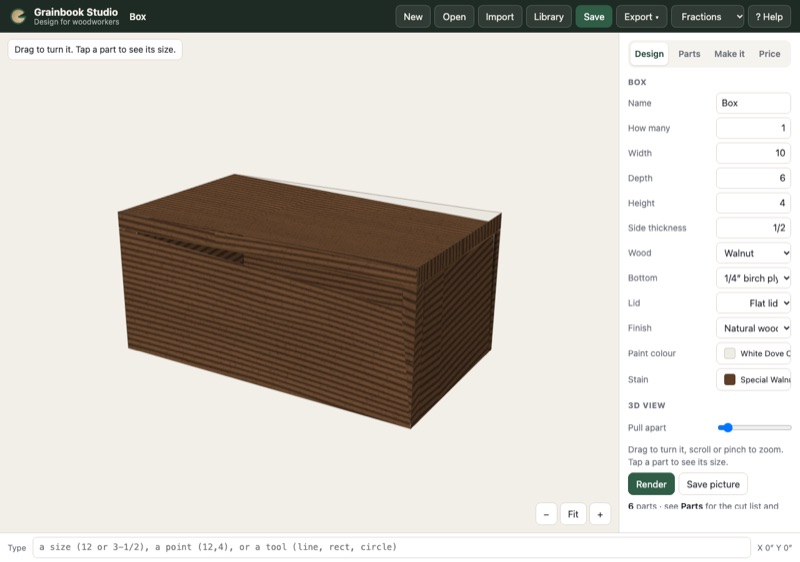
| Choice | What it means | Starts at |
|---|---|---|
| Width | How wide it is, outside to outside. | 10″ |
| Depth | Front to back, outside to outside (not counting the doors). | 6″ |
| Height | How tall it is. For base and tall cabinets this includes the toe kick, not the countertop. | 4″ |
| Side thickness | Thickness of the box sides. | 1/2″ |
| Wood | The lumber it is made from. | from your Library |
| Bottom | The sheet for the bottom (it sits in a groove). | from your Library |
| Lid | Flat lid — a solid lid sized to the box. No lid. | Flat lid |
| Finish | Natural wood — clear finish on the wood. Stained — the Stain colour on the parts that show. Painted — the Paint colour on doors, drawer fronts, face frames, finished ends and toe kicks; the boxes stay their plywood. | Natural wood |
| Paint colour | Tap to pick a paint colour (maker, name and code) or add your own from a chip. | from your Library |
| Stain | Tap to pick a stain colour. | from your Library |
Reference: End-grain board
Strips, two glue-ups, checkerboard.
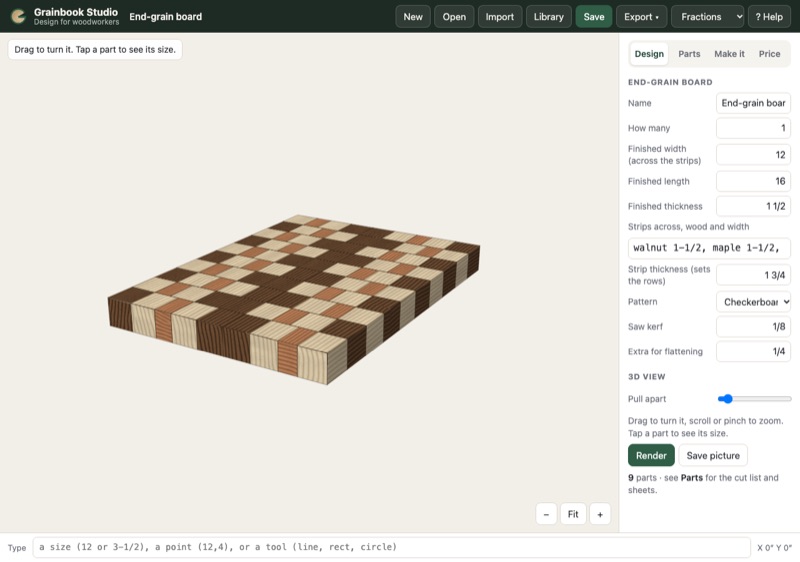
| Choice | What it means | Starts at |
|---|---|---|
| Finished width (across the strips) | Finished width (across the strips). | 12″ |
| Finished length | Finished length. | 16″ |
| Finished thickness | Finished thickness — the length you crosscut each row. | 1-1/2″ |
| Strips across, wood and width | The strips across the board, left to right: wood then width, separated by commas, e.g. maple 1-1/2, walnut 1. Any wood in your Library. | walnut 1-1/2, maple 1-1/2, cherry 1, maple 1-1/2, walnut 1-1/2 |
| Strip thickness (sets the rows) | How thick you rip the strips for the first glue-up. It sets the rows in the finished board (with the saw kerf). | 1-3/4″ |
| Pattern | Checkerboard — every other row turned end for end. Brick — rows shifted half a strip. Stripes — all rows the same way. | Checkerboard |
| Saw kerf | Your saw blade’s kerf: wood lost in each crosscut. | 1/8″ |
| Extra for flattening | Extra thickness and size to flatten away after glue-up. | 1/4″ |
| Shape (CNC cut-out) | The outline the CNC cuts once the board is glued up: Rectangle, Oval, Round or Paddle (with a handle and hanging hole). | Rectangle |
| Corner radius | Radius of the corners (rectangles and paddles). | 1″ |
| Juice groove | A juice groove cut around the top. | Yes |
| Groove in from edge | How far the juice groove sits in from the edge. | 3/4″ |
| Groove width | How wide the juice groove is (the bit cuts it this wide). | 3/8″ |
| Finger grips underneath | Finger grips cut in the underside of the ends (their own file: flip the board). | No |
| Rubber feet | Pilot holes in the underside for rubber feet. | No |
The Parts tab gives the strip list, the two glue-ups and the crosscut rows. See End-grain boards.
Reference: Edge-grain board
Strips on edge, one glue-up.
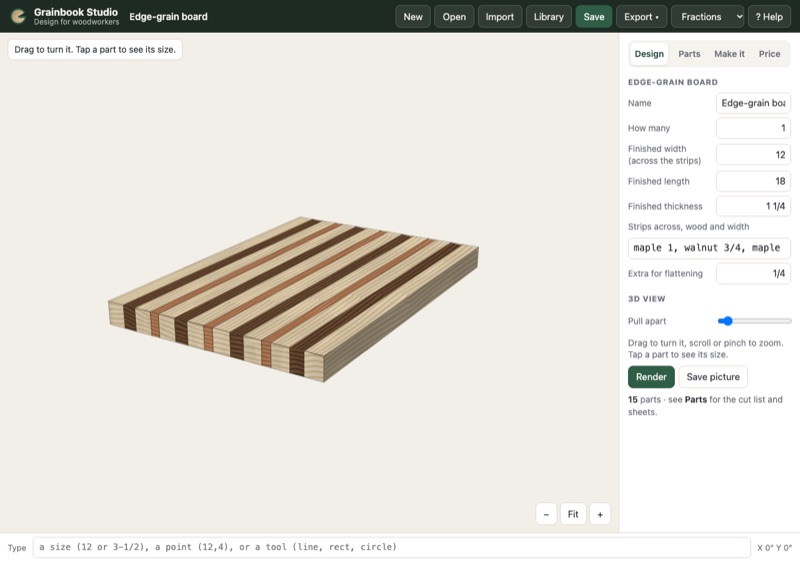
| Choice | What it means | Starts at |
|---|---|---|
| Finished width (across the strips) | Finished width (across the strips). | 12″ |
| Finished length | Finished length. | 18″ |
| Finished thickness | Finished thickness (the strips stand on edge). | 1-1/4″ |
| Strips across, wood and width | The strips across the board, left to right: wood then width, separated by commas, e.g. maple 1-1/2, walnut 1. Any wood in your Library. | maple 1, walnut 3/4, maple 1, cherry 1/2 |
| Extra for flattening | Extra thickness and size to flatten away after glue-up. | 1/4″ |
| Shape (CNC cut-out) | The outline the CNC cuts once the board is glued up: Rectangle, Oval, Round or Paddle (with a handle and hanging hole). | Rectangle |
| Corner radius | Radius of the corners (rectangles and paddles). | 1″ |
| Juice groove | A juice groove cut around the top. | Yes |
| Groove in from edge | How far the juice groove sits in from the edge. | 3/4″ |
| Groove width | How wide the juice groove is (the bit cuts it this wide). | 3/8″ |
| Finger grips underneath | Finger grips cut in the underside of the ends (their own file: flip the board). | No |
| Rubber feet | Pilot holes in the underside for rubber feet. | No |
Reference: Kitchen run
A row of base and wall cabinets.
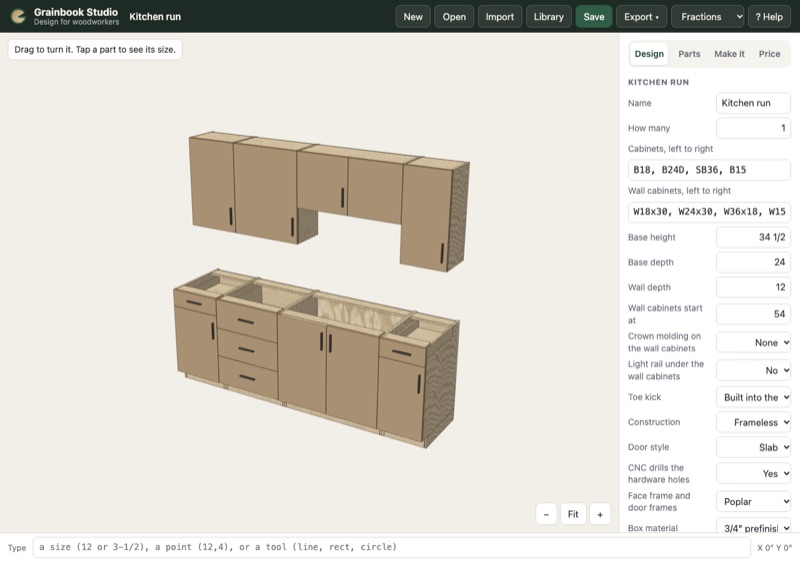
| Choice | What it means | Starts at |
|---|---|---|
| Cabinets, left to right | Base cabinets and appliances, left to right, separated by commas — see Cabinet and appliance codes. Add /L, /R, /LR, /A or /0 to a code to say which ends are finished. | B18, B24D, SB36, B15 |
| Wall cabinets, left to right | Wall cabinets, left to right — see Cabinet and appliance codes. Use X and a width for a gap (a window, a hood). | W18x30, W24x30, W36x18, W15x30 |
| Base height | Height of the base cabinets (without the countertop). | 34-1/2″ |
| Base depth | Depth of the base cabinets. | 24″ |
| Wall depth | Depth of the wall cabinets. | 12″ |
| Wall cabinets start at | Height from the floor to the bottom of the wall cabinets (54″ = 18″ above a 36″ counter). | 54″ |
| Backsplash tile | Tile on the wall from the counter up, behind every stretch of counter (not behind a fridge or tall cabinet). Pick from Library → Tile & flooring. It shows in 3D and Render and goes on the bill of materials and the estimate. | empty |
| Backsplash height | Full — up to the bottom of the wall cabinets (and the same height where there are none). 18″ or a 4″ splash above the counter. | Full (up to the wall cabinets) |
| Backsplash tile supplied by | Us — priced on the estimate. The customer — still drawn and listed (maker, colour, how much to buy) but marked “supplied by customer” at $0. | Us |
| Crown molding on the wall cabinets | Crown molding along the tops of the wall cabinets (3″ or 4-1/2″), priced by the foot. | None |
| Light rail under the wall cabinets | A light rail under the wall cabinets to hide under-cabinet lights, priced by the foot. | No |
| Toe kick | Built into the sides — the sides run to the floor with a notch cut out at the front for your toes (most shops). Separate base — a ladder base you build and level first; the boxes sit on it. Legs with a clip-on kick — plastic leveling legs; a kick board clips on after install. | Built into the sides |
| Construction | Frameless — European style: doors cover the box edges, everything bored on the System 32 pattern. Face frame — a solid-wood frame (1-1/2″ stiles and rails) on the front; doors overlay it by 1/2″. | Frameless |
| Door style | Slab — one flat piece. Shaker (5-piece) — solid-wood stiles and rails (2-1/4″) around a 1/4″ panel in a groove. Shaker (CNC MDF) — one MDF piece; the CNC pockets the recessed centre. | Slab |
| CNC drills the hardware holes | Yes — the sheet CNC files drill hinge cups, hinge plates, slide holes, shelf-pin holes and pull holes. No — you drill them by hand (the holes still show on the cut list). | Yes |
| Face frame and door frames | The lumber for face frames, 5-piece door frames, crown and light rail. | from your Library |
| Box material | The sheet the box is made from: sides, bottom, top stretchers and shelves. | from your Library |
| Back material | The sheet for the back. | from your Library |
| Doors | What the doors are made of: a sheet (MDF, plywood…) or solid wood (marked “solid wood”; glued up to the Solid-wood thickness). Also used for end panels, fillers and the island back panel. | from your Library |
| Drawer fronts | What the drawer fronts are made of: Same as the doors, or any sheet or solid wood — solid fronts over 8″ tall are marked as glue-ups. | from your Library |
| Solid-wood door and front thickness | How thick solid-wood doors and fronts are milled (3/4″ usual). Sheets keep their own thickness. | 3/4″ |
| Drawer boxes | What the drawer boxes are made of: a sheet (1/2″ Baltic birch is usual) or solid wood — maple is usual, any species works. Solid boxes are noted for dovetail or box-joint corners and get no edge banding; the drawer bottom stays the back material. | from your Library |
| Solid-wood drawer box thickness | How thick solid-wood drawer sides, fronts and backs are milled (1/2″ usual; 5/8″ for heavy drawers). Sheets keep their own thickness. | 1/2″ |
| Hinges | Which hinge, from your hardware catalog. Its cup size and plate pattern set the drilling. | from your Library |
| Pulls or knobs | Which pull or knob, from your hardware catalog. Its screw spacing sets the holes. | from your Library |
| Drawer slides | Which drawer slide, from your hardware catalog. Undermount slides set the drawer box size and the notches and holes in it. | from your Library |
| Finished ends are | Painted box side — the side of the box itself is finished. Applied panel to match the doors — a panel in the door style is added to the outside. | Painted box side |
| Countertop (shown, by others) | A countertop to show in 3D and on the picture. It is made and fitted by others, so it is listed under "By others", not in the cut list or the price. | None |
| Countertop colour | The countertop colour. | White |
| Finish | Natural wood — clear finish on the wood. Stained — the Stain colour on the parts that show. Painted — the Paint colour on doors, drawer fronts, face frames, finished ends and toe kicks; the boxes stay their plywood. | Natural wood |
| Paint colour | Tap to pick a paint colour (maker, name and code) or add your own from a chip. | from your Library |
| Stain | Tap to pick a stain colour. | from your Library |
Each cabinet in the run is a whole cabinet with every choice above; codes set its type and width. See Kitchens.
Reference: Kitchen room
Walls, doors, windows, cabinets on every wall, an island.
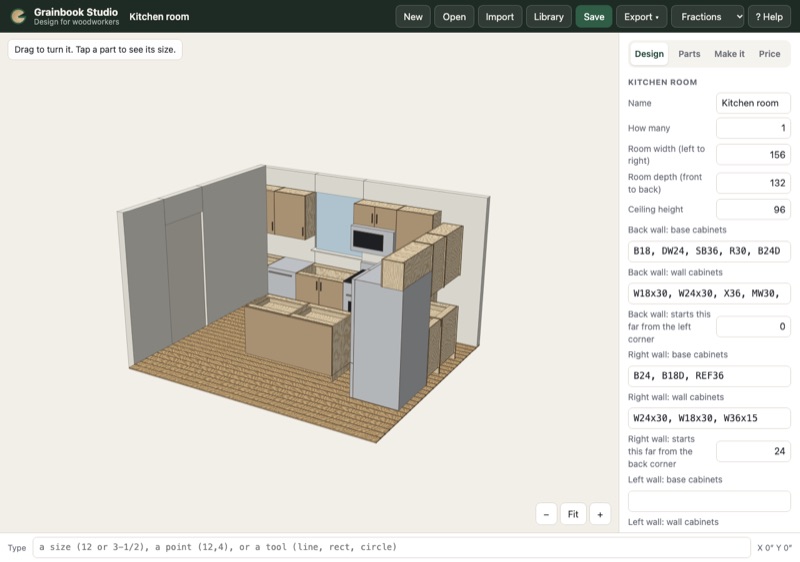
| Choice | What it means | Starts at |
|---|---|---|
| Room width (left to right) | Inside width of the room, left wall to right wall. | 156″ |
| Room depth (front to back) | Inside depth, front wall to back wall. | 132″ |
| Ceiling height | Floor to ceiling. | 96″ |
| Back wall: base cabinets | Base cabinets along the back wall (codes). | B18, DW24, SB36, R30, B24D |
| Back wall: wall cabinets | Wall cabinets along the back wall (codes). | W18x30, W24x30, X36, MW30, W24x30 |
| Back wall: starts this far from the left corner | Where the back-wall cabinets start, measured from the left corner. | 0″ |
| Right wall: base cabinets | Base cabinets along the right wall, starting at the back. | B24, B18D, REF36 |
| Right wall: wall cabinets | Wall cabinets along the right wall. | W24x30, W18x30, W36x15 |
| Right wall: starts this far from the back corner | Where they start, from the back corner (leave 24″ where the back wall’s cabinets turn the corner). | 24″ |
| Left wall: base cabinets | Base cabinets along the left wall, starting at the front. | empty |
| Left wall: wall cabinets | Wall cabinets along the left wall. | empty |
| Left wall: starts this far from the front corner | Where they start, from the front corner. | 0″ |
| Front wall: base cabinets | Base cabinets along the front wall, starting at the right. | empty |
| Front wall: wall cabinets | Wall cabinets along the front wall. | empty |
| Front wall: starts this far from the right corner | Where they start, from the right corner. | 0″ |
| Island cabinets (face the back wall) | The island’s cabinets (codes). Their fronts face the back wall; the other side gets a finished panel. | B30, B30 |
| Island: from the left wall | How far the island stands from the left wall. | 48″ |
| Island: from the back wall | How far the island’s front stands from the back wall’s cabinets. | 66″ |
| Island seating overhang | How far the countertop overhangs on the seating side. | 12″ |
| Island: finished sides | Every side — the island’s open ends and its back (the seating side) are finished. Ends only — no back panel (it backs onto something). Back only — ends left plain. | Every side (ends and back) |
| Doors and windows | Doors and windows, separated by commas: window back 36x40 at 42 sill 44 (width × height, how far from that wall’s left corner, sill height) or door left 36x80 at 30. Walls: back, right, front, left. | window back 36x40 at 42 sill 44, door left 36x80 at 30, window front 48x48 at 54 sill 36 |
| Wall colour | Tap to pick the wall colour. | from your Library |
| Floor | Wood floors are drawn as boards; tile and concrete as tiles or a slab. | White oak |
| Floor from the catalog (instead) | A floor from Library → Tile & flooring (tile, laminate, hardwood or vinyl), drawn at real size and priced by the room’s area plus waste. Leave it on None to use the simple Floor choice above (drawn only, not priced). | empty |
| Flooring supplied by | Us or The customer — as for the backsplash. | Us |
| Base height | Height of the base cabinets (without the countertop). | 34-1/2″ |
| Base depth | Depth of the base cabinets. | 24″ |
| Wall depth | Depth of the wall cabinets. | 12″ |
| Wall cabinets start at | Height from the floor to the bottom of the wall cabinets (54″ = 18″ above a 36″ counter). | 54″ |
| Backsplash tile | Tile on the wall from the counter up, behind every stretch of counter (not behind a fridge or tall cabinet). Pick from Library → Tile & flooring. It shows in 3D and Render and goes on the bill of materials and the estimate. | empty |
| Backsplash height | Full — up to the bottom of the wall cabinets (and the same height where there are none). 18″ or a 4″ splash above the counter. | Full (up to the wall cabinets) |
| Backsplash tile supplied by | Us — priced on the estimate. The customer — still drawn and listed (maker, colour, how much to buy) but marked “supplied by customer” at $0. | Us |
| Crown molding on the wall cabinets | Crown molding along the tops of the wall cabinets (3″ or 4-1/2″), priced by the foot. | None |
| Light rail under the wall cabinets | A light rail under the wall cabinets to hide under-cabinet lights, priced by the foot. | No |
| Toe kick | Built into the sides — the sides run to the floor with a notch cut out at the front for your toes (most shops). Separate base — a ladder base you build and level first; the boxes sit on it. Legs with a clip-on kick — plastic leveling legs; a kick board clips on after install. | Built into the sides |
| Construction | Frameless — European style: doors cover the box edges, everything bored on the System 32 pattern. Face frame — a solid-wood frame (1-1/2″ stiles and rails) on the front; doors overlay it by 1/2″. | Frameless |
| Door style | Slab — one flat piece. Shaker (5-piece) — solid-wood stiles and rails (2-1/4″) around a 1/4″ panel in a groove. Shaker (CNC MDF) — one MDF piece; the CNC pockets the recessed centre. | Slab |
| CNC drills the hardware holes | Yes — the sheet CNC files drill hinge cups, hinge plates, slide holes, shelf-pin holes and pull holes. No — you drill them by hand (the holes still show on the cut list). | Yes |
| Face frame and door frames | The lumber for face frames, 5-piece door frames, crown and light rail. | from your Library |
| Box material | The sheet the box is made from: sides, bottom, top stretchers and shelves. | from your Library |
| Back material | The sheet for the back. | from your Library |
| Doors | What the doors are made of: a sheet (MDF, plywood…) or solid wood (marked “solid wood”; glued up to the Solid-wood thickness). Also used for end panels, fillers and the island back panel. | from your Library |
| Drawer fronts | What the drawer fronts are made of: Same as the doors, or any sheet or solid wood — solid fronts over 8″ tall are marked as glue-ups. | from your Library |
| Solid-wood door and front thickness | How thick solid-wood doors and fronts are milled (3/4″ usual). Sheets keep their own thickness. | 3/4″ |
| Drawer boxes | What the drawer boxes are made of: a sheet (1/2″ Baltic birch is usual) or solid wood — maple is usual, any species works. Solid boxes are noted for dovetail or box-joint corners and get no edge banding; the drawer bottom stays the back material. | from your Library |
| Solid-wood drawer box thickness | How thick solid-wood drawer sides, fronts and backs are milled (1/2″ usual; 5/8″ for heavy drawers). Sheets keep their own thickness. | 1/2″ |
| Hinges | Which hinge, from your hardware catalog. Its cup size and plate pattern set the drilling. | from your Library |
| Pulls or knobs | Which pull or knob, from your hardware catalog. Its screw spacing sets the holes. | from your Library |
| Drawer slides | Which drawer slide, from your hardware catalog. Undermount slides set the drawer box size and the notches and holes in it. | from your Library |
| Finished ends are | Painted box side — the side of the box itself is finished. Applied panel to match the doors — a panel in the door style is added to the outside. | Painted box side |
| Countertop (shown, by others) | A countertop to show in 3D and on the picture. It is made and fitted by others, so it is listed under "By others", not in the cut list or the price. | None |
| Countertop colour | The countertop colour. | White |
| Finish | Natural wood — clear finish on the wood. Stained — the Stain colour on the parts that show. Painted — the Paint colour on doors, drawer fronts, face frames, finished ends and toe kicks; the boxes stay their plywood. | Natural wood |
| Paint colour | Tap to pick a paint colour (maker, name and code) or add your own from a chip. | from your Library |
| Stain | Tap to pick a stain colour. | from your Library |
All the kitchen run choices apply to every wall and the island. See A whole kitchen room.
Reference: Table
Solid top, legs, aprons with tenons.
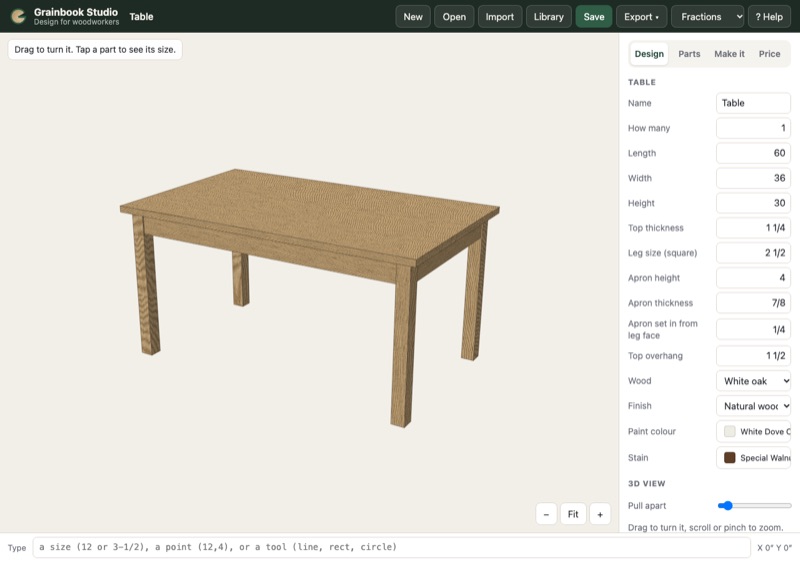
| Choice | What it means | Starts at |
|---|---|---|
| Length | Length of the top. | 60″ |
| Width | Width of the top. | 36″ |
| Height | Floor to the top of the top. | 30″ |
| Top thickness | Thickness of the top. | 1-1/4″ |
| Leg size (square) | Leg size (square). | 2-1/2″ |
| Apron height | Apron height. | 4″ |
| Apron thickness | Apron thickness. | 7/8″ |
| Apron set in from leg face | How far the aprons sit back from the outside face of the legs. | 1/4″ |
| Top overhang | How far the top hangs past the aprons. | 1-1/2″ |
| Wood | The lumber it is made from. | from your Library |
| Finish | Natural wood — clear finish on the wood. Stained — the Stain colour on the parts that show. Painted — the Paint colour on doors, drawer fronts, face frames, finished ends and toe kicks; the boxes stay their plywood. | Natural wood |
| Paint colour | Tap to pick a paint colour (maker, name and code) or add your own from a chip. | from your Library |
| Stain | Tap to pick a stain colour. | from your Library |
Reference: Chair
Side chair: legs, seat rails with tenons, stretchers, slatted back.
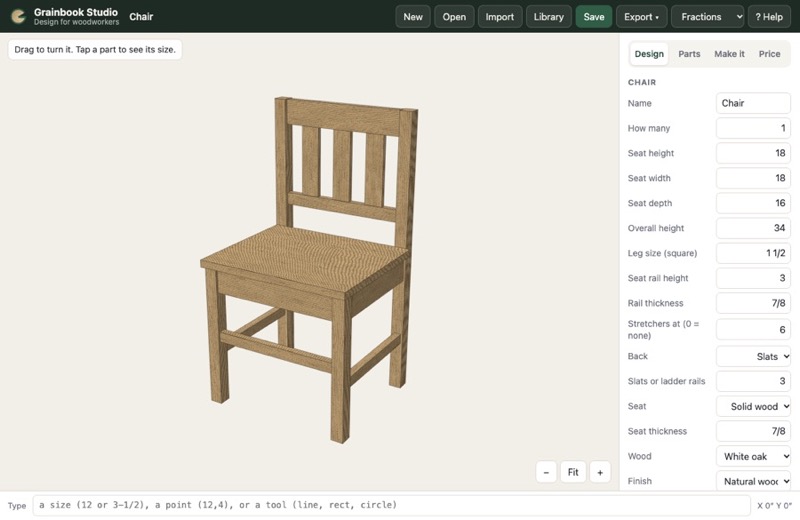
| Choice | What it means | Starts at |
|---|---|---|
| Seat height | Floor to the top of the seat. | 18″ |
| Seat width | Seat width, outside of the legs. | 18″ |
| Seat depth | Seat depth, front of the front legs to the back of the back legs. | 16″ |
| Overall height | Floor to the top of the back. | 34″ |
| Leg size (square) | Leg size (square). | 1-1/2″ |
| Seat rail height | Height of the seat rails (aprons) under the seat. | 3″ |
| Rail thickness | Thickness of the seat rails and stretchers. | 7/8″ |
| Stretchers at (0 = none) | Height of the lower stretchers from the floor; 0 leaves them off. | 6″ |
| Back | Slats — upright slats between a lower and top back rail. Ladder (rails across) — rails across between the back legs. Solid panel — one panel. | Slats |
| Slats or ladder rails | How many slats (or ladder rails) in the back. Studio says so if they won’t fit. | 3 |
| Seat | Solid wood — a glued-up seat screwed on from below. Upholstered (plywood base) — a 1/2″ plywood base for foam and fabric (priced as a line). | Solid wood |
| Seat thickness | Thickness of a solid seat. | 7/8″ |
| Wood | The lumber it is made from. | from your Library |
| Finish | Natural wood — clear finish on the wood. Stained — the Stain colour on the parts that show. Painted — the Paint colour on doors, drawer fronts, face frames, finished ends and toe kicks; the boxes stay their plywood. | Natural wood |
| Paint colour | Tap to pick a paint colour (maker, name and code) or add your own from a chip. | from your Library |
| Stain | Tap to pick a stain colour. | from your Library |
Reference: cabinet and appliance codes
Kitchen runs and rooms take a list of codes, left to right, separated by commas. The number is the width in inches (fractions like 15.5 are fine). Upper or lower case.
| Code | What it is |
|---|---|
B24 | Base cabinet 24″ wide, a drawer over doors |
B24D | Base cabinet, all drawers (three) |
B24-0 | Base cabinet, doors only |
SB36 | Sink base: doors, no shelf (a sink shows when there’s a countertop) |
BCL42 · BCR42 | Blind corner base, blind side on the left · right |
W30x30 | Wall cabinet, width × height |
T24x84 | Tall cabinet, width × height |
F3 · F3x30 | Filler strip (base · wall height) |
B24/L · /R · /LR · /A · /0 | After any code: its finished ends — left, right, both, all sides (ends and back), or none. Without a mark, Studio finishes the ends that stand open (the end of a run, beside a fridge or range). |
| Cabinets alike | Cabinets built exactly alike share a name and a count (B24 × 3); the same code built differently gets a letter (B24A, or B24D-A after a letter). |
DW30 | Dishwasher (width) |
R30 | Range (freestanding) (width) |
SR30 | Slide-in range (width) |
REF30 | Refrigerator (width) |
CT30 | Cooktop on a base cabinet (width) |
WO30 | Wall oven in a tall cabinet (width) |
MW30 | Over-the-range microwave (width) |
HOOD30 | Range hood (chimney) (width) |
X30 | Open space (window, gap) of that width |
Countertops: Quartz, Granite, Marble, Quartzite, Soapstone, Butcher block, Laminate, Solid surface, Concrete, Stainless steel, Porcelain slab, Terrazzo, Recycled glass.
Reference: every Make it setting
Machine and job
| Box | What it does |
|---|---|
| Controller | What runs your machine — sets the kind of file (see the list below). |
| Tool changer | Yes: one file, the machine changes bits. No: one file per bit. |
| Program in | Inches or millimetres in the file. |
| Fastest feed (in/min) | Nothing in the file goes faster. |
| Laser runs on | The laser’s controller. |
| Full power is S | The S number your laser treats as 100%. |
| Air assist | Turn air on with the laser (M8). |
| Cutting | The material — sets the suggested feeds and speeds. |
| Safe height above the wood | How high the bit lifts to move. |
Buttons
| Button | What it does |
|---|---|
| + Add toolpath | Starts a toolpath on the picked shapes. |
| Tool database | Your bits (see below). |
| Preview the cut | Shows the finished wood after every toolpath; Back to toolpaths returns. |
| ▶ Play the cut | Animates the bit cutting; ❚❚ Pause, ↺ Play again, Speed slider, Stop playing. |
| Save CNC file | Writes the file(s) for your controller (and the underside file, and a laser file, when there are some). |
| Each toolpath | The tick turns it on or off (off = left out of the file); Change edits it; ↑ cuts it earlier; Delete removes it. A warning shows if something cuts all the way through before other work. |
Kinds of toolpath
| Kind | What it does |
|---|---|
| Cut out (profile) | Cuts along a shape’s line — outside it (cut a part out) or inside it (cut a hole). Tabs hold the part. |
| Clears everything inside a closed shape to a depth (islands inside it are left). | |
| Groove on the line | Runs the bit right on the line: juice grooves, V-lines, decorative grooves. |
| Quick engrave (sharp corners) | |
| Drill holes | Plunges at the centre of each circle (pecking for deep holes); a hole bigger than the bit is pocketed. |
| Thread milling | |
| V-carve | A V-bit follows the shape, going deeper where it’s wider: lettering and signs. Also makes inlay pockets and plugs. |
| Chamfer an edge | |
| Fluting | |
| Flatten / surface | |
| Texture | |
| 3D shape (prism, dome, bowl, moulding) | |
| 3D carve a picture or model | Carves a picture in 3D: dark is deep (or high), with a ball-nose bit, after roughing. |
| Laser: along the line (cut or score) | The laser follows the line: cut through with passes, or score. |
| Laser: fill inside (engrave) | The laser fills closed shapes line by line: engraving. |
| Laser: engrave a photo | Engraves a photo, dots or shades of power. |
Toolpath boxes
Only the boxes that apply to the kind you picked are shown.
| Box | What it does |
|---|---|
| Name | What you call it (shows in the list and the file). |
| Bit | From your tool list. |
| Depth · All the way through | How deep it cuts; the button sets the stock thickness + 1/32″. V-carve: Deepest (blank = no limit). |
| Bit runs | Outside the line (a part) or inside it (a hole) — cut-outs only. |
| Direction | Climb (cleaner edge) or conventional. |
| Going down | Ramp in (easier on bits) or straight down — cut-outs and grooves. |
| Inlay | V-carve: a plain V-carve, the inlay pocket (the hole) or the inlay plug (the piece that goes in, mirrored). |
| Plug start depth (glue gap) | How deep the plug starts above the pocket floor — the gap for glue. |
| Border around the plug | Extra cut around the plug so it can be cut free. |
| Clear wide parts with | V-carve: an end mill clears wide flat areas first (end grain: the V-bit goes first). |
| Dark parts are | 3D carve: deep (carved in) or high (raised). |
| Smooth | 3D carve: none to lots. |
| Rough first with | 3D carve: an end mill takes the bulk out first. |
| Stepover (% of bit) | How far apart passes are when clearing. |
| Tabs · How many · Length · Thickness | Small bridges that hold a cut-out part in place. |
| Router speed (RPM) · Feed · Plunge · Depth per pass | Suggested from the bit and the material; change them, or Use the suggested numbers. |
| Use the N picked now | Runs the toolpath on the shapes picked on the drawing. |
Laser boxes
| Box | What it does |
|---|---|
| Speed (in/min) | How fast the head moves. |
| Power (%) | Laser power. |
| Passes | How many times round (cutting thick wood). |
| Line spacing | Distance between fill lines (photo or fill). |
| Angle (degrees) | Direction of fill lines. |
| Shading | Photo: dots (dithered — best on most wood) or power follows darkness. |
| Lightest power (%) | Photo: the power for the palest parts. |
Bits (Tool database)
| Box | What it is |
|---|---|
| Name | What you call it. |
| Kind | End mill (flat), Ball nose, V-bit, Drill, Thread mill. |
| Cut | Upcut, Downcut, Compression, Straight, O-flute (plastics), Surfacing, Engraving, Core box, Roundover, Other. |
| Diameter | The cutting diameter. |
| Flutes | How many flutes (sets the feed). |
| Cutting length | The deepest it can cut. |
| V angle | V-bits: the included angle (60°, 90°…). |
| Tool number | Its pocket in a tool changer. |
| Maker, Part number, Notes | For you. |
| Feeds and speeds per material | Your own RPM, feed, plunge and depth per pass for each material — suggestions use them first. |
| + Add a bit · Export · Import · Done | Add one; save the list as a CSV or JSON file; bring one in (from another computer or a supplier list). |
Controllers
| Controller | File | Tool changer |
|---|---|---|
| Avid CNC EX controller | .cnc | Yes |
| Centroid CNC12 (Avid CNC EX, Acorn, Oak) | .nc | Yes |
| GRBL (Shapeoko, X-Carve, Onefinity, Sienci) | .nc | No |
| Mach3 / Mach4 | .tap | Yes |
| UCCNC | .nc | Yes |
| LinuxCNC | .ngc | Yes |
| Masso | .nc | Yes |
| ShopBot | .sbp | No |
Avid CNC EX controller follows Avid’s own setup for the EX: the whole job is one file (.cnc); at each bit change it asks for the next bit (T# M6), lifts to the top of Z first (G53 Z0), and numbers every line. With a tool changer the machine fetches the bit instead.
Laser: Avid CNC EX laser (power by S, 0 to 100); GRBL laser ($32=1: LightBurn-style lasers, Shapeoko/Onefinity/Sienci laser kits); Centroid CNC12 laser (Avid CNC EX laser kit).
Materials for feeds and speeds: Hardwood (maple, oak, walnut, cherry), End grain (cutting boards), Softwood (pine, cedar, poplar), Plywood, MDF, Plastic (HDPE, acrylic).
Cabinets and furniture
On designs, Make it shows one CNC file per sheet: joinery first with the biggest end mill that fits, then every part cut out with two small tabs, smallest parts first. Zero X and Y on the sheet’s front-left corner and Z on top of the sheet. Save CNC file under each sheet. Solid-wood parts aren’t nested on sheets.
Reference: the 3D view and the Parts tab
| Thing | What it does |
|---|---|
| Drag | Turns the piece. Inside a room: looks around. |
| Scroll or pinch | Zooms. Inside a room: steps forward and back (↑ ↓ keys too; ← → turn). |
| Tap a part | Shows its name, size and material on the tip line (it lights up). |
| Pull apart | Slide to spread the parts out (an exploded view). |
| Render | A photo-real picture (see Render). |
| Save picture | Saves the 3D view as a picture. |
| Walk in / Back outside | Kitchens and rooms: stand inside at eye height. |
| 2D drawings | Front, right side and top views with sizes and a title block, as a new drawing you can change and print (see 2D drawings). |
| Parts tab: Summary | Sheets of each material, board feet to buy, feet of edge banding, things “by others”. |
| Prints the front view, cut list, steps, lumber list and sheet layouts. | |
| Part labels | Prints a label for every part (Avery 5160, 30 to a letter sheet): name, cabinet, size, which sheet it’s on, and which edges get banding. |
| Cut list | Every part: quantity, length (with the grain), width, thickness, material, notes (edge banding, holes, notches, which cabinet). |
| Lumber to buy | Each wood and rough thickness, board feet and with waste. |
| Sheets | Each sheet laid out, how much is used. |
| Cabinet by cabinet | Each cabinet on its own: what it is, its size, drawers and doors, finished ends, its parts, its hardware, and its price (its own parts, hardware and labor, its share of the sheets and CNC time, plus overhead and profit). Price tab → Show each cabinet’s price puts the list on the estimate. |
Reference: every ready-made shape
The Shapes tool: pick one, fill in its sizes (the picture changes as you type), Place it, then tap where its middle goes.
| Shape | For | Sizes you type |
|---|---|---|
| Bowtie (butterfly key) | Stops a crack; inlay a pair | Length, Width at the ends, Width at the waist |
| Dogbone rectangle | Square-cornered mortise a bit can cut | Width, Height, Bit diameter |
| Keyhole slot | Hang it on a screw head | Screw head hole, Slot width, Slot length |
| Slot (barbell) | Rounded ends: adjustment slots, handles | Length (end to end), Width |
| Holes in a row | Shelf pins, dowels, pegs | How many, Diameter, Centre to centre |
| Holes round a circle | Bolt circles, lazy susans, clocks | How many, Hole diameter, Circle radius |
| Polygon | Hexagon coasters, octagon tables | Sides, Across the flats |
| Star | Points in or out | Points, Outer size, Inner size |
| Box joint fingers | Fingers along a board end | Board width, Finger depth (stock thickness), Finger width |
| Oval / ellipse | Trays, platters, signs | Width, Height |
| Arch top | Doors, signs, frames | Width, Height, Arch rise |
Reference: hardware, colours, text, tracing and Grainbook Mill windows
Hardware catalog
| Thing | What it does |
|---|---|
| Search | Finds by name, maker or part number (try hinge, 128, insert). |
| Everything / Hinges / Drawer slides / Pulls / Knobs / Fasteners and inserts / Other | Shows one kind. |
| check tag | Sizes from the usual published pattern — check the maker’s drawing for your model. |
| Place | (when inserting) Puts it on the drawing: tap where it goes; type an angle first to turn it. |
| Change · Copy | Change your own item · make your own copy of a built-in one to change. |
| + My own hardware | A new item with its prep. |
| Find on McMaster-Carr | Opens McMaster-Carr with your search, to look up a part. |
My own hardware (and Change / Copy)
| Box | What it does |
|---|---|
| Name, Kind, Maker, Part number | What it is. |
| Price · Priced | Its price, each, a pair or a pack (goes on the estimate). |
| Link | Its web page (McMaster-Carr, the maker…). |
| Centre to centre | Pulls: screw spacing (0 = a knob, one screw). |
| Prep table | Each row: What (Hole, Hole + counterbore, Pocket), X and Y from the point you place it, Size (diameter, or width × height), Depth (thru = through); × removes a row. |
| + Hole · + Pocket | Adds a row. |
| Read the prep from a DXF drawing… | Circles become holes and closed shapes pockets, from the maker’s drawing. |
| Save to my catalog · Remove · Cancel | Keeps it in your Library · deletes your item · leaves without saving. |
Paint and stain colours
| Thing | What it does |
|---|---|
| Search | By name or code (white dove, SW 7006, navy); each colour shows the maker’s code beside its name. |
| Tap a colour | Uses it. |
| + My colour | Add one from a chip: Maker, Code, Name, and Colour (hold the chip by the screen to match it). |
Text
| Box | What it does |
|---|---|
| The words | What it says. |
| Font | Any font on this computer. |
| Capital letter height | How tall capital letters are. |
| Style | Regular, Bold or Italic. |
| Add the text / Save | Puts it on the drawing (then V-carve it or laser-fill it). |
Tracing a picture (Import a .png or .jpg)
| Box | What it does |
|---|---|
| Dark enough | Where a pixel counts as dark (Studio picks a starting point). |
| Smooth | Smooths the traced lines. |
| Trace | Dark parts or light parts become shapes. |
| Width | How wide the traced picture is. |
| Use the traced shapes | Adds them as shapes to cut. |
| Use it as a photo (laser) | Keeps the picture as a photo to engrave. |
Grainbook Mill
| Window | Boxes and buttons |
|---|---|
| Grainbook Mill… (Shop prices) | Grainbook Mill address and API key (made in Grainbook Mill: Settings → Other programs, read and write); Connect / Save, Use Mill lumber prices, Disconnect. The key stays on this computer. |
| Slab from Grainbook Mill (New) | Slab tag and Extra around it; Bring it in draws its real outline on stock sized to fit. |
| Send to Grainbook Mill (Price) | Project name, Customer, Phone; Send makes a project there with every estimate line (and holds the slab). |
Reference: every kind of file
| File | Import (bring in) | Export (save as) |
|---|---|---|
| DXF (.dxf) | Lines, arcs, circles, polylines, splines, blocks; inches or millimetres from the file. | For AutoCAD, Aspire, VCarve, Fusion, SketchUp. |
| SVG (.svg) | Paths, shapes and transforms. | For laser software, Illustrator, Inkscape, Cricut. |
| Shaper Origin SVG | — | Cut types (outside, inside, on line, pocket) and depths from your toolpaths; shapes with no toolpath go as guides. |
| — | A full-size template, tiled on letter paper: print at 100%. | |
| HPGL (.plt) | — | For vinyl cutters and plotters. |
| Pictures (.png .jpg) | Traced into shapes (dark becomes shapes), or kept as a photo for laser engraving. | — |
| Grainbook Studio project (.gbstudio) | Opens it as a project. | This project as a file — to keep, send, or open on another computer. |
| DWG | Not read: save it as DXF first. | — |
| 2D drawings | — | Export → 2D drawings (designs): front, side and top views as an editable drawing. |
| Printed drawing | — | Export → Print the drawing (to scale) (drawings): Letter or Tabloid at a standard scale; save as PDF from the print window. |
| CNC files | — | From Make it → Save CNC file (see Controllers). |
| Library (.json) | Library → Import library. | Library → Export library. |
Reference: Shop prices and the Price tab
| Box | What it does |
|---|---|
| Business name, Address, Phone, Website | Printed at the top of estimates. |
| Grainbook Mill… | Connect to Grainbook Mill (optional). |
| Charge part sheets | 1 = charge only the part of a sheet a job uses (to the next quarter sheet); 0 = whole sheets. |
| Shop time $/hour · CNC time $/hour | Your labor rates. |
| Overhead and profit % | Added to the cost to make the price. |
| Lumber waste % | Added to board feet. |
| Edge banding $/ft | Per foot of banded edge. |
| Finish $/sq ft | Per square foot of faces that show. |
| Hinges, Drawer slides, Pulls, Shelf pins, Levelers, Tabletop fasteners | Standard prices when a catalog item has no price of its own. |
| Materials · + Sheet · + Lumber | Quick edits; the full list is in the Library. |
| Price tab: Customer | Who the estimate is for (see Customers). |
| Price tab: How many | Prices a batch. |
| Price tab: Stock is | Drawings: the wood or sheet the stock is (sets its price). |
| Price tab: Extra labor | Add or change hours (each); blank a name to remove it. |
| Price tab: Hardware catalog · Render a picture · Use the 3D view instead | Prices of hardware; a photo-real picture for the estimate, or back to the 3D picture. |
| Price tab: Print the estimate | Prints the estimate (or save it as a PDF from the print window). |
| Price tab: Send to Grainbook Mill | Makes a project in Grainbook Mill with every line, ready to bill there. |
Shortcuts
| Keys | Does |
|---|---|
| ⌘S | Save |
| ⌘Z / ⌘⇧Z | Undo / redo |
| ⌘D | Duplicate what's picked |
| ⌘A | Pick everything |
| Arrow keys | Nudge 1/16″ (Shift: 1″) |
| Delete | Delete what's picked |
| Esc | Stop drawing, close a window, pick nothing |
| Space + drag | Move the view |
| Any letter or number | Starts typing on the Type line |
On Windows, use Ctrl where this says ⌘.
When something's not right
| What you see | What to do |
|---|---|
| "The bit is too big for one of the shapes" | The bit can't fit inside that shape (or a narrow part of it). Pick a smaller bit for that toolpath. |
| "Its shapes were deleted" | The toolpath's shapes are gone. Pick shapes, open the toolpath with Change and tap Use the … picked now. |
| A cut-out warning about cutting through before other work | Use ↑ to move the other toolpaths earlier, so parts aren't loose while they're cut. |
| An imported drawing is tiny or huge | The file didn't say its units. Pick everything and use Size… (type the width it should be). |
| "Left out: … text" | Text in DXF and SVG files isn't imported. Retype it with the Text tool, or convert text to outlines in the program it came from. |
| The cut is too deep or too shallow | Check Z zero is on the top of the stock, and the stock thickness on the Design tab matches the wood. |
| Feeds sound wrong (squealing, burning) | Burning: feed faster or slow the router. Squealing or chatter: take a shallower pass. Change the numbers in the toolpath. |
What's new
- Nov 9, 2026 — Studio on the web: sign in with your name and PIN, each new phone or computer let in once by the owner, People and devices for owners, a phone layout (☰ menu, settings that pull up from the bottom), an app icon for the home screen, and nightly backups on the server.
- Nov 9, 2026 — More toolpaths: Flatten / surface (slabs and the spoilboard), Quick engrave with sharp corners, Thread milling, Texture, and 3D shapes from any outline (prism, dome, bowl, tray, and roundover, cove, ogee and chamfer edges). Cut-outs get onion skin and lead in/out; cut-outs and pockets get dogbone and T-bone corners; pockets can clean their corners with a smaller bit; 3D carving finishes across, front to back or both. Import reads 3D models (STL) for 3D carving.
- Nov 9, 2026 — True circles: circles, round holes, round pockets and rounded corners are cut on exact circles and go to the machine as true arcs (G2/G3) on every controller that reads them. The tools Shape and Shapes are now Polyline and Ready-made.
- Nov 9, 2026 — Start screen: Studio opens on a home page with a tile for each kind of project, your recent projects with pictures, search, and your machine, Library, Customers and Help on the side. New and the Studio name come back to it.
- Nov 9, 2026 — Undo and Redo buttons at the top (also ⌘Z, ⇧⌘Z, ⌘Y).
- Nov 9, 2026 — Measure anything: distances, everything about a shape (sides, corner angles, area), angles, circles and arcs through three points, areas, and the gap between two shapes. Keep, copy or measure again.
- Nov 9, 2026 — Machines: pick your machine from several hundred routers, engravers and lasers by maker, use a post file of your own, ShopBot options (spindle speed, tool changer, second head), rotary jobs and arcs.
- Nov 9, 2026 — Toolpaths: cut on the line, allowance and a finishing pass on cut-outs; pockets cleared in rows at any angle; holes bored to size; new Chamfer an edge and Fluting; ramped tabs, and tabs you place by tapping the drawing. A cut that goes through with no tabs is flagged.
- Nov 9, 2026 — Cabinets built exactly alike now share one name (B24 × 3) on the cut list, labels, cabinet sheets and estimate; the same code built differently gets a letter (B24A).
- Nov 9, 2026 — Solid-wood drawer boxes (any species) and drawer fronts in their own material; finished-end marks on kitchen codes (
/L,/R,/LR,/A,/0); All sides finished cabinets and island choices; Cabinet by cabinet sheets with each cabinet's price, and on the estimate if you want. - Nov 9, 2026 — Backsplash tile and flooring: your own catalog (manufacturer, colour, store, item number, price by the square foot or box, waste, install, layout, photo), drawn at real size in 3D and Render, with Find at Lowe's / Home Depot, a bill of materials and estimate lines; supplied by customer shows at $0. Whole paint palettes from the makers' .ase, .aco, .gpl or .csv files.
- Nov 9, 2026 — New project in six kinds: New project, Cutting boards, Cabinets, Boxes, Custom furniture and Describe it. New Chair design. Glue-up boards take every board option and open their CNC cut-out. Describe it: Claude designs a piece from your words. 2D drawings of any design, printable to scale. New Avid CNC EX controller from Avid's own setup: one file per job, the EX asks for each bit.
- Nov 9, 2026 — The manual now has a Reference: every button, box and choice on every screen, every design option, every typed command, toolpath, controller, shape and file type, with pictures.
- Nov 9, 2026 — Fixed: grain in the 3D view no longer leaves a pale strip on faces seen at an angle; the island’s seating side is painted all the way across; Crown molding and Light rail are now choices on Kitchen run and Kitchen room.
- Nov 9, 2026 — Library (top bar): materials with sizes, per-thickness prices, supplier and look; hardware, bits, colours and prices in one place, saved by Studio (not the browser), with Export / Import for another computer. Customers: Studio’s own list, on estimates, shared both ways with Grainbook Mill when it’s connected.
- Nov 9, 2026 — Render: photo-real pictures of any design — real wood grain, stone, steel, glass and paint, three kinds of light, sizes for printing and phones, and a picture you can put on the estimate.
- Nov 8, 2026 — Walk in to a kitchen room at eye height; Save picture; estimates show the 3D picture and front view; blind corner cabinets, fillers, crown molding and light rail.
- Nov 8, 2026 — Kitchen room: the whole room in 3D — walls in your paint colour, wood or tile floor, doors and windows, cabinets on every wall, an island with seating; warnings when cabinets cover a window or run past a corner. Wall cabinets, fridges, microwaves and hoods now sit back against the wall.
- Nov 8, 2026 — Cabinets: toe kick built in, separate ladder base or legs; frameless or face frame; slab, 5-piece Shaker or CNC MDF Shaker doors; tall cabinets; finished ends (painted or applied panels); prefinished maple boxes; hinge cups, press-in pins, hinge plates, shelf pins, slide and pull holes drilled on the CNC; front view and part labels. Kitchens: countertops of every common type, appliances (dishwasher, ranges, cooktop, fridge, wall oven, microwave, hood) and sinks. Hardware catalog with prep (Blum, Salice, Accuride, pulls, fasteners), your own hardware, McMaster-Carr. Paint and stain colours and real-size wood grain. Tool database. Shapes, join/cut/overlap, round corners. Cutting boards: shapes, grips, feet (side 2), edge-grain designer. 3D carving from a picture.
- Nov 8, 2026 — 3D carving from a picture: dark parts carved deep or raised, finished with a ball nose, optional end-mill roughing.
- Nov 8, 2026 — V-carve inlays: make the inlay pocket and the plug that fits it, with a glue gap.
- Nov 8, 2026 — End-grain boards: pick strip woods and widths and a pattern (checkerboard, brick, stripes); get the steps, strips to mill, board feet and a price, with a 3D view of the finished board.
- Nov 8, 2026 — Grainbook Mill: connect with an API key to use Mill's lumber prices (per thickness), design on a Mill slab with its real shape, and send an estimate to Mill as a project.
- Nov 8, 2026 — Laser: line cutting and scoring, fill engraving and photo engraving, for GRBL and Centroid lasers. Text in any font. Import DXF and SVG, trace pictures; export Shaper Origin SVG, a full-size PDF template and HPGL. Changing shapes: offset, copies, mirror, turn, size, line up and nudge. Ramping into cuts, V-carving with a flat clear-out, ▶ Play the cut. Kitchen runs from cabinet codes.
- Nov 8, 2026 — Furniture and cabinets: base and wall cabinets, bookcase, box and table from a few sizes, with a 3D view, cut list, sheet layouts, lumber list, CNC files for each sheet, and a Price tab with shop prices and a printed estimate.
- Nov 8, 2026 — Make it: toolpaths (cut out with tabs, pocket, groove, drill, V-carve), bits with suggested feeds and speeds, a carved-wood preview, cutting time, and CNC files for Centroid CNC12 (Avid CNC EX), GRBL, Mach3/4, UCCNC, LinuxCNC, Masso and ShopBot.
- Nov 8, 2026 — First version: cutting boards from sizes, drawing tools, fractions, save and open, DXF and SVG export.
Render uses three.js, three-mesh-bvh and three-gpu-pathtracer (MIT licence). Wood photos and light pictures from Poly Haven (polyhaven.com, CC0, free for any use).